
The Use of Poseable Mannequins During Bowling Motor Skill Training
Originally published in Bowling This Month
All athletes go through several stages during the process of motor skills training.
During the first stage, the athlete must be given all the information needed to form an image of the movement being practiced in his or her mind.
The next stage is when the athlete starts to master the new movement. This stage is characterized by the conscious control of all actions, slow movements, a significant amount of errors, and being easily distracted by external or internal stimuli.
The final stage of skill mastery is evident when the athlete starts performing movements automatically, without conscious control, using an optimal rate of movement, with an error rate that is trending to zero, and has a stable resistance to external or internal distractions.
Forming the image of the skill in the mind
The role of the first stage of mastering a skill is often underestimated. It is critical that the information be delivered in a way that is accessible and understandable to the student so that they can form the correct image of movement within their mind. In my observations, sometimes 15 minutes effectively spent at this stage can save dozens of hours of training in the later stages of mastering a skill.
This important first stage will be discussed in this article, and I will include my experience with optimizing this process. Future articles will cover the next two stages.
Methods of image formation
As a coach, one must use all possible channels of education to help the athlete create the correct execution of the skill within their minds. The visual, auditory, and kinesthetic learning modalities should be used effectively as needed for each student. In general, the effectiveness of training will increase significantly when a combination of these modalities is utilized.
In fact, the uptake rate and quality of understanding increase dramatically when combining all three perception channels. Research has shown that when using just auditory or visual channels separately, only 10% of new information is absorbed. The combination of audio and video helps to increase the uptake level to 50%. Adding the kinesthetic channel to the other two provides an optimal rate of 90% of new information being understood. Thus, the integrated approach of using all three learning modalities is the most efficient. Of course, the coach needs to recognize and take advantage of the athlete’s dominant channel of perception.
During the initial stage of skill training, it is necessary to create a complete field of information for a given skill set.
During the later stages of skill encoding, the most efficient implementation is to work with the channel of perception which “delivers” information in the form closest to the type and kind of thinking directly involved in the learning process and the implementation of a given skill. For example, when mastering a skill that predominantly uses spatial and visual thinking, it is usually most efficient to use the visual channel as the dominant one and the others as complementary. Or, if the proprioceptive senses are mostly involved, it is recommended to use the kinesthetic channel of perception as the dominant one and the other channels as complementary.
The critical role of spatial and visual thinking in bowling skill-building
Spatial thinking is an activity that helps the athlete create mental images which they can adapt to solve practical and theoretical problems. Following this definition, we understand that it is this kind of thinking that is dominant when we are teaching and training different skills in bowling. A well-developed sense of spatial thinking will greatly enhance the bowler’s ability to learn and understand many physical and analytical skills related to bowling.
In the bowling alley, where in addition to a good technical throw, the player is required to understand motion phase analysis of the ball along it’s path (skid, hook, and roll), changes in the oil pattern, types of pin action, and much more. In virtually all stages of the training process, spatial and visual thinking modalities are absolutely essential tools for a player’s success. Equally important is the development and the effective use of these kinds of learning modalities for the coach’s success in training their athletes.
Spatial and visual thinking in forming motor imagery
Spatial and visual thinking allows a player to simultaneously work on understanding technical elements of the physical game as well as forming motor imagery in the player’s mind (i.e. it can be used as the first stage of motor skill formation). Some elements of this technique are similar to the motor imagery practice, but it is simpler to use and does not require special training.
We must simplify the process of mentally visualizing a technique to the point that the player can easily press “play” in their mind in order to see the technique played out. The creation of a mental image of a practiced movement is a prerequisite for its further improvement. The rate of a player’s improvement depends largely on the degree of detail and accuracy given to this mental imagery. Plus, fine motor skills will be used to develop such thinking skills as reaction time, attention, coordination, imagination, observation, and visual and motor memory.
For using this training method, three things are needed: a video of a student’s shot, a video of an equivalent master’s shot (i.e. a bowler with similar physical and mental traits to the student), and a 12 inch tall mannequin, such as one used by art students and sold in stores like IKEA, Hobby Lobby, Michael’s, etc. Examples of the type of mannequins which are effective for this type of training are shown below.
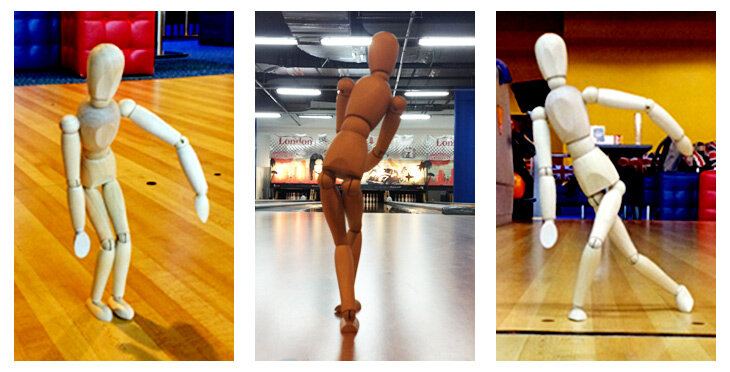
A small artist’s mannequin can be used to demonstrate physical poses during training.
The coach and the student view the video of the student’s shot and discuss the technical elements which are to be worked on.
The coach and the student view the video of the equivalent master shot and, once again, discuss the technical elements.
Using the mannequin, create images of the necessary technical elements.
Set the mannequin in the approach area of a lane or on the layout of a bowling lane for a more complete and correct understanding of the player’s position in the space.
At the end of the process, ask the student to mentally reproduce all the movements in sequence.
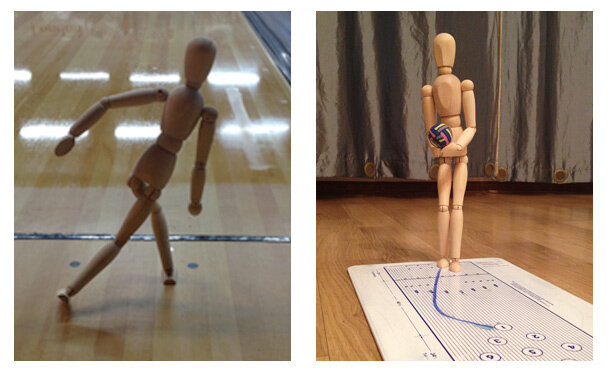
The mannequin can be used both on-lane and on top of a bowling lane overlay, such as the clipboard overlay shown.
After a while, your students will be able to easily adjust the image of the necessary technical elements in full, and “play” it at will in their imagination. This method is especially effective for young players.
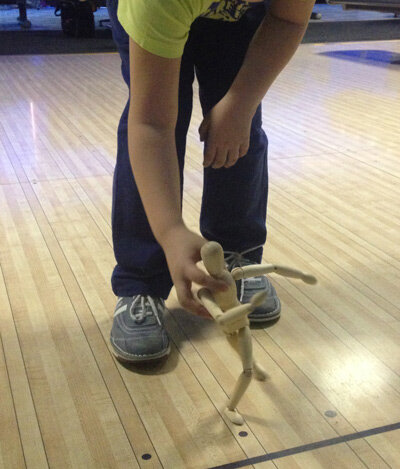
Use of the mannequin during training sessions involving young bowlers is especially effective.
Often, this method of training is not only useful, but it is also is a lot of fun. Give it a try in your own coaching sessions and see for yourself!

Jedi Bowling: Line-of-sight construction skill and the methods of its training
Originally published in Bowling This Month
“Skill” is the ability to carry out an action automatically without active conscious control. An indicator of skill competence is performance of an action without the need to consciously think about how the action will be performed. When a person has skill competence for a given task, it is no longer necessary to think about the execution of the skill via its separate partial sub-operations.
Successful bowling, of course, requires competence in countless complex skills. One of the many jobs of the bowling coach is to develop and use the most effective methods of skill training on our students so that their learning processes can be accelerated as much as possible.
In this article, I want to analyze the process of learning and the implementation of one specific bowling game skill. Namely, we will examine the line-of-sight construction skill of the bowler. Line-of-sight construction is a skill that allows the bowler to envision the launch trajectory of the bowling ball on the lane. We’ll start with some background and with a description of why this skill (as well as other similar skills) can be so challenging to teach. Finally, we will give an example of a new method of line-of-sight training that I’ve been using successfully with my own students to accelerate their development.
Background and motivations
Throughout my career as a bowling coach, I’ve had the opportunity to work with a wide variety of bowlers. This includes players at the novice level all the way up to the national team level.
Additionally, I have a significant amount of experience coaching deaf bowlers. One of my students is a medalist in the Deaflympics and numerous of my other deaf students are European Bowling Championship winners. Recently, one of my female deaf students won a Gold medal at the 3rd World Deaf Bowling Championships in Bologna, Italy in August 2015.
Working with bowlers who have different types of thinking skills has motivated me to seek out improved teaching methodologies for our sport. The task of building an efficient training process for deaf bowlers, for example, has been very non-trivial. This led me to deeply analyze the process of bowling skill learning from the perspectives of cognitive and educational psychology.
This process uncovered psychological regularities of the bowling training process. Developing an understanding of these regularities has resulted in me adjusting my training methods for improved efficiency. This has led to significant accelerations in skill mastery for players of all types.
Line-of-sight construction is one particular bowling skill that can be challenging to teach to both deaf bowlers and many non-deaf bowlers alike. Let’s start by taking a close look at this skill and the current methods of its teaching.
Line-of-sight construction: one of bowling’s fundamental skills
Bowling is a complex skill that involves perceptual, intellectual, and motor abilities of the player. In these ways, it is quite similar to other complex skills, such as learning to control an aircraft, for example. The ability to:
construct motion paths,
control physical efforts,
feel position in space,
make quick decisions about the current situation,
perform standard operations, and
know and apply correctly a set of rules
All are features of both bowling and controlling an aircraft. Many complex activities in a wide variety of disciplines share these same characteristics.
In bowling, line-of-sight construction is an important skill related to targeting that must be developed by bowlers of all levels. This skill is chosen as an illustration due to its importance in the overall structure of the bowling training process.
The ability to envision the line-of-sight on the lane, to keep it in the mind during the bowling approach, and to subsequently analyze the delivery with respect to the line-of-sight allows the bowler to effectively solve a wide range of tasks, such as:
positioning himself in space and correctly performing the physical game elements relative to the given line;
making a correct analysis of the accuracy of a delivery and of the dynamic characteristics of the ball motion on the lane;
making decisions on the necessary changes in ball trajectory and then rapidly implement them;
and much more!
Thus, the described skill of line-of-sight construction is one of the basic skills of our sport. The degree of its mastery defines the speed of a player successfully training the rest of the skills of bowling. It can be an indicator of his success as a whole on the lanes. In fact, the development of this skill is one of the first tasks facing a coach while training a new player in our sport.
Bowler skill level vs. line-of-sight construction skill mastery level
While preparing this article, I have performed testing of bowling players on their mastery of line-of-sight construction skill and found correlations between the players’ success on the lanes and the extent to which they’ve mastered this skill. Here are some brief details of the results of this study:
Entry-level bowlers: Often cannot imagine and describe in words the ball trajectory on the lane; are not visually concentrating on the point of sight during delivery preparation and execution; often use hitting the pins as an accuracy criterion; have no clear image of the line-of-sight.
Mid-level bowlers: Can describe in words the ball trajectory on the lane; are concentrated on the point of sight (sometimes excessively) during delivery preparation and execution; use assessment of hitting the point of sight as an accuracy criterion; the line-of-sight image is in the forming stage.
Advanced bowlers: Can describe the ball trajectory with precise detail in any area of the lane; are concentrated on the line-of-sight duringdelivery preparation and execution, with the ability to change the visual concentration to various points of sight along the line; use assessment of hitting the line-of-sight as an accuracy criterion detailed in various zones of the lane; the image of the line of sight is clearly formed in the visual imagination of the player and is used with no effort during delivery preparation and execution.
As the results of this test show, there is significant correlation between overall bowler skill level and line-of-sight construction skill level.
Current methods of line-of-sight skill training
All existing targeting systems in bowling are built on the principle of line-of-sight construction on the lane. Differences in targeting systems are only in using different markers as the coordinate system for the line of throw construction (targets, pins, breakpoints, exit points, laydown points, starting position of the player, and so on). The final aim of all systems is a line construction on the lane surface and in the approach area.
Operating with initial data in accordance with the theory of the throw line construction voiced by the coach, the player must use abstract logical, spatial, and visual imagination to construct the throw line on the lane and in the approach area. The player must then hold his concentration to perform a delivery, controlling his own movements and the subsequent movement of the ball relative to this imagined line.
If it is necessary to change the ball trajectory, the player (using information provided by the coach) must recalculate the coordinates of the required markers and construct a new line. This is not an easy task. The main problem is in the constant interaction of abstract logical and visual representation types of thinking.
Even when a player is given initial information in the form of visual images and tips from his coach, the transfer of these images to the real lane is always performed in the mind of the player. In such a case, it is impossible to avoid the process of personal interpretation.
Solving this problem, we are increasingly becoming dependent on the features and level of a player’s abstract logical thinking and the abilities of his mental apparatus regarding the interpretation and transferring of the abstract logical concepts into symbols and images used by visual and representation thinking.
If the player is talented in this respect, we get the correct image in his mind and we get it very rapidly. For other players, perhaps even those who are more gifted in physical and coordination abilities, this task may be very difficult. It may either take a long time to perform, or it may not even be solved at all.
“So what?” you might object to me. “Successful bowling is about survival of the fittest; the most talented players will succeed and thrive!”
In my opinion, the difficulty of solving this problem for the player is not so much due to the level of the player’s ability. Instead, the difficulty is caused by the method of supplying the initial information and the proposed algorithms of solution. Too large of a role of abstract and logical thinking in the described processes can be destructive.
We as bowling coaches are a lot like a teacher who tries to solve the problem of constructing and fixing in a pupil’s visual memory the image of a 90 degree angle. Doing this using only a verbal description is quite difficult. Even if the teacher is permitted to draw two randomly-arranged straight line segments and then explain in words how to form a 90 degree angle from them, it is still an incredibly difficult task.
Alternatively, just draw two perpendicular lines, show the angle, and then add any verbal description for better understanding. The result is instant and the student immediately understands the concept of a 90 degree angle!
A proposed new technique for bowling line-of-sight construction training
I will now introduce a new method of line-of-sight construction training that I have used with great success with many of my students. The method involves using a device to create and consolidate in the spatial and visual imagination and in the memory of the player a bright image of the line-of-sight in the real playing environment during delivery preparation and execution.
While training using this device, there is no need to describe the line image using objects of abstract logical thinking, and, as a consequence, there is no need for any interpretation by the player.
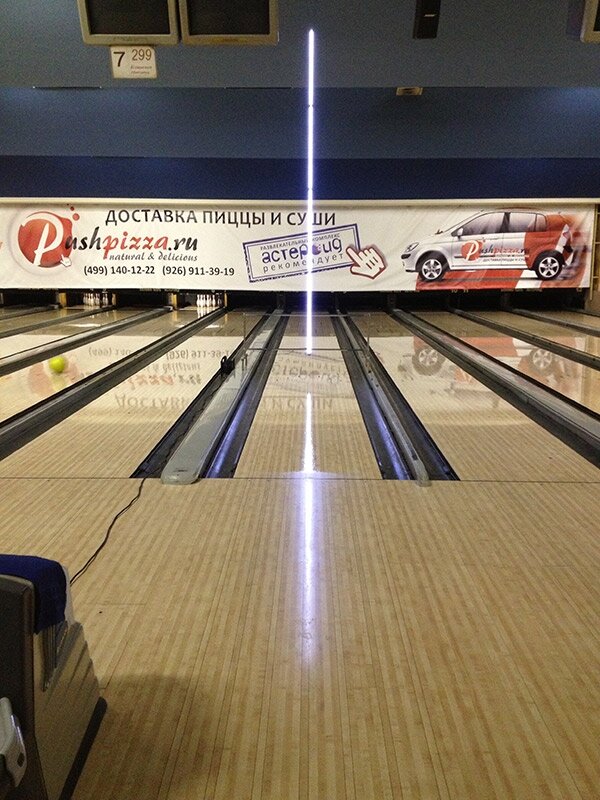
This patent-pending device utilizes a luminous bar (3 to 5 meters high) installed above the lane in a vertical position. Depending on the particular training task, it can be installed in the targeting area, at the exit point, at the breakpoint, or as close as possible to pins. Reflection of this bar creates a bright and clearly visible image of the line-of-sight on the lane. This bright reflected line on the lane is used to train and consolidate the required skill of constructing the line-of-sight by the bowler.
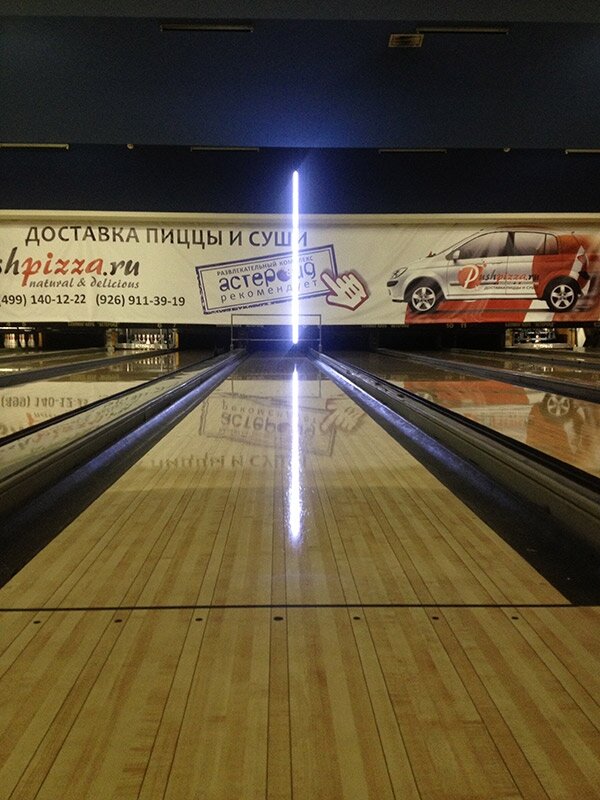
Lighted bar, installed in the breakpoint zone
The property of the reflected line to change its position while the player moves left and right, as well as the possibility to change the initial position of the device, allows the bowler to almost intuitively understand the process of adjusting the line position on the lane.
Since this training technique so directly demonstrates the concept of line-of-sight and its fundamental properties, it is even effective on players who haven’t yet developed advanced abstract logical thinking abilities, such as children.
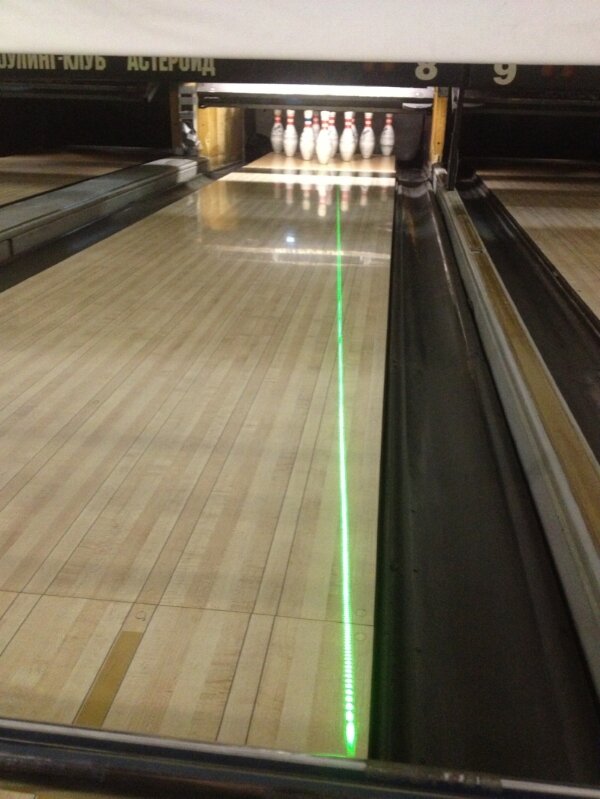
Here, the lighted bar is installed at the arrow zone for the purposes of 3-6-9 training.
Besides the basic training function of teaching a bowler how to construct the line-of-sight, use of this device has generated four important additional benefits:
Hitting or nearly hitting the line visible by the player is only possible with correct technical throw execution.
The possibility to assess visually the dynamics of the line-of-sight movement along the lane by the player during the delivery creates conditions for more effective correction and monitoring of the spatial and technical elements of the approach. This creates a very effective instant feedback system for the bowler.
It becomes possible to see a diagram of oil application on the lane and its variations, because due to different oil amounts in different areas of the lane, the reflection coefficient of the light source varies. As a result, the thickness of the oil in different zones and the dynamics of its changes during play become visible to the bowler.
The reflected light line creates the possibility of performing a visual assessment of lane topography. The curvature of the reflected line shows the deviation of the lane plane from the horizontal plane.
Here are some additional videos of the lighted bar in use during training, both as viewed from the coach’s position behind the approach and as viewed through the eyes of the bowler.
Results
The practical use of this technique has shown that it has high efficiency. The image of the line-of-sight is quickly fixed in the visual memory of the player. After just a few training deliveries, it is not difficult for most players to use this image, even in the absence of the training device.
Mastering the line-of-sight construction skill has become much faster. Testing has shown that the time duration of mastering this important skill is reduced significantly (sometimes by an order of magnitude) through the use of this device and this training method. Additionally, the skill is successfully mastered by players regardless of the development of their abstract logical and visual representation thinking.
Often, after a month of training using this technique, entry-level players show a skill mastery level comparable to that of advanced players. This allows them to progress more quickly in their future training.
Practical considerations and next steps
Some of you might be wondering about the practicality of the above-described training method. It is true that it does require some special equipment. Also, like all things that happen beyond the foul line, use of such equipment requires agreement and cooperation with the bowling center owner.
As of now, there is no commercially-available “off-the-shelf” luminous bar line-of-sight training system. However, it is a fairly simple design that can be constructed from components that are readily available. It can be installed on the lane in about five minutes and removed in three minutes. Also, I have built and used a version of this system that is fully portable. Development of a ready-made system that can be purchased by coaches is a possibility for the future.
Conclusions
I hope you have enjoyed this introduction to some of the challenges in bowling skill training and that I have opened your eyes to the opportunities that exist in developing more efficient training methods for our sport. As previously mentioned, I have studied the theory of effective learning and skill development for bowling extensively. I have many other ideas in different areas of bowling skill development, such as timing training, swing direction training, ball reaction understanding, and more. I hope to share them with you in upcoming articles.
Finally, I welcome your questions, comments, and suggestions, as they will be very beneficial in helping me decide on content for future contributions.
Entry Angle Assessment
Originally published in Bowling This Month - February 2016
In modern bowling, a player’s success depends on the implementation of numerous components: throw execution, ability to measure the characteristics of ball motion, mental and psychological preparedness, and much more. In this article, I want to share my experience in teaching the skill of determining the bowling ball’s entry angle. Mastering this skill allows the player to quantitatively assess one of the major characteristics of ball motion and enables deliberate correction of numerous game components.
In this skill, as well as the line-of-sight construction skill (described in my previous article), visual and spatial thinking are critical. We have to pay the most attention to these types of thinking when learning and using both line-of-sight construction and entry angle assessment skills. When testing players at different levels, most players, including advanced ones, could not determine the value of their ball’s entry angle. In the majority of cases, they could provide only a simple and ambiguous description, such as small, large, insufficient, bad, too much, etc.
This is not surprising, since very few players have had the opportunity to assess this parameter using the currently-available technical feedback systems that provide entry angle data (such as CATS and others). In practice, the skill of entry angle determination is almost always developed over many years of training and long tournament practice. On the other hand, applying the training methods described below, it is possible to obtain improved results in significantly less time, wherein players, using their spatial and visual thinking and memory, are able to determine the entry angle quantitatively using a range from 3 to 6 degrees.
When we evaluate trajectory accuracy characteristics, the lane markings (counting of boards and/or targets) allow us to see and quantitatively assess the ball’s lateral position in different parts of the lane (target area, breakpoint area, position of the ball at pin contact, etc.). This allows us to literally name the number of a board on which the ball is positioned at any given point along its trajectory. For example, when we need to draw the line-of-sight, we can use readily visible marks, such as targets, pins, dots, etc. In contrast, it is difficult to determine the entry angle on the lane due to the absence of readily visible and memorable orienting points.
Laser line projection
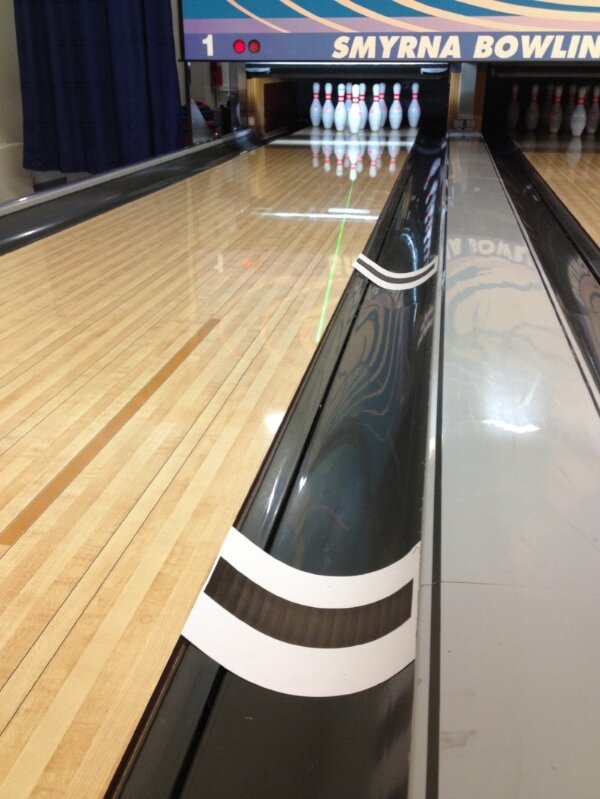
To overcome this lack of orienting points, the student first and foremost needs to be shown the image of the entry angle line on the lane and how the entry angle is determined. For this purpose, a special line laser can be used to “draw” the entry angle line on the lane.
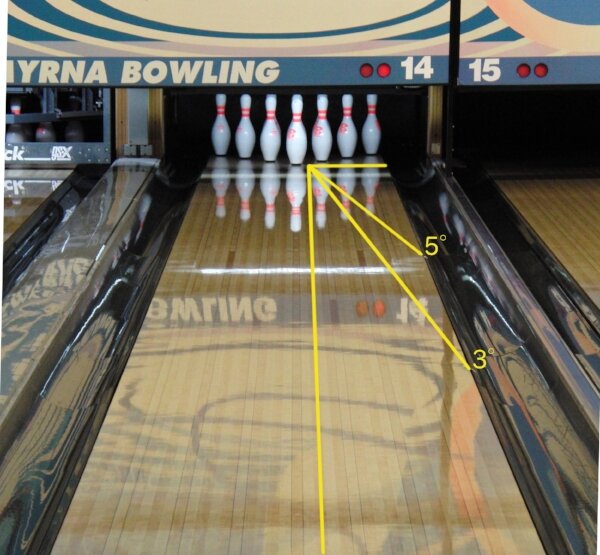
An entry angle line of 5 degrees “drawn” onto the lane with a green line laser.
During the initial training phase, it is important that the student does not focus on the entry angle value. It is most important for the student to see the image of the entry angle line on the lane and memorize that image. A good starting point is to mark the angle at 4 degrees and ask the player how the entry angle of his throw differed from the visible one on the lane.
A powerful memorization technique is for the coach to quickly move the visible entry angle line to reflect the characteristics of the specific player’s throw in order for the ball to pass along the visible line as often as possible. Thus, the player will quickly learn to determine the presence or absence of ball roll as well as the length of the ball roll. This is a very important and useful intermediate skill!
Editor’s note
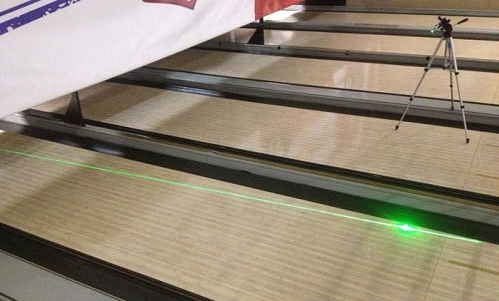
Laser setup example
The laser line in the above image was generated using a standard off-the-shelf 350 mW green laser pointer in conjunction with an off-the-shelf line lens kit, with the laser mounted on a tripod, as shown.
Please be advised that lasers can be dangerous. A 350 mW laser is a Class 3B laser device which can cause harm if used improperly. Among other risks, never look directly into the beam of a laser and never point a laser beam at a person. Never use a laser unless you are properly trained and understand all the possible risks. Also, please keep in mind that the sale and use of lasers can sometimes be subject to government regulations.
It doesn’t take long for the student to memorize the entry angle image when using a bright and memorable laser line. Once the player fully understands these concepts, the next step is to learn how this line ties into a coordinate system which provides the framework to make the necessary quantitative assessment to determine the angle value correctly in the absence of the laser line. There are two very helpful methods for this purpose.
Intervals
The first one is the method of intervals. With this method, the player is taught to quickly analyze and determine various lengths on the lane correctly. In principle, this skill is very important for understating ball reaction.
The goal is for the student to memorize the most important intervals on a lane, including 30 feet, 35 feet, 40 feet, 45 feet, and 50 feet. We approach this task by placing memorable marks, such as paper taped in the gutter, at the desired length or lengths.
An example of using paper markers in the gutter to show the location of specific distances.
An example of using paper markers in the gutter to show the location of specific distance. Of course, this is assuming that the player understands basic lane geometry (such as the width of lane, the distance to the targets and pins, etc.), since memorizing the desired unmarked points requires that the student use all available visual cues. For instance, the 1st pin (at 60 feet) has a reflection that can either correspond to or be very close to one of the desired intervals (50 feet for a taller person, down to 45 feet for a shorter person). Determine what interval the bowler sees and use it.
It is important to understand that the intervals are determined by the individual’s unique characteristics, since they are connected with the player’s height and the height of his eyes in the initial and finish positions. To begin with, focus on memorizing the required intervals from the player’s finish position, as it is critical to choose a consistent and repeatable position from which to memorize visual cues. Moreover, this is yet another argument for the benefit of a stable and proper finish position. Obtaining visual information after releasing the ball from the foul line is facilitated by correct and consistent technical execution.
For entry angle determination, memorizing just the two lengths of 30 feet (half the distance from the foul line to the first pin – 1/2 of the lane) and 45 feet (half the distance from the 30 feet mark to the first pin – 3/4 of the lane) is enough. It is easiest to start by memorizing the 30 feet mark and then later adding the 45 feet mark. Once the student has memorized these intervals, the next training session can focus on learning how these lengths relate to the two entry angles of 3 degrees and 5 degrees.
Ideally, using two laser lines, the coach should indicate the 3 degree line extending from 31 feet to the pocket and the 5 degree line from 42.5 feet to the pocket. Remembering the memorized visual cues for 30 and 45 feet, the student can simply add 1 foot for the 3 degree line and subtract 2.5 feet for the 5 degree line in order to commit these angles to memory.
In order to achieve different entry angles, balls and throw execution parameters (speed of throw, axis tilt, ball trajectory, etc.) can be changed. The table below shows the entry angle which corresponds to the given length of the lane edge from the foul line.
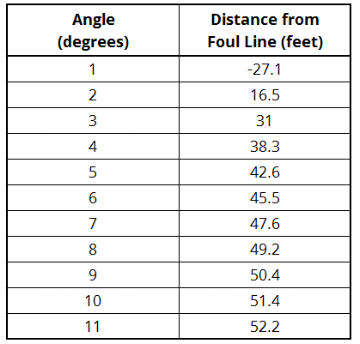
Angle vs. distance for a line drawn from the gutter edge to the pocket.
At this point, the student has learned a significant and complex skill set: a practical understanding of the detailed range of his ball arsenal and the effect of changing throw characteristics on the ball trajectory.
The use of a device for marking the aiming line, described in my previous article, in combination with marking the entry angle line(s), is an efficient technique for teaching the player to consolidate these skills.
Retinal angle assessment
For further consolidation of this newly acquired skill, there is another approach to memorizing the entry angles that a player sees. Have you ever asked a beginning student or spectator about the entry angle value they perceive? The answer is consistently 45 degrees. This is accurate if the angle is assessed as obtained by the retina at the foul line. It matches the angle measured on video or photos.
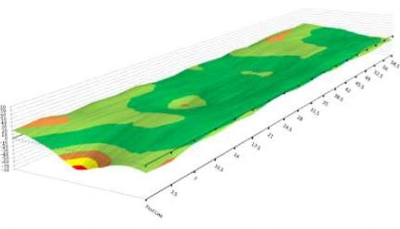
A bowler’s perception of entry angle is typically very large (shown from a height of 4.5 feet at the foul line).
Retinal angle assessment can be used to obtain the true angle. In order to do this, the coach must determine the characteristics of the player that will influence their perception of the entry angle. The table below shows the height of the player’s eyes at the finish position which corresponds to their perception of 3 degrees and 5 degrees.
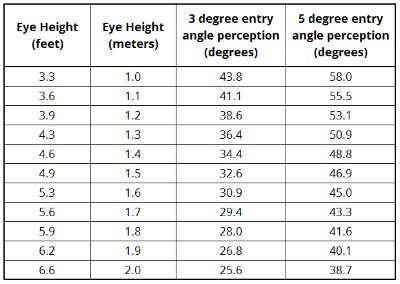
Entry angle perception (retinal angle) from the bowler’s perspective vs. height.
In applying this assessment method, the difference between these two angles (3 degrees and 5 degrees) as viewed by the bowler is approximately 15 degrees. For example, if the height of the eye is 1.6 meters (5.3 feet), the angle of 3 degrees is perceived as 31 degrees and the angle of 5 degrees as 45 degrees. These angles are fairly easy to remember. Simply measure the height of the player’s eyes at the finish position and print the respective angles for memorization.
Finally, once the player has fully understood the entry angles of 3 degrees and 5 degrees, he can extrapolate from there to additional angles. For instance, knowing 3 degrees and 5 degrees, the player can easily see when the ball’s trajectory is between these memorized points and determine the angle to be 4 degrees. Equally an angle less than 3 degrees would be 2 degrees or slightly more than 5 degrees is 6 degrees. The ability of the player to determine the range of angles helps him assess the situation on the lane and ultimately provides the tools to consistently obtain the ideal entry angle during competition.
New Product Lifecycle
Have you ever wondered about the process of creating a new conditioner? How do we test? What do we look for when we’re testing? How do we choose test centers? How does field testing work? If you’ve ever wondered about the research and development process, or if you’ve ever thought you might like to be a test center for a new product, keep reading.
Creating a new conditioner is a lot like baking a cake without a recipe; you know how you want the cake to look and taste and you know you’ll need some flour and sugar. But, you don’t have an actual recipe so you have to figure out the rest of the necessary ingredients in order to get to the desired result.
Creating a lane conditioner can follow that same concept. In general, mineral oil is the “base” so we’ll likely use some combination of mineral oils to start. After that, we experiment with different combinations of chemicals to try to achieve the results we want to see. Since we’ve been in the lane conditioner business for quite some time, we have a solid foundation of knowledge of many raw materials. We know that some materials will give us more “slickness” while other materials may help the conditioner be “hookier”. We constantly search for new technologies to help us create the best lane conditioner we can.
Once we have a formula, we start testing. For lane testing, we generally use a house pattern and we’ll use the same house pattern throughout testing so that we have an equal comparison when we make formula adjustments. We are fortunate to not only have our Batch Test bowlers, but some extremely talented bowlers throughout our building. So, we take full advantage and use them when we’re testing a new product. We try to use a variety of bowlers so that we can see how the conditioner performs for bowlers of different styles. And, as much as possible, we try to use the same set of bowlers throughout a product test. While they’re bowling, we’ll track scoring, bowler moves, and we’ll make notes on things like ball reaction, residue on the bowling balls, and carry down.
In the lab, we’ll test physical properties like viscosity, density, and surface tension. These properties give us some general characteristics about the conditioner like how it might flow on a lane. We also do temperature stability testing. We’ll put samples through freeze/thaw cycles to see if the conditioner is impacted by cold and we’ll do heat ramp studies to see if the heat negatively impacts the conditioner. We even do chemical compatibility studies. Belts and other materials from pinsetters, tubing and other parts from lane machines, and other materials that could contact the conditioner are cut into pieces and soaked in the conditioner as well as in some of the raw materials. We measure the parts before we soak them and then measure them again after one month. This helps us determine if the chemicals will create any issues with the parts.
The next phase of testing for a conditioner is field testing. Initially, we’ll test in one or two centers to make sure the product will perform well. We work with the centers to understand what they see from the conditioner using their normal pattern and maintenance routines. They provide feedback and we work together with them to make pattern adjustments, machine adjustments, and such to try to improve the performance. We track all of these changes and use the information to determine if we need to make adjustments to the product. If we make adjustments, we continue testing until we get to the point where we feel confident that we’ve created a viable product.
Next, we continue adding centers to our field test. Ultimately, we like to have at least 15 centers test a product for several months. We try to cover as many different variables as possible by using centers all over the country. By testing on different lane surfaces, pinsetters, ball returns, and so forth, we can determine if the conditioner will be a good fit for different combinations and in different environments.
While the product is in field testing, we continue collecting data in lab testing. We send samples to partner labs for analytical testing like flash point and fire point testing. These tests allow us to determine proper packaging and shipping requirements. We also submit a sample to USBC for approval. In order to gain USBC approval, a lane conditioner must meet the required specifications for viscosity and UV content.
As we continue with field testing, we keep notes on pattern adjustments made by each center. This helps us learn what works; and, more importantly, what doesn’t; with patterns on different surfaces. We use this information once a product is released to the market so that we can give our customers educated adjustments for their patterns when they switch. What that means is you can switch with a little less trial and error and a few less irate bowlers.
Just before we release a product to market, we build all of our marketing and sales materials. We use information we gathered from our field testers and data we collected during our various phases of testing. We conduct in-house training for our Techs, Customer Service, and Sales staff. And, we start making batches in preparation for sample kits. Our goal is to release the conditioner to the market in the summer so that your center has time to try it and fine tune your pattern before your fall leagues start again.
Now, all this may sound glamorous, but many of our test centers would likely tell you that testing isn’t always rainbows and butterflies. It can get ugly and you certainly have to be willing to make your bowlers angry. When we send a center a new product, we request that the center try the product without making any changes to their normal procedures and pattern. So, if a center had been using a conditioner that was characteristically hookier, and we asked them to use a conditioner that is slicker, the bowlers would see something different than what they’re used to seeing. And, if scores go down, it could make for some pretty angry customers. Test centers can’t be reactive to that though. We need centers who can give us quality feedback and that are willing to make the adjustments we suggest based on their feedback. We need centers that will work with us as we work through issues and try to improve the situation. It can take some time to fine tune the adjustments and we need centers that are not going to throw in the towel while we work through the chaos. The rainbows and butterflies come when we get the right adjustments and scores go up and bowlers comment about not moving as much during a league session. Being a test center can be as frustrating as it can be rewarding.
We do our best to create products that solve a problem or fill a need in the industry. The process takes a lot of time and it involves a lot of people. If we didn’t have customers to give us valuable feedback and we didn’t have test centers we could trust to help us during the development process, we wouldn’t be able to create solid products. We count on our customers to tell us what they think and even what they need as we continue to create products to improve the bowling experience.
If you’ve made it this far and still think being a Kegel test center sounds pretty darn awesome, you can reach out to our Kegel team to see if you qualify. You can also fill out our Test Center Information Form so we can gather all of your center specifics.
You just push the button...right?
As I sit in the back of another bowling center, maintaining lanes for another tournament, I have been thinking about that famous line above, partially because I have already heard it at least once today. There are so many stories…some funny, not so funny, and some downright scary if you were in my shoes. I thought a glimpse of what we do behind the scenes could be an eye opener for many. Making things run smooth through chaos can be our biggest attribute sometimes.
The tournament I am currently at is a great example of the time put in outside of actually running lanes. Starting with a flight across the Atlantic and getting off the plane as first light breaks in Europe, which can be OK for those that can sleep on planes. My mind before an event however, runs 100 MPH, so that never happens. Explaining the Lane Mapper to the agent withholding it in luggage was easy THIS trip…first hurdle.
After arriving at the bowling center and plugging in my batteries for the mapper, I realize the charger isn’t working. The adapter that I brought is not converting voltage properly, so a quick google search of local hardware stores and off I go, many Euro’s later, we are in business. I finished mapping half the house around 4pm local time, just in time to head back to the hotel to find there was a new windows update pushed out that wouldn’t allow the PDA from the mapper to connect to the computer. Hacking windows registries until almost midnight and that problem is solved. The bowlers will be happy; they can have their lane map, barring nothing else tries to get in my way.
Arriving the following morning, or same morning if you like semantics, the mapping is finished. Setup the machines, run all the tests and calibrations, study the maps, pick a pattern. Out by 5:00pm, it’s a good day!!!!
Once the tournament starts, it’s the normal day to day obstacles, bowlers take more time than anticipated and we run two machines and catch things up so squads start on time. In 11 days I will be back in the US to start all over again. No rest for the weary.
Thinking of previous events as well, it’s normally not the machines that we deal with when we have problems. I remember going to a major event and doing a test clean on the first set of lanes for testing. I honestly thought something was wrong with my machine. I ran the second machine I had with me and saw the lanes had the same look as the first I did a strip only on.
At first I thought the lanes had a delamination problem, but upon further inspection, there was a film on the lanes from 10-10 that I couldn’t pull up. I scratched it with my finger nail and was able to remove it, but the lane machine would not. Running down the list of things to do. I tried straight cleaner with a rag by hand, that didn’t work. IPA with a rag by hand, two strikes. I don’t like to strike out, so it was time to call the chemical engineer back at the office!
After a few pictures, and a lengthy conversation, she asks me to grab some vinegar from the snack bar. We let it sit on the lane for a few minutes and to my surprise, the film came right off. This means I needed a mild acid based cleaner to clean the lanes and remove the film. Not wanting to hurt the lane bed itself, we found a cleaner that would work from a local hardware store with a little more “potency”, and another problem is solved for the day. Granted I returned to the hotel smelling like a fresh pickle from using the vinegar as a test, but the bowlers would be happy at the end of the day so it was worth the trouble.
During the PWBA tour, I was at an event with one of the most attentive staff I had worked with in quite some time, which saved me from a disaster believe it or not. We had been charging the machines on the far side of the building for testing, and the first day of open practice. No issues all week and it was smooth sailing. I walk into the center after going to get breakfast and one of the staff pulls me aside and says they had moved some things around for my machines.
Apparently, they had some electrical work done earlier in the year for a renovation, and the water heater on the OTHER side of the building was tied to the outlet I had plugged my machines into. They never knew it, nor did I, and it hadn’t been an issue until the center was full of people going to the bathroom and washing their hands making the water heater turn on and ultimately tripping the breaker I had my machines plugged into. They happen to notice that the lights on my charger had gone out and started to investigate on their own. I guess their attentiveness was good on three fronts. They know what the water heater is linked to, people had hot water to wash their hands, and my machines got charged and didn’t die 4 lanes before I finished in the middle of a tournament. Kudos to them for saving me on that one.
What came out that example was a lesson learned, and I now carry a tester for loads and outlets that I use when I go to bowling centers. I had to laugh out loud as I typed that last line. A little known fact is a lot of the upgrades or changes that happen to machines come from the fact that we experience things in the field and want to make them better for the end user. Automatic shut offs after a certain period of time on battery operated machines, suction cups on drip pads, redesigns of certain parts, and numerous software changes based on scenarios we encounter just to name a few.
Lastly, as most know, Kegel provides lane maintenance for a multitude of tournaments, but JR Gold is the most brutal workout a lane technician can go through. No problems have occurred at this event over the years that are worth writing about, but just to give you an idea of the schedule we maintain; seven days of up at 3:30am, pushing the button by 4:30am, and staying at the bowl until 8:30pm through multiple re-oils. We provided 4 of the 8 lane technicians, 16 brand new machines, did almost 14,000 lanes, and we also provided and went through over 50 cases of oil and cleaner. This is equivalent to what a 40 lane bowling center does in 1 year in a week!!! Not to mention the 200+ lane tapes that were read over the course of the week.
Even through all of this, we answer questions for customers that may be at the centers with their children, do our paperwork and answer emails between squads; it is truly non-stop for a solid week. We would not however, have it any other way.
I can only hope that this small glimpse of what one lane technician has experienced over the years, will allow you to appreciate what we do. When my career is over, I could probably write a tell-all book that wouldn’t sell more than 10 copies but would be 200 pages long and one heck of a funny read for anyone in the business.
It all leads to one bottom line, we take pride in what we do, the builders in manufacturing take pride in what they do, and at the end of the day we all try to make things look seamless. Hearing the statement “you just push the button” is actually a compliment. If you walk into the bowling center and see me wrapping up lanes for a tournament and you can say, “You have it made, all you have to do is push a button”, then I have done my job well.
Have you hugged your mechanic today?
A recent topic on a bowling technician website caught my attention. It was posted by a proprietor wanting to know why he could not find a mechanic for his center. Bowltech.com is visited by some of the best techs from around the world as well as several manufacturers. The gentleman had been trying to hire a mechanic for the past three years with hardly a nibble.
After posting his compensation package, he was still in a quandary as to why good mechanics are so hard to find. Several members of the bulletin board responded that many topnotch techs were lured or forced to seek maintenance positions outside the bowling industry. Others were very happy staying where they were, having growing families and roots in the area. A few even felt that they had been driven out of the bowling industry by management that treated them as "second class citizens".
Money is a consideration - a good tech can be worth $20-30 per hour - and many are doing the job with little or no benefits. To many techs, the work environment is also an important consideration. A number of techs I talked to said that they felt as though they were being isolated from the rest of the employees.
Having spent over 25 years as a mechanic, I am sympathetic with both the proprietor and the maintenance people. Hiring a head maintenance technician can be one of the toughest things an owner has to do. Starting a new position can also be stressful for a head mechanic. Hopefully, with the suggestions that follow, everyone's life can be a little easier.
What to look for and where to look
Working on bowling equipment is a highly specialized occupation and is probably the least respected as far as the industry goes as a whole. It has evolved to the point where the tech is expected to not only work on the pinsetting equipment, its peripherals, and maintain high scoring lanes, but also must be a computer whiz, a plumber, carpenter, an electrician, an appliance repairman, and an inventory specialist. In some centers he must drill bowling balls and in the same day, help in the snack bar.
The head mechanic is on call anytime the center is open (most are open about 18 hours a day) and is expected to come in and do repairs on weekends and evenings. Many work for long weeks during state and national tournaments without a day off. He is in charge of his night and weekend employees and therefor needs to have some "people skills." These skills are applied when dealing with customers as well. Meetings regarding employee relations should include your head technician
When searching out a candidate for your position, you should decide how much experience is desired. Longevity in the bowling industry can be a sign capability. Seasoned veterans are going to be rarer to find and will also be harder to woo away from their current locations.
Many of the large chain operations promote from within their own companies, moving techs through their training programs towards the goal of placing them in company centers. Some of these younger mechanics have great attitudes and are more likely to be open to the idea of relocation. The hunt for a new key employee should start with ads placed in the trade magazines and the numerous job related websites.
After reviewing the current crop of ads, I noticed most ads for managers were well written. These ads used colorful words and conveyed a feeling of excitement. Most ads for mechanics seemed dull, with little more than a stark description of the position. The use of descriptive language with a more detailed explanation of the position being offered can make your ad stand out. Word of mouth can also bring you results.
Contact bowling suppliers in your area. These distribution centers have contact with mechanics from around the country, and can get the word out to bowling world about your vacancy. Also, do not discount technicians from outside the United States. Some outstanding mechanics live overseas and might be willing to make a big location change. Be sure to include your e-mail address in your ad. This will make responding much easier for those who are not in your immediate area.
Once you begin to receive responses to an ad, take the time to check references. A well written resume with job history is an important tool in determining the viability of the prospective employee. Skills that are listed on the resume can also give you an idea of what you can expect out of an individual.
If a desired attribute is missing, you must determine if the individual is worthy of the cost of additional training. Many colleges offer night and weekend classes in fields that can be helpful to the bowling center. These classes can add to the value of the mechanic and in the long run, save a center a substantial amount of money. Heating, ventilation, and air conditioning classes and clinics are offered by some manufacturers. Welding and electronic classes are available at most Vo-Tech schools.
In some specialized centers, such as military and casino operations; the mechanic has the luxury of a staff of other professionals who will take care of the various areas of the building. This leaves him with the bowling operation to maintain. Even in these centers, the head mechanic should have a rudimentary knowledge of facility maintenance on his resume.
What to offer
A good package of benefits can assist in bringing a quality employee into your organization. Health insurance, profit sharing and retirement can carry a lot of weight when looking for an important addition to the bowling center team. A compensation package that includes assistance with relocation costs is a big plus. Moving a new employee and family across the country is an expensive proposition. Hourly versus salary is something that should be discussed. This issue can be extremely sensitive and should not have any "gray areas" regarding overtime or extra compensation for extra work accomplished.
Contacting other centers and non-bowling facilities can give you valuable insight regarding pay and benefits. Check with hospitals, bakeries and manufacturing facilities near you. The engineering departments of these businesses can give insight into what kind of competition you might face in the event of a mechanic leaving your center. Review all of the jobs that will be required of your head maintenance tech, and compensate him accordingly.
Money, however is not everything. Having the tools he needs is another benefit that can bring a good mechanic into the center. A good set of hand tools along with the necessary electric or air equipment can make many repairs easier. In this quickly changing world, some high tech tools are becoming necessary.
Access to a computer and a cell phone is very important. Many technical drawing and wiring diagrams can be emailed directly to a mechanic. Most manufacturers now have websites with support for their products. Bowltech.com and Facebook mechanic pages have a wealth of information for both the beginner and the most experienced mechanic.
Another important tool is continuing education. Most manufacturers offers clinics and seminars year round. A well informed maintenance staff is critical to a center's success.
The ability to manage the budget for the department is another thing many techs feel that they should have control of. When a part or supplies are needed, he should be able to place an order without having to jump through flaming hoops. Many mechanics have abused this freedom and have forced management to take hard stands on spending. Still, an arrangement should be possible without compromising the maintenance of the equipment or the building.
Most long time mechanics share one thing in common...a love for what they do. Not much compares to the feeling of accomplishment they get when they hear the gentle hum of "their" equipment. The head of maintenance in many cases in responsible for millions of dollars’ worth of equipment. The livelihoods of all the employees in the center are directly tied to his ability. The enjoyment and comfort of your customers depend on this "Rodney Dangerfield" of the bowling industry. View him as an important member of management. Provide a set of work uniforms, include him in decisions and give him "some respect."
Finding the right person might take some time, but the search can bring you a true professional, someone who is ready and willing to contribute to the success of your center.
In the Good Old Summertime
As the warmth of spring starts to creep into our thoughts, summer projects come to mind. While they are necessary to keep our machines and lanes maintained in top-notch manner, other priorities need to be addressed for the summer.
The spring months are the perfect time to evaluate any educational opportunities that will arise in the summer. Ongoing training for your staff should be scheduled at this time. Check with bowling distributors in your area. They will have information regarding seminars on lane maintenance and pinsetter maintenance. Ball drilling clinics are often conducted by manufacturers in conjunction with their distribution network.
The slower months of May, June, and July are the perfect time to schedule a training session with Kegel. We offer training on all of our lane maintenance equipment along with classes on lane care. Training sessions on lane machines and lane maintenance can fill quickly and must be reserved in advance. The information from these classes can lead to cleaner, more consistent lane conditions for your bowlers. Maintenance issues can be addressed by the experts and solutions gleaned from their knowledge.
Our state of the art, newly remodeled training center offers coaching from world class instructors using the latest techniques and high tech equipment such as Specto and the Torch.
The major equipment suppliers will hold schools for their specific machinery year round, but the summer sessions are the most popular. Make reservations early for these classes. Sending your mechanic or even a pin chaser to school can pay huge benefits. The knowledge acquired can be put to use immediately at your center.
Bowl Expo is held every year and contains some of the most advanced training available in our industry. From marketing, to maintenance, to new products and services, this is the one event to put on your "must do" list. Send as many of your staff as possible to the classes and seminars.
Over the years, some of the most useful information I have ever learned came from Bowl-expo. And not all of it was from a classroom! The interaction between managers and their peers can lead to impromptu round table discussions that can solve the bowling centers’ worse problems. It is great to know that you are not the only person with a dilemma and others may have already solved it and are willing to share their solution.
The same goes for your mechanic. The center mechanic can gain a tremendous amount of knowledge during a day long clinic, then retire to the lounge and learn even more over a couple of beverages with his cronies. This kind of communication is important; it gives him an insight to the procedures of maintenance personnel from around the country.
Attending the trade show, you can start to build a rapport with a distributor that was just a faceless voice on the other end of the telephone. Take the time to shake hands and say "Hello" to the face that takes the orders that keep your center supplied.
Some participants in the trade show offer discounts for orders placed at the show or within a short time-frame after the show closes. Take advantage of these reduced prices and other specials. They can save you some big bucks! .
The summer can be a great time to start team building. Start a softball team, host a picnic or barbeque. You and your employees just spent 8-9 months indoors and could use some fun outside of a bowling environment.
Reserve a tee time at the local links and have a fun type golf tournament. Have quirky prizes and events. Many times these events can be traded with the golf course staff for a bowling party.
An event like this can be a great way to ensure that the employees that might be laid-off during the summer will be willing to return in September. Your part-time help is often overlooked, and should be included in whatever "end of the season" bash you decided to hold.
The education and well being of your staff should be one of your top concerns. By showing them that you do appreciate their hard work, you will create a loyalty that won't soon fade. Give your employees the schooling they need to do a better job, and both you and they will have an easier time when the leaves start to turn yellow and the snow begins to fly.
Tick Tock Tech Support
“Hello, thank you for calling the technical support line of (Insert company name here). If you have reached this recording, it means you are calling outside of our regular business hours or all of our support staff are helping other customers. At the tone, please leave your name, company name, phone number including area code, your account number; service tag number; make and model of your product, a brief description of your problem, and a member of our support staff will return your call as soon as possible…”
If I had a dollar for every time I have heard something like this recording, I might be able to buy a private island and retire. Not much is more frustrating than having a major problem with a piece of equipment and reaching a recording.
At Kegel however, we do our best to get you to a person by providing emergency tech support 24 hours per day, 7 days a week. With a response time of 30 minutes or less, you can be certain you will have help with your lane maintenance needs.
No matter how old a customer's machine is or what their problem might be, Kegel Tech Support is free for our customers, and we don’t plan on making changes to this policy any time soon. But to ensure we can support you in the most accurate and timely manner, there are some things we may need to ask you.
The information we will ask at the beginning of a tech call are:
Confirmation of the center’s physical address along with updated points of contact, phone numbers, and e-mails.
Lane machine information: type of lane machine, serial number (can be found on the bottom plate), and the version of the PLC thoughtware. This information can let us know what pattern or upgrade possibilities are available for any specific lane machine.
Lane information: wood or synthetics, and if synthetics, what type, plus the age of your lane surface.
Lane chemicals and supplies currently being used: lane conditioner, cleaner, and cleaning cloth.
If you can have this information available before you call tech support, it will help expedite your call, fix your problem quicker, and we greatly appreciate it.
Apart from lane machine tech calls, we get a lot of calls for oil pattern assistance, but telling us that your lanes are “squirrely” or “spotty” doesn’t tell us much – we need specifics in order to help you the best way possible.
For instance:
Do the backends seem to play tight or is there too much backend?
Is there not enough hold area or not enough swing area?
Is the pattern not holding up long enough, and if so, where are the lanes breaking down the quickest? For example; specifically from boards 8-12 from 25-35 feet.
Once you know that information and you call us, make sure you have the following:
What are the pattern numbers in the lane machine? Do you have a KOSI program sheet of your pattern you can quickly e-mail?
What kind of lane surface do you have? If synthetic, what brand, how old, and are the on top of old wood lanes or not? If wood, when was the last cut and re-coat?
What kind of oil transfer system is in your lane machine – transfer roller, wiper bar, dual transfer brush, or the newest Duo System? Each oil transfer system has its own unique characteristic and oil patterns must be built to complement the system.
If not shown on the program sheet, what is the oil pump set at – 40, 45, or 50 mics?
How many games per lane are you trying to get out of the pattern? Fifteen games per lane (one shift of league play) or more than that?
What kind of oil and cleaner, and what is the dilution ratio of the cleaner?
From this point, the Kegel tech can begin to tweak your oil pattern, or figure out what else might be causing your problems.
what if you have to call another company for support?
While many of the following tips for tech support do not apply to Kegel, they do give advice for tech support calls to companies who might not have a fully staffed tech department on hand.
When we call for support, we want to talk to a real person with an answer to our question, and we want the solution now! Most of the time when we call tech support it’s a crisis breakdown and it must be taken care of post-haste.
So we make our panic-stricken call, and we fall into a mindset that we are the only customer on the planet. We want to get our problem fixed and we want the solution as quickly as possible - we do not want to "leave a message” for the next available tech.
Unknown to us, there may be numerous messages ahead of our own. In our mind we feel that after a couple of minutes, we should be hearing from the support desk. In the real world however, it could take several minutes to receive a call back.
The people working the phones often are helping more than one customer at any one time. They may be trying to walk people through procedures who have no expertise with the equipment - this can be very time consuming.
The number of staffers working the phones can also vary, which can contribute to long wait times for support and call backs. No one can predict the number of calls a tech support desk will get during the course of a day and they are sometimes caught shorthanded.
Another cause for a delay in returning your call might be the fact that you did not give enough information while recording your message - so have all your information ready when you call. Make, model number, part number, and serial numbers are going to be needed. If the tech has to spend time researching what equipment you have, it will add to the time it takes to get your equipment repaired.
Giving a detailed description of the problem and what you have already attempted will help the tech. They can then start the troubleshooting procedure prior to calling you back. This can help you get operational faster.
Patience is needed when waiting for a call back from the support desk. While waiting, try to troubleshoot the problem yourself. Sometimes a solution to the problem becomes apparent after a few minutes away from the afflicted equipment.
When you finally receive that call back from the support desk, take notes! Do not rely on your memory to be able to recall a long sequence of troubleshooting procedures. Note whom you are speaking with and all reference numbers that are given to you.
With this information, you can make return calls to the same person who worked with you earlier. The reference number will allow them to access a case file on your problem, thereby speeding up any potential solutions.
Support techs may sometimes hand you off to a more experienced employee in order to provide you with an answer quickly. These veterans often have years of education in the real world, but are in high demand. It may take extra time to get a response from one of these top level support staffers.
The people manning the support desk are often trying to assist customers who have no experience doing repairs. Do not feel offended if they walk you through some very basic steps while on the phone. They have no way of knowing your level of expertise.
When a problem has been solved, be certain to write down what was done and why. This way if the problem arises again, you have the troubleshooting procedure and any calls to the support desk will be shortened considerably.
After a solution has been implemented, a call to the tech desk is a nice gesture. It will let the company know that you are up and running. If a tech was especially helpful, let a supervisor know. Techs rarely receive a pat on the back.
The next time you call a company’s support desk, try the above-mentioned suggestions. Have patience, speak clearly, speak slowly, and if you are forwarded to a recorded message, don’t run from the phone screaming something about “If I had a dollar for every time I have heard…”
Changing Lanes
With the invention of the Kegel LaneMapper, came a study about bowling lane topography like no other in the history of the game. Truth be told, when lanes were made of wood, and resurfaced in a timely manner and taken care of by craftsmen, topography was not really an issue. But with the proliferation of synthetic lanes and overlays, along with lanes getting minimal attention today, topography is much different and more influential than in past times – and the Kegel LaneMapper has been able to show it.
We now know what lanes shapes favor different type ball rolls. We know exactly why the same oil pattern can play completely different from one center to another. We know that different lane shapes can affect the durability of an oil pattern, or lane conditioner. And we know that different types of lane constructions are not created equal, nor do they change equally. It’s within this last statement this edition of the Inside Line will focus on – how synthetic panels laid on top of wood lanes can change with seasonal changes.
“All lanes look flat, but they really aren’t.”
We’ve always known that wood lanes change from summer to winter. In the days of regularly resurfaced and maintained wood lanes, we saw depressions go from the minus .010” range to maybe the minus .020” to .030” range in the winter months – a depression increase of 10 to 20 thousands of an inch. In climates where seasonal changes and humidity differences were greater, so were the changes in the lanes.
But today, because of the aforementioned lack of attention lanes receive, we are seeing changes much greater from season to season - especially in climates that have greater seasonal differences.
A big part of Kegel's original Mission Statement was “we study the game of bowling”. It was a mandate from the late John Davis. This edition of the Inside Line will focus on some of that study from bowling centers around the world, and we will show how much, and how fast, bowling lanes with synthetic overlays can change in shape.
Real World
Our first example is from a bowling center located in the northern hemisphere. Being in the north, there can be significant differences in humidity from summer to winter - it is humidity that makes wood change in shape.
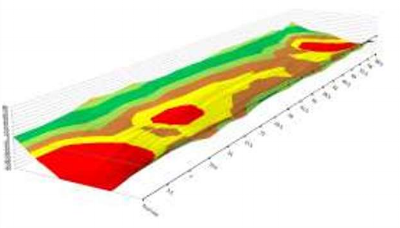
The graphic below is a lane with a synthetic panel on top of existing wood lane (overlay) in the summer time when the humidity is highest. Humidity always enters wood in the area of least resistance and with a wood lane humidity enters the wood from the bottom of the lane.
Synthetic overlay measured in August when humidity is high.
We call this a ‘bird wing’ shaped lane because the wood lane pushes the panel up between the screw rows (2L, 20C, and 2R boards) causing a hill around the 10 board. This lane shape will cause hang spots outside of second arrow, and “hook” inside of second arrow. Medium length patterns are most difficult on this lane shape.
The wood lane underneath the synthetic panel "pushes up" the panel between the screw rows causing the shape of the lane to resemble a bird wing.
What is also interesting is the lanes in this center pass the plus/minus .040” specification at every distance on the lane, in the summer time.
The below graphic shows what the lane looks like during the transition from summer to winter, or winter to summer. In the fall time, the humidity has decreased causing the moisture in the wood lane to also decrease - everything is contracting and the panel takes shape of what’s underneath it. In the spring time the process is reversed. Medium oil patterns begin to play easier - actually all oil patterns begin to play easier.
As the humidity begins to lower, the moisture in the wood lane begins to release, making the wood lane contract. Measurements taken in early November.
Where the lane gets the most abuse, the head area, the depressions begin to exceed the minus .040” specification. The toe screws holding the wood lane together, and the screws that hold the wood lane to the levelers below, are getting loose, or back out all together in many instances. The lane acts like an accordion.
It must be noted that when the heads are cut out and replaced with a substrate like MDF, we do not see these huge depressions. Synthetic panels on top of a substrate like MDF, HDF, or PSL, do not seem to be affected near as much during seasonal changes.
Below is what the above lane looks like in the winter time, when the humidity is lowest. In some instances, bowling centers may even turn the heat on, which lowers humidity even more. It's at this point in the year most of the moisture has come out of the wood lane and the depressions are the greatest. This is also when oil patterns tend to play the easiest; everything “ramps back” to the pocket.
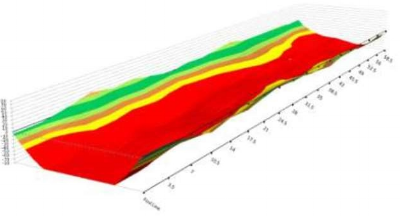
When the humidity is the lowest, the depressions increase the most.
What may be thought provoking for some is, every distance on this lane has now exceeded the minus .040” specification. We have seen this in more than a few instances.
Oil patterns on a lane with depressions of this magnitude will also tend to break down quicker, when playing outside of center. This happens because there is more pressure (gravity) pushing up against the ball when outside of center so it's easier for the ball to "poke through" the oil film on the lane - the “shot” will tend to go inside quickly because of that. Think of a car rounding a curve on a banked road or race track - the banking is there to help a car navigate the turn.
This is when lofting the gutter often comes into play on competitive longer patterns - the ball will “see the lane quicker” as the pattern breaks down on the uphill slope. So players quickly move to and play the downhill side of the depression as long as they can. Physics dictates that the ball will retain energy longer on the downhill side of depression and then hook off of the uphill side easier. Once deep inside, bowlers with high rev rates, high axis rotations, and high tilts will benefit the most on this lane shape - that's physics at work also.
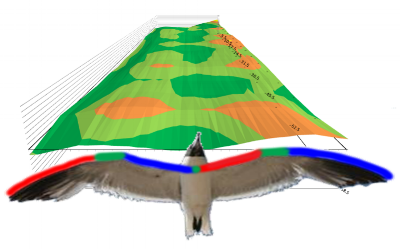
The Kegel Slope Graphs make the slope differences even more apparent:
Same lane over the coarse of seasonal changes.
The Slope Graphs are revolutionary in bowling because they are the first illustrations that show the severity of the ‘rise and falls’ on a bowling lane. Slopes to the right are in the blue color spectrum – the darker the color the more severe the slope to the right. Slopes to the left are in the orange/red spectrum - the darker the color the more severe the slope to the left. Read more about Kegel's Slope Graphs.
How fast can lanes change?
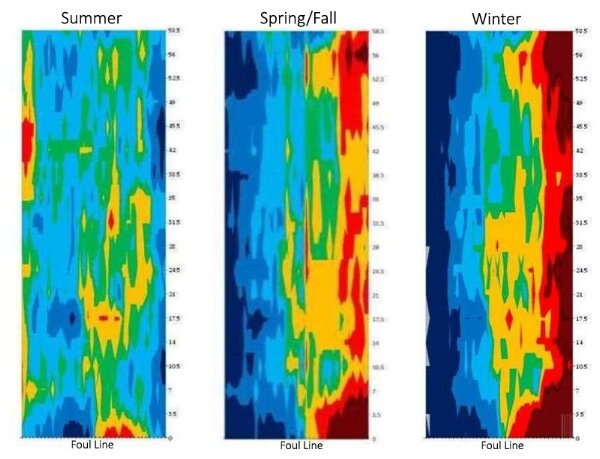
The following graphic shows how a synthetic overlay pair of lanes can change over the course of 28 days – from May 17th to June 13th. This center is also in the northern part of a country and one floor below ground level – so if anything changes are less than a center on the ground floor or above. The foul line is at the bottom of the graphic.
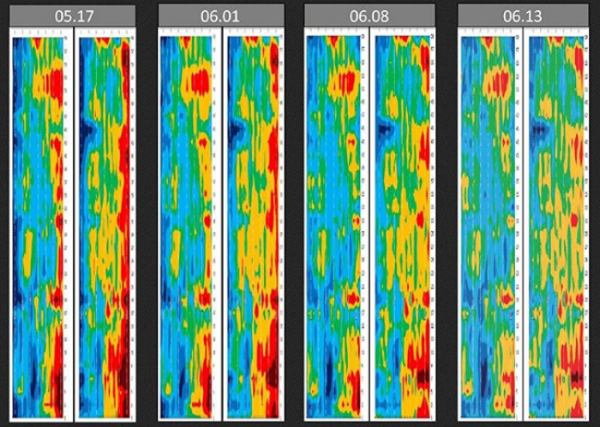
A pair of synthetic lanes with overlays changing during a 28 day period - from May to June. The foul line is at the bottom,
What to notice here are the slopes on the outside part of the lanes – reds on the right are slopes towards center and blues on the left are slope towards center - so the lanes here are predominantly depressed at the beginning of this time frame.
Over the course of 28 days it is clear that the depressions are decreasing. The reds become lighter in color so the movement towards center is less influential, and some areas of the lane are even turning to blue in color, which indicate slopes to the right. Hang spots are caused by these "outward slopes". What we noticed during these 28 days was "the oil pattern" became tougher as the lanes flattened out - gravity always wins on planet earth.
If we talk about the raw data, the lanes were changing (swelling up) about 6-7 thousands of an inch per week as it takes in moisture. In 28 days the depressions went from the mid-minus 30 thousands of an inch to less than 10 thousands of an inch. And the process will reverse itself come fall time as the wood releases all that moisture.
“Gravity always wins on planet earth.”
How this can help you – the proprietor, the bowler, the coach, the federation, or the tournament organizer.
With synthetic lanes it’s even more crucial to see these slopes because it’s the only way we can really understand what’s happening with ball motion – is it friction or a significant slope causing the ball to hook too much, or not enough?
Knowing the shape of the lane at different times of the year will tell you the answer, and it will also tell you how an oil pattern will play, develop, and breakdown.
For instance; when the wood underneath the synthetic swells up in the summer your pattern will play longer or it seems like carrydown comes out of nowhere – the ball has a hard time moving towards center, when the lane is sloped towards the gutter.
This lane swelling can also "make the shot" go more inside as bowlers stay away from the hang area towards the outsides.
This is especially important to any one bowling center when trying to provide lane conditions for their weekly league customer base. If your center has lanes that change as much as these examples, you may need different house patterns for different times of the year so the house playing characteristics stay more similar.
It’s also important to know if a bowling center wants to “experiment” with a different oil pattern or try a new chemical product. If you don't which way your lanes are changing, or how much, it will be difficult to know why things are playing the way they are.
It’s important for tournament organizers or federations to know so when they ask for a pattern months in advance they have a better idea of what to expect come tournament time. Testing an oil pattern in one part of the year and expecting things to play the same at another time of year will often make the question "what happened" arise.
It’s important for coaches and bowlers so they can properly prepare for an upcoming tournament, or make the proper adjustments when the bowling ball is not reacting like they think it should.
Technology can definitely make life easier when used in the proper manner – the Kegel LaneMapper is one of those advances.
When used it can definitely help a bowling center get know their lanes better and use oil patterns that compliment the predominant shape of those lanes to provide more consistent playing conditions for their customers.
Or better yet, the LaneMapper can tell you where and how to correct your lanes if needed so they are "fair" for as many styles as possible.
In a game like bowling, providing equal opportunity for as many different playing styles as possible should be the goal. It worked before and although history may not always repeat itself, it sure does rhyme.
What to LOOK for when choosing a "Coach"
Once you have bowled several games and have a feel for the "game", I think that it is very important (and necessary) to start looking for a "Coach". Why? Improving your scores is essential in getting more enjoyment out of this great game.
Based on your experience (basically how many games you have bowled), will help you to determine just how serious you want to be. The "rule of thumb" and "what to look for" in choosing a Coach is stated below. (NOTE: These are not listed in any particular order, as the reasons are all equally important).
REMEMBER: "You" are the student and you need a good teacher. Interview your prospective Coach to see if they have the following qualifications. You may you need more than one.
• Motivators: All great Coaches in all sports have the innate ability to motivate their athletes. Be sure that your Coach has this ability.
• Fundamentalist: Be sure that your Coach knows the proper fundamentals of the game, from: "push-away" to "timing" to "follow-through", etc.
• Knowledge of Equipment: It is so important in today's game to have a Coach that has a thorough knowledge of bowling balls. Be sure that they do.
• Knowledge of Lane Conditions: With the game getting more and more technical, a Coach that knows about lane conditions is essential.
• Positive Mental Attitude: Does your Coach have a "positive" Mental Attitude? If not, it's time to find one that does.
• Disciplinarian: A tough Coach is the best Coach. If you think that you hate him/her because they make you work hard, you will love them later on.
• Realistic Goal Setter: Are you honest with your Coach? Is your Coach honest with you? Be realistic when you both set YOUR goals. Frankly, being a World Champion is NOT for everybody. "THAT" takes many things and is clearly reserved for a very few of the extremely talented individuals. HOWEVER, there are many other goals that can be reached. Set your goals realistically (best on your team, best in your bowling center, best in your city, best in your state, ABC Hall of Fame, etc.).
I hope that info helps when it is time for you to decide on getting a Coach. You are never too young or too old to start learning and improving in this great Sport.
REMEMBER, NOT everybody is a Coach. Only a few are qualified based on the criteria listed above. I'm sure you have heard a team-mate tell you that you are "dropping your shoulder" or: "not following through". Certainly, they all mean well. BUT - are they telling you ‘why’ or ‘how’ you can fix this particular problem?
Decide today to seek some quality help from a qualified Coach in your area.
The One Thing That Really Makes Oil Patterns Play Different
Normal force, N, is the force that pushes up against an object, perpendicular to the surface the object is on. In other words, the normal force is the force pushing the two surfaces together. The stronger the normal force, the stronger the force due to friction.
How often have you experienced an oil pattern that didn’t play anything like the pattern graph suggested it would? The pattern was ‘x’ length, the high point of the oil on ‘y’ board, yet when you played on it your ball didn’t react anything like you expected, and the optimum pattern exit point wasn’t near where it was “supposed to be”.
From there we look for explanations, and we might get answers like; “the temperature was different today”, “it was raining outside”, “the lane machine put out the wrong pattern”, or who knows what else. In past years technology might not have been available to check things, so theories flourished.
Today, however, we can use technology to confirm the correct pattern is in the lane machine. We can use the Lane Monitor to make sure it was applied correctly to the lane. And with the Kegel LaneMapper, we can even measure the topography of the lanes to see if and how that influenced things.
Knowing and understanding these critical components about our invisible playing environment can help us answer the infamous question every person entrusted with lane conditions has heard at least once in their life; “what happened?”
What lane topographies are most common?
The Kegel Training Center has 12 fully adjustable lanes that can be shaped to mimic almost any lane topography known to exist. After measuring thousands of lanes over the years we have shaped three pairs of lanes in the KTC with some common topographical shapes, and one pair of lanes we consider as “fairly neutral”.
Neutral lanes are not perfectly flat, no lane in the world is, but a neutral lane has topographical slopes on them which do not “overly disturb” the ball as it travels from the foul line to pin deck.
We see neutral lanes often when they are made of wood and resurfaced regularly – these lane types are the “flattest” lanes with regard to topographical shape.
We also see neutral synthetic lanes, but not very often. In fact, of all the synthetic lane bowling centers we have mapped over the years we can count the number of centers having totally neutral synthetic lanes on one hand – it's definitely the exception, not the rule.
The three most common topographical shaped lanes today are what we call a seagull-wing or bird-wing shape, depressed (dish-shaped), and crowned (mound-shaped). These lane shapes are where things get interesting with regard to oil patterns, how they play, and maybe most important, how they develop as the oil pattern breaks down.
Seagull-wing shaped lanes have slopes towards the center from around the second arrow, and slopes towards the gutter outside of that. This happens because a synthetic panel is mostly screwed down on the outside 1st or 2nd boards on either side and then in the middle on the 20th board. In-between there are no securing screws “holding the panel down” other than where the panels meet, which is only every 10’ or 12’ depending on the manufacturer.
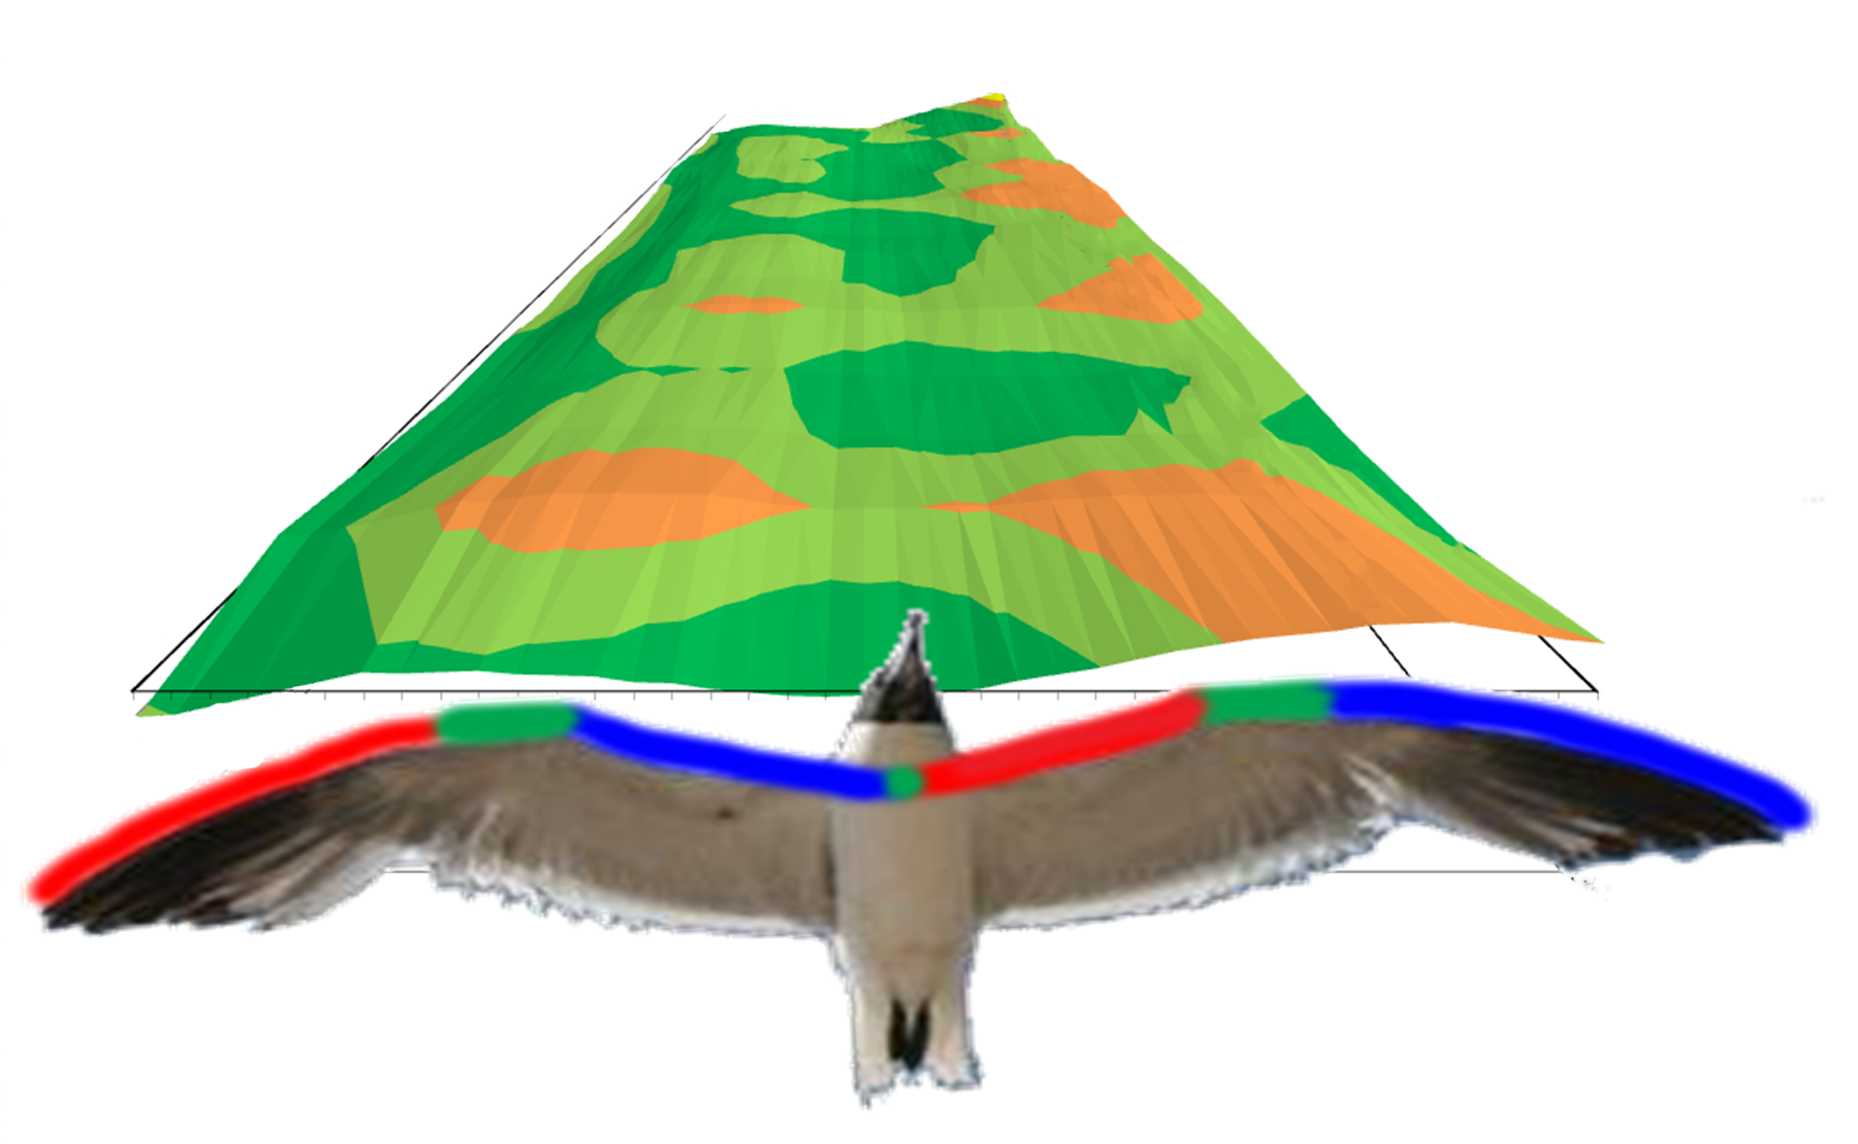
Seagull or Bird Wing Lane Shape
In the summertime when the humidity is high, or in climates with high humidity, we see this lane shape very often - especially when wood lanes are underneath the panels.
Moisture penetration on a wood lane comes from the bottom of the lane where the boards are put together essentially making the lane swell up, which then pushes up the panels in-between these rows of securing screws. This causes the lane to “mound up” around the 8-9-10 board creating slopes towards center inside of that area, and slopes towards the gutter outside of that. The resulting shape resembles a seagull's wing.
Furthermore, in both new lanes with a continuous LSL underlayment (Laminated Strand Lumber - an engineered wood product) and for certain manufacturers who use MDF or LSL to replace the old wood head section, there is a similar securing-screw pattern.
Just like the lane panels themselves, the underlayment is top-screwed in three spots across the lane, near the two outer edges and near the middle, at each of the 30 or so securing locations along the 60' length of the lane. This can also create a bird-wing shaped lane; albeit not as severe as what we see with a wood lane underlayment in high humid environments.
Crowned lanes also happen in year-round climates with high humidity; like Island countries, cities by the sea, or in Southeast Asia. This often happens with overlays where the wood lane underlayment was not screwed down in the middle prior to the lane panel installation.
Depressed lanes often happen in lower humidity climates, or in the winter time, with a wood lane underlayment. In fact, all wood lanes are cut with a slight depression in them, but the longer the panels have been on top of the old wood lane, the more they tend to depress - especially in the area of the lane that takes the constant pounding of the bowling ball, the first third of the lane.
Have you ever notice that scores often go up after Christmas time? This is when a wood lane, or synthetic panels on top of wood lanes, become most depressed because the moisture has finally been released from the wood causing it to contract (shrink). Think of a high banked race track - it's much easier to navigate the curve.
New synthetic lanes can also be installed with a depression, but rarely do we see a nice smooth depression like a resurfaced wood lane has.
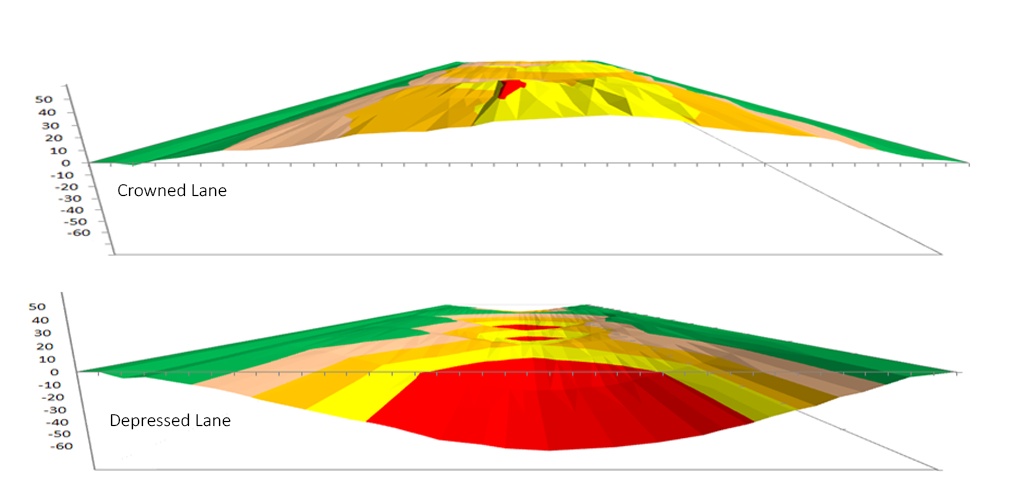
Although we see these type lane shapes often down the entire lane, we also see at times a combination of shapes on any one lane. For certain type overlays, we often see very depressed heads and slightly beyond (mostly related to ball impacts), and then bird-wing shapes after that.
In the case of a new synthetic installation, we often see topography slopes that are totally random throughout any one lane, or even within one panel.
Lane shape is more the reason than anything else why certain styles (ball rolls) “match up” to certain bowling centers.
Because of the invention of the Kegel LaneMapper and resulting Slope Graphs, we now know why, and we can show it.
Where the rubber meets the road
A few months ago the Men’s National Team from Sweden came to the Kegel Training Center with a special request; to learn more about topography and train on lanes with topography differences. So to prepare for their visit we adjusted lanes 5-6 with a seagull-wing shape, lanes 7-8 with a crown, and lanes 9-10 with a depression. We also made sure the lanes remained within USBC specifications.
Below are the Slope Graphs of each pair of lanes:
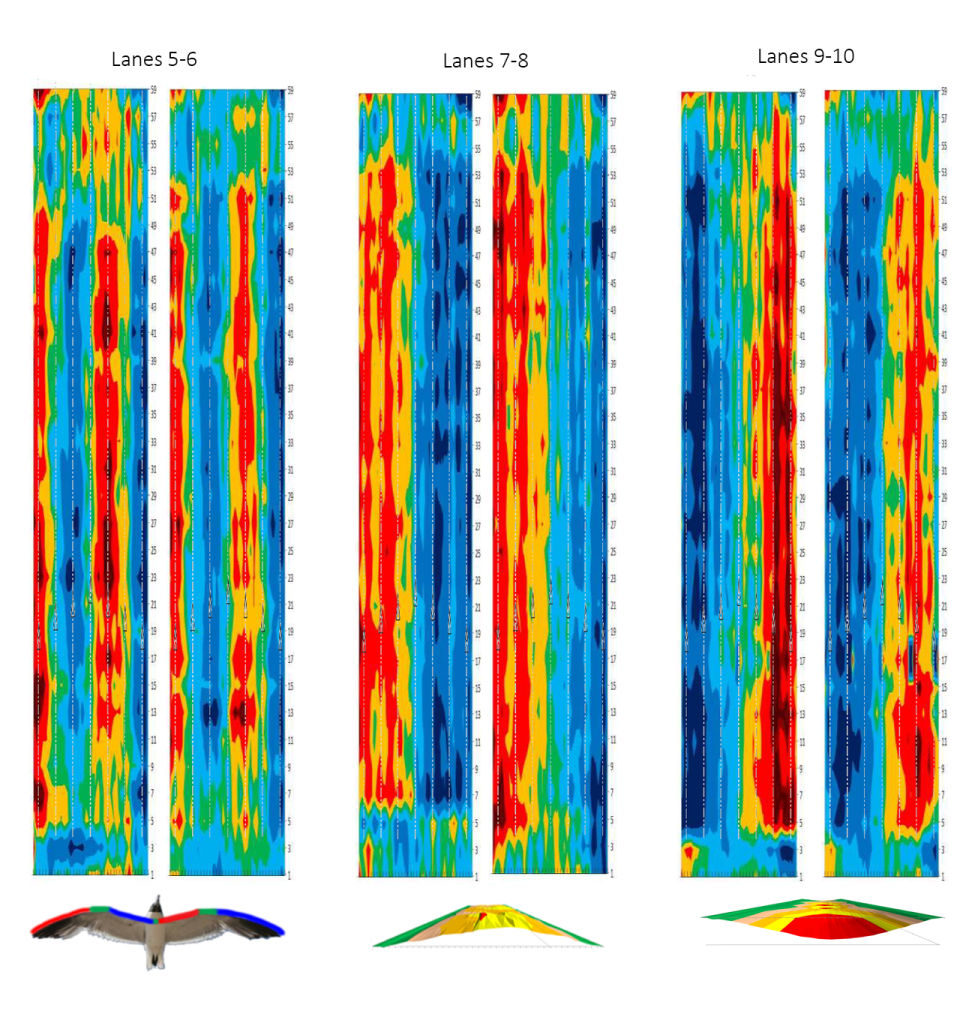
Remember, the specification for lanes is plus/minus .040”, and it does not specify which way a lane must be shaped in order to satisfy those requirements. The specification also does not state over how many boards those min/max numbers can hit their limit, and that’s where things can get interesting.
For instance, if there is a .024” rise on the lane from the gutter to the eighth board, that’s an average Slope per Board of .003” – that equates to a smooth cross-tilt of .120”. The ball has a very hard time “hooking back to the pocket” on a slope this severe and we see this more often than you might think.
For more about Slope per Board, read this article: Kegel’s Revolutionary Slope Graphs.
So how does lane topography affect an oil pattern and the resulting breakdown?
This is where we have learned the same thing Sir Isaac Newton learned – you can’t fight gravity, you can only work with it.
For a little test and learning experience for all involved, we decided that the 12 players from Team Sweden would bowl six games across the three pair of lanes moving every game – this would make all players hit each pair twice.
There were three left-handed players and nine right-handed players. We chose a medium length oil pattern from the 2017 World Bowling patterns, Beijing.
Here is what the fresh oil pattern looked like, with the foul line being at the top of the graphic:
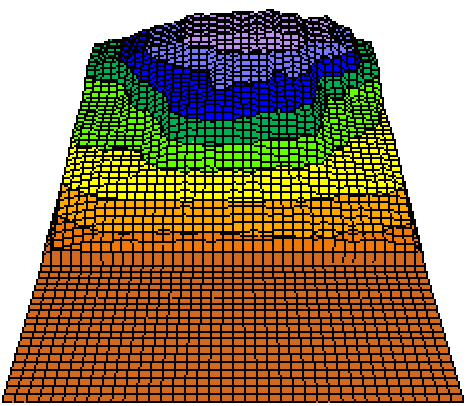
2017 World Bowling Beijing oil pattern
After 12 games of bowling, we took after tapes on each of the pairs to see how the players broke down the oil pattern on these different lane shapes.
On lanes 5-6, the bird-wing shaped lane, players tried to play outside in practice but the slopes towards the gutter made it play very difficult - they immediately “moved inside” and away from the “hang spot”.
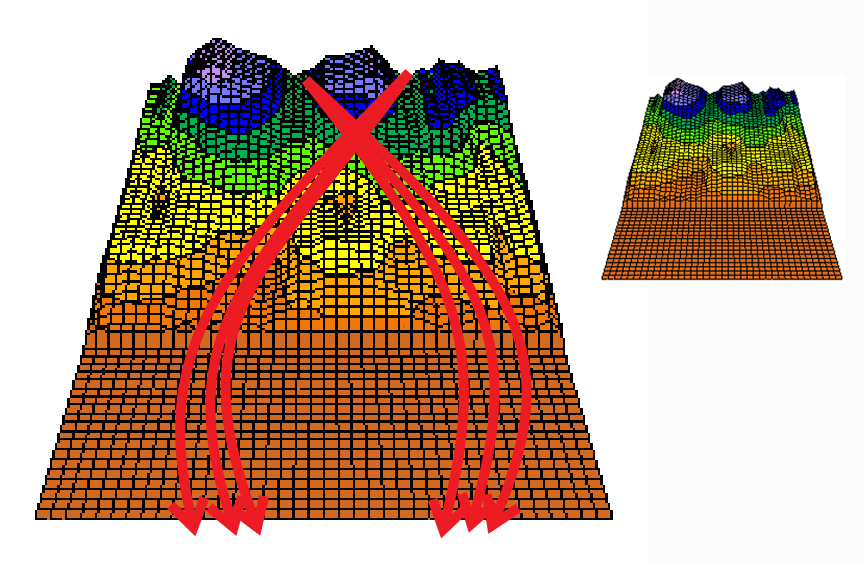
Beijing oil pattern breakdown on the bird-wing shaped lanes
The after tapes show the paths of all balls by way of oil pattern depletion. From these tapes, we can clearly see both left-handers and right-handers played deep inside on this pair of lanes. Our tape data also shows the farthest outside anyone got was on board 9, because there was hardly any pattern depletion of the pattern outside of that. Specto data confirmed this depletion observation.
On lanes 7-8, the crowned pair of lanes, everyone stayed much more outside and never migrated that deep - in fact, they never got inside the third arrow. A few factors involved here; gravity simply helps “push” the ball towards the outside, and the ball doesn’t see pattern breakdown near as much because it's rotating "with the slope" - Normal Force is lessened.
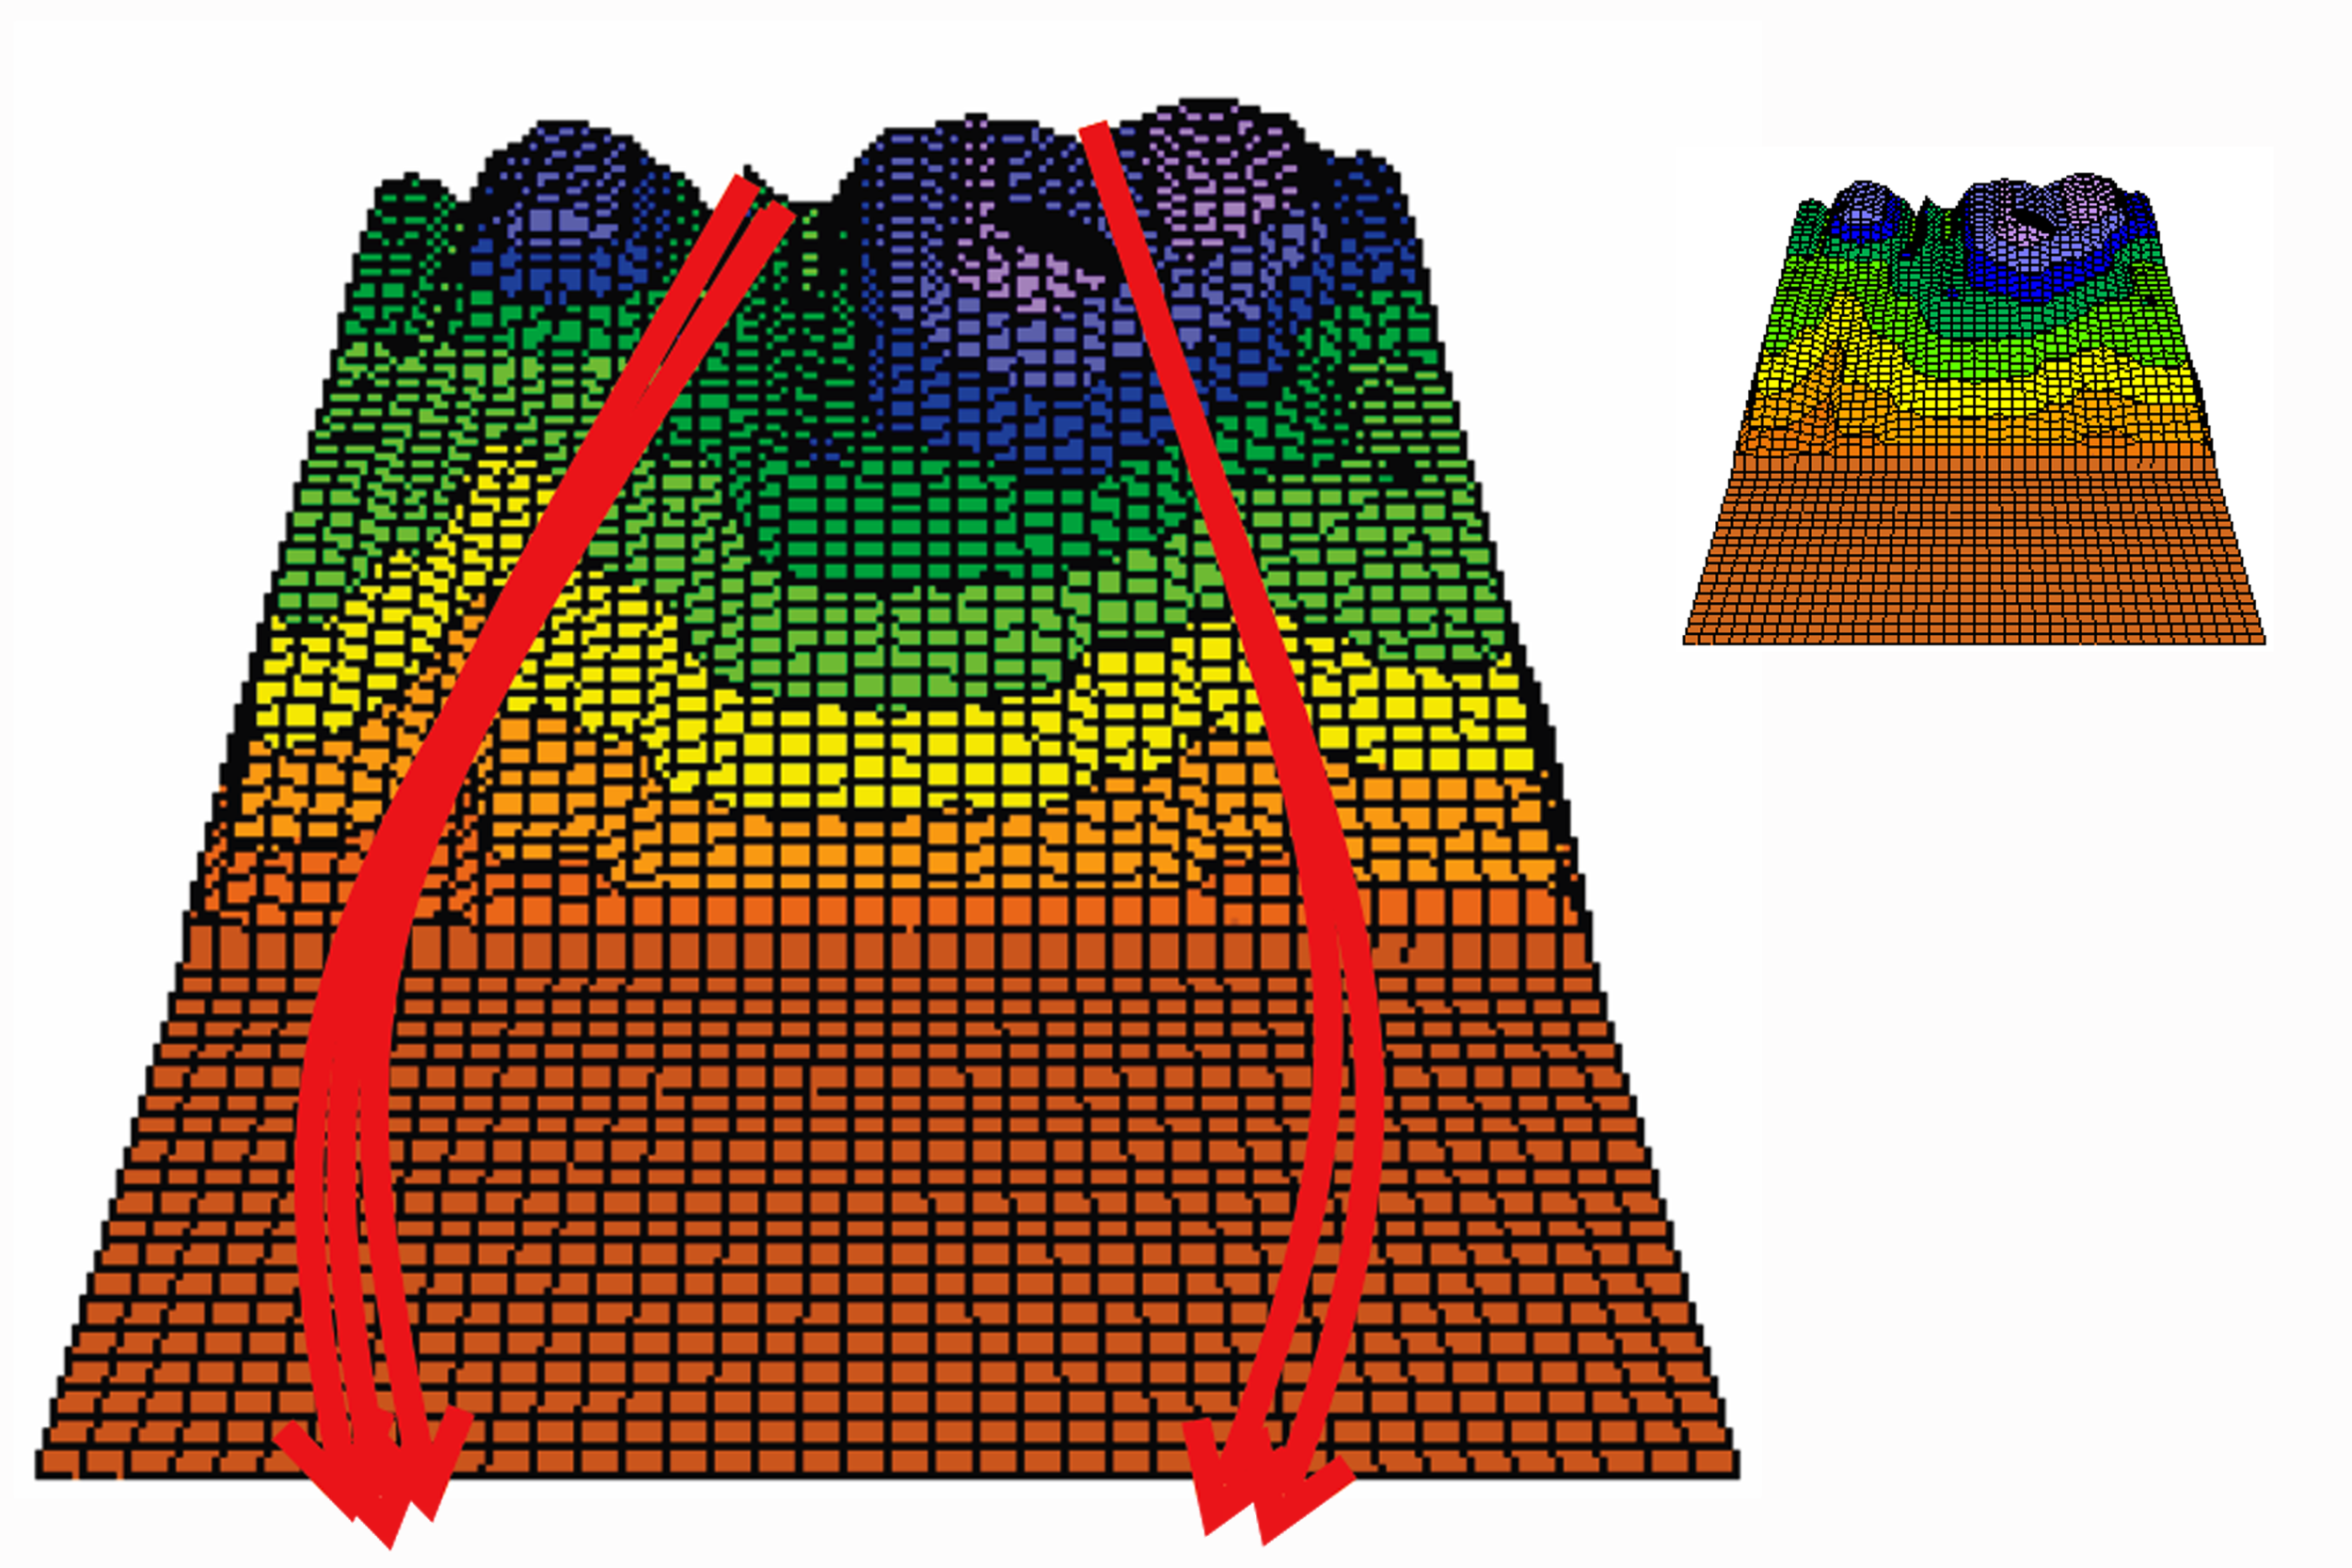
Beijing oil pattern breakdown on the crown shaped lanes
On lanes 9-10, the depressed shaped pair of lanes, the depletion data shows how quickly everyone moved inside and how far they banked it to the towards the outside part of the lane – there wasn't a "hang spot" on that lane.
From our experience we know the ball “sees breakdown" much quicker on the uphill side of a depressed lane because the lane is essentially pushing up against the ball (greater Normal Force) making it “poke through” the thin oil film easier, which causes more friction and makes the players move inside quicker.
Once deep inside and players can play the “downhill side” of the depression the oil pattern might even feel like it has “stabilized” when in fact, it’s just gravity helping the ball “push” towards the outside. In this case, we literally mean push.
This lane shape is the main reason lofting of the gutter comes into play. Along with the pattern "feeling" like it's breaking down quickly, by lofting the gutter cap the ball is able to remain on the downhill side of the depression longer. This allows the ball to retain more energy while also creating a bigger margin for error, along with improved pin carry.
If players tried to stay to the right towards or on the uphill side of the depression, the ball would simply use up energy too quick, minimizing both pin carry and mistake area.
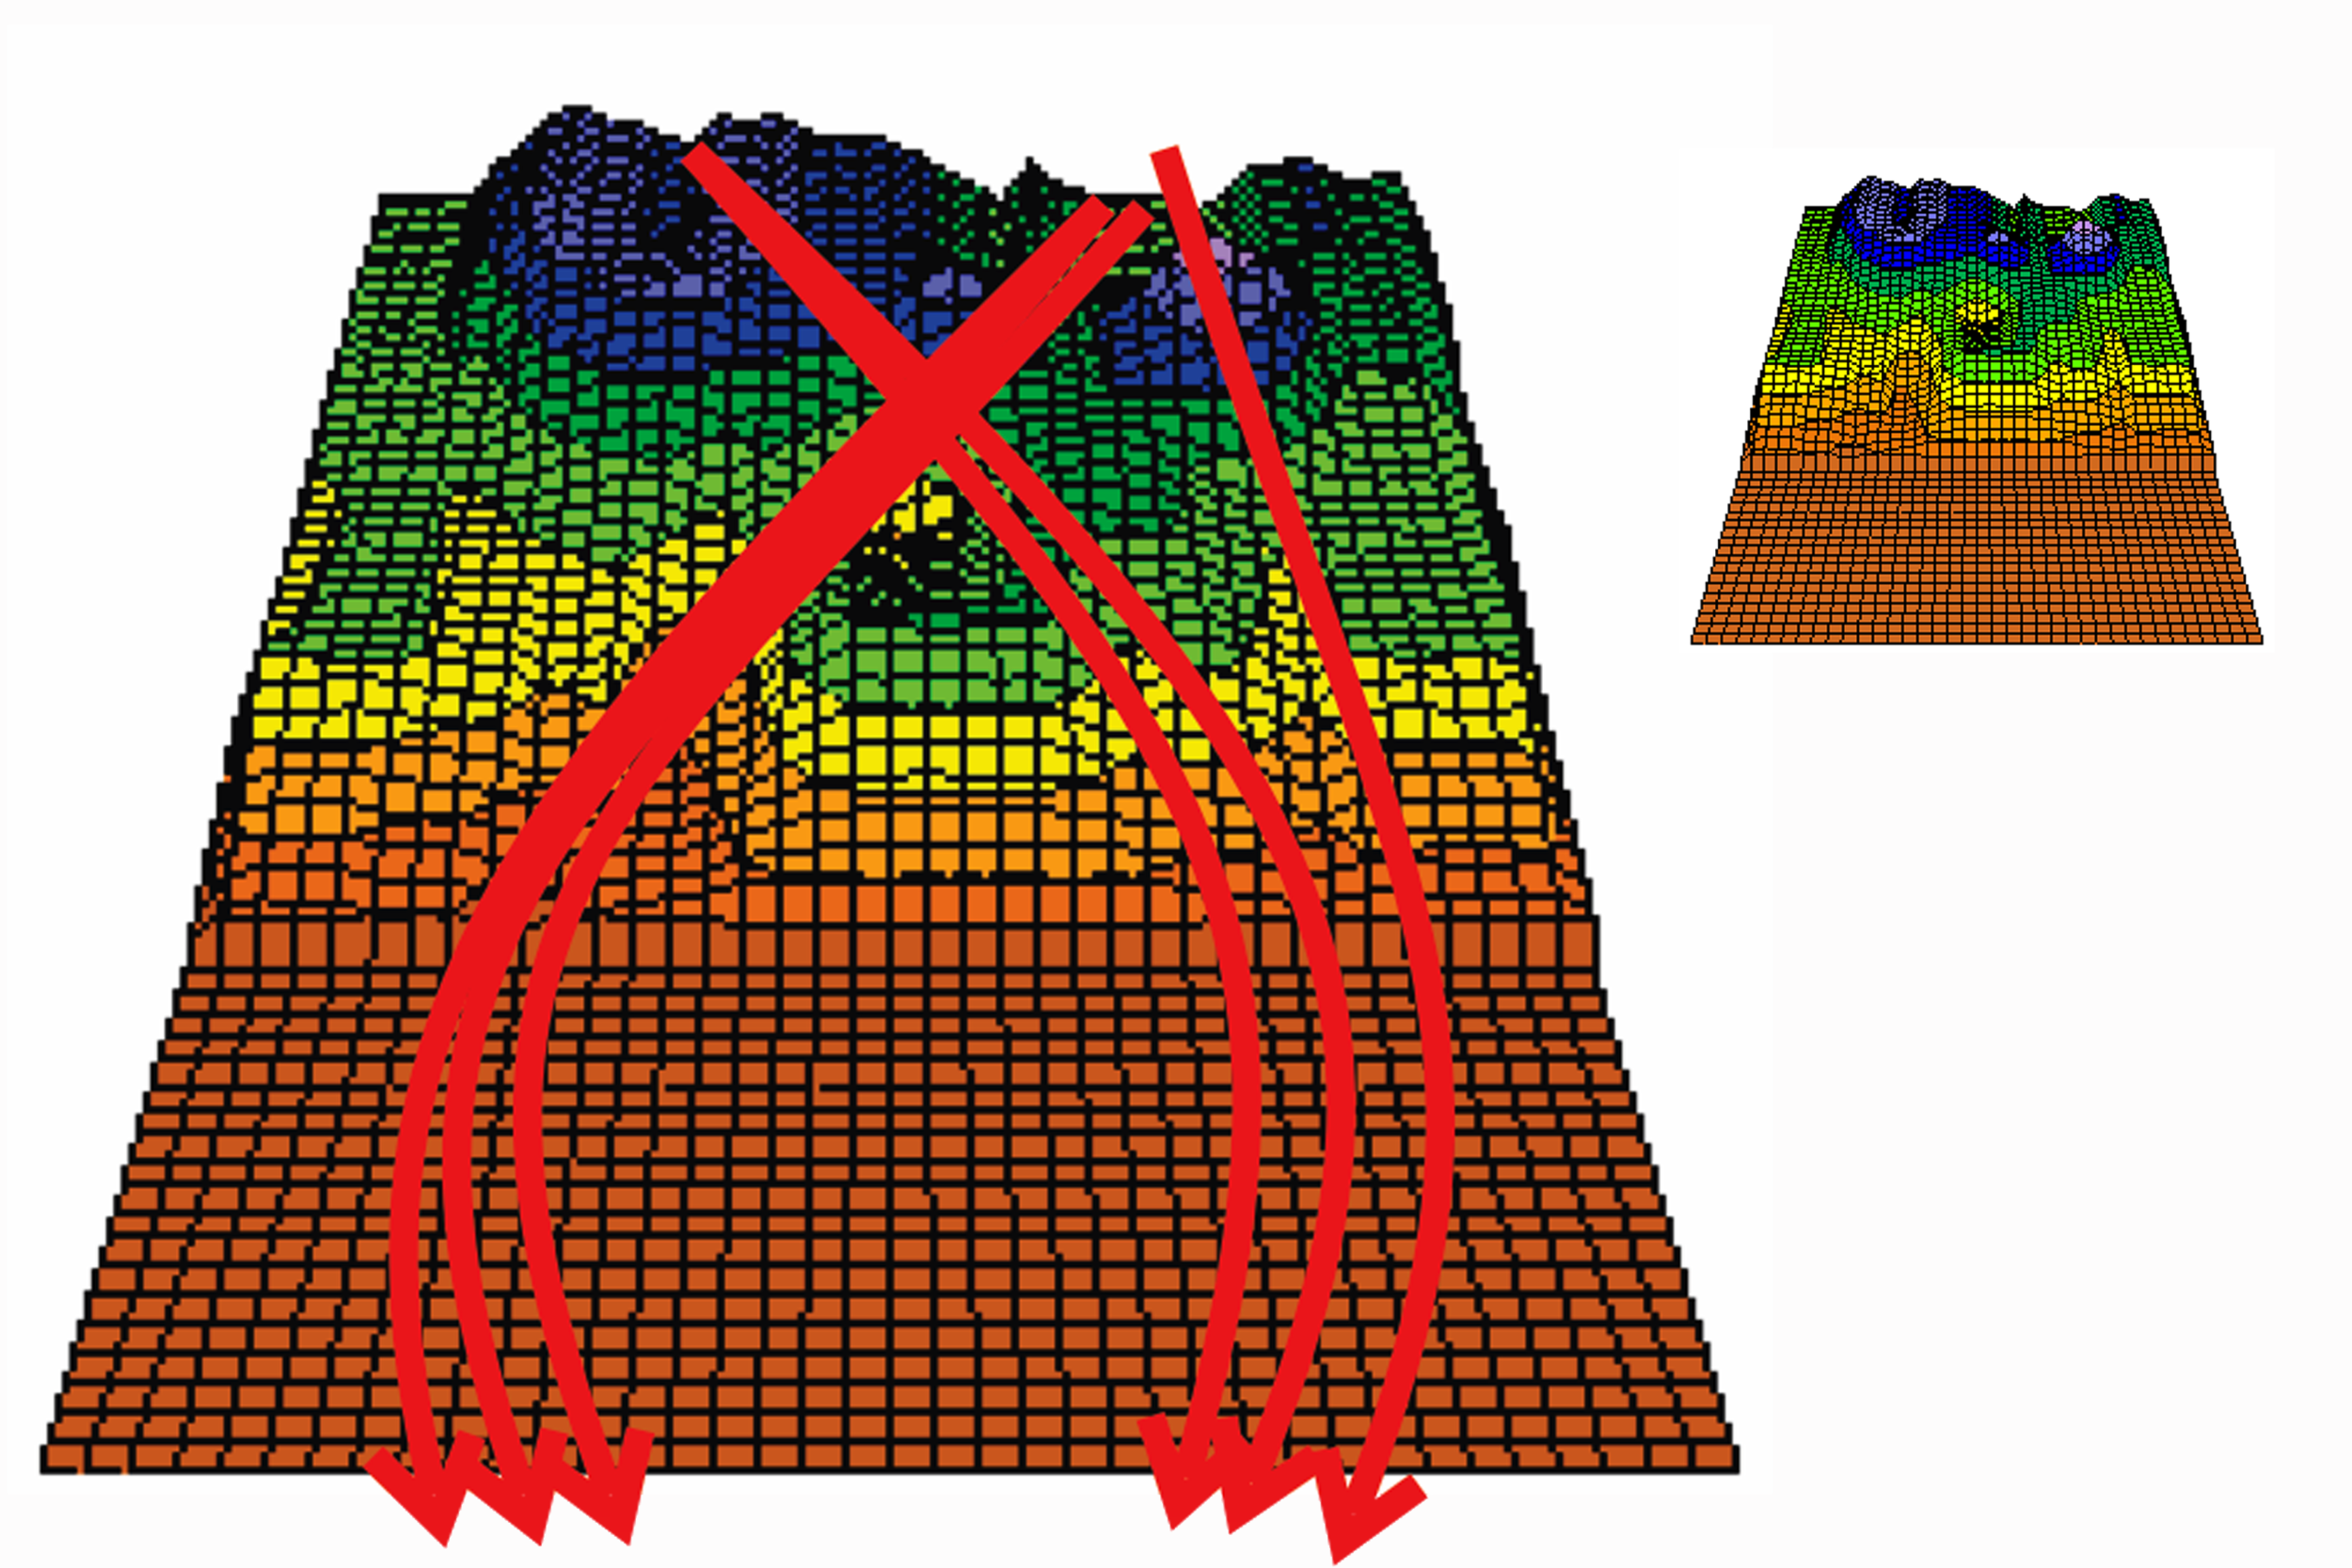
Beijing oil pattern breakdown on the depressed shaped lanes
Along with depletion data, we used Specto to track the ball paths on each lane. The below graph shows the average lines of each right-handed player during the last game; the blue line is the bird-wing shaped lane, the orange line on the crowned lane, and the grey line on the depressed lane.
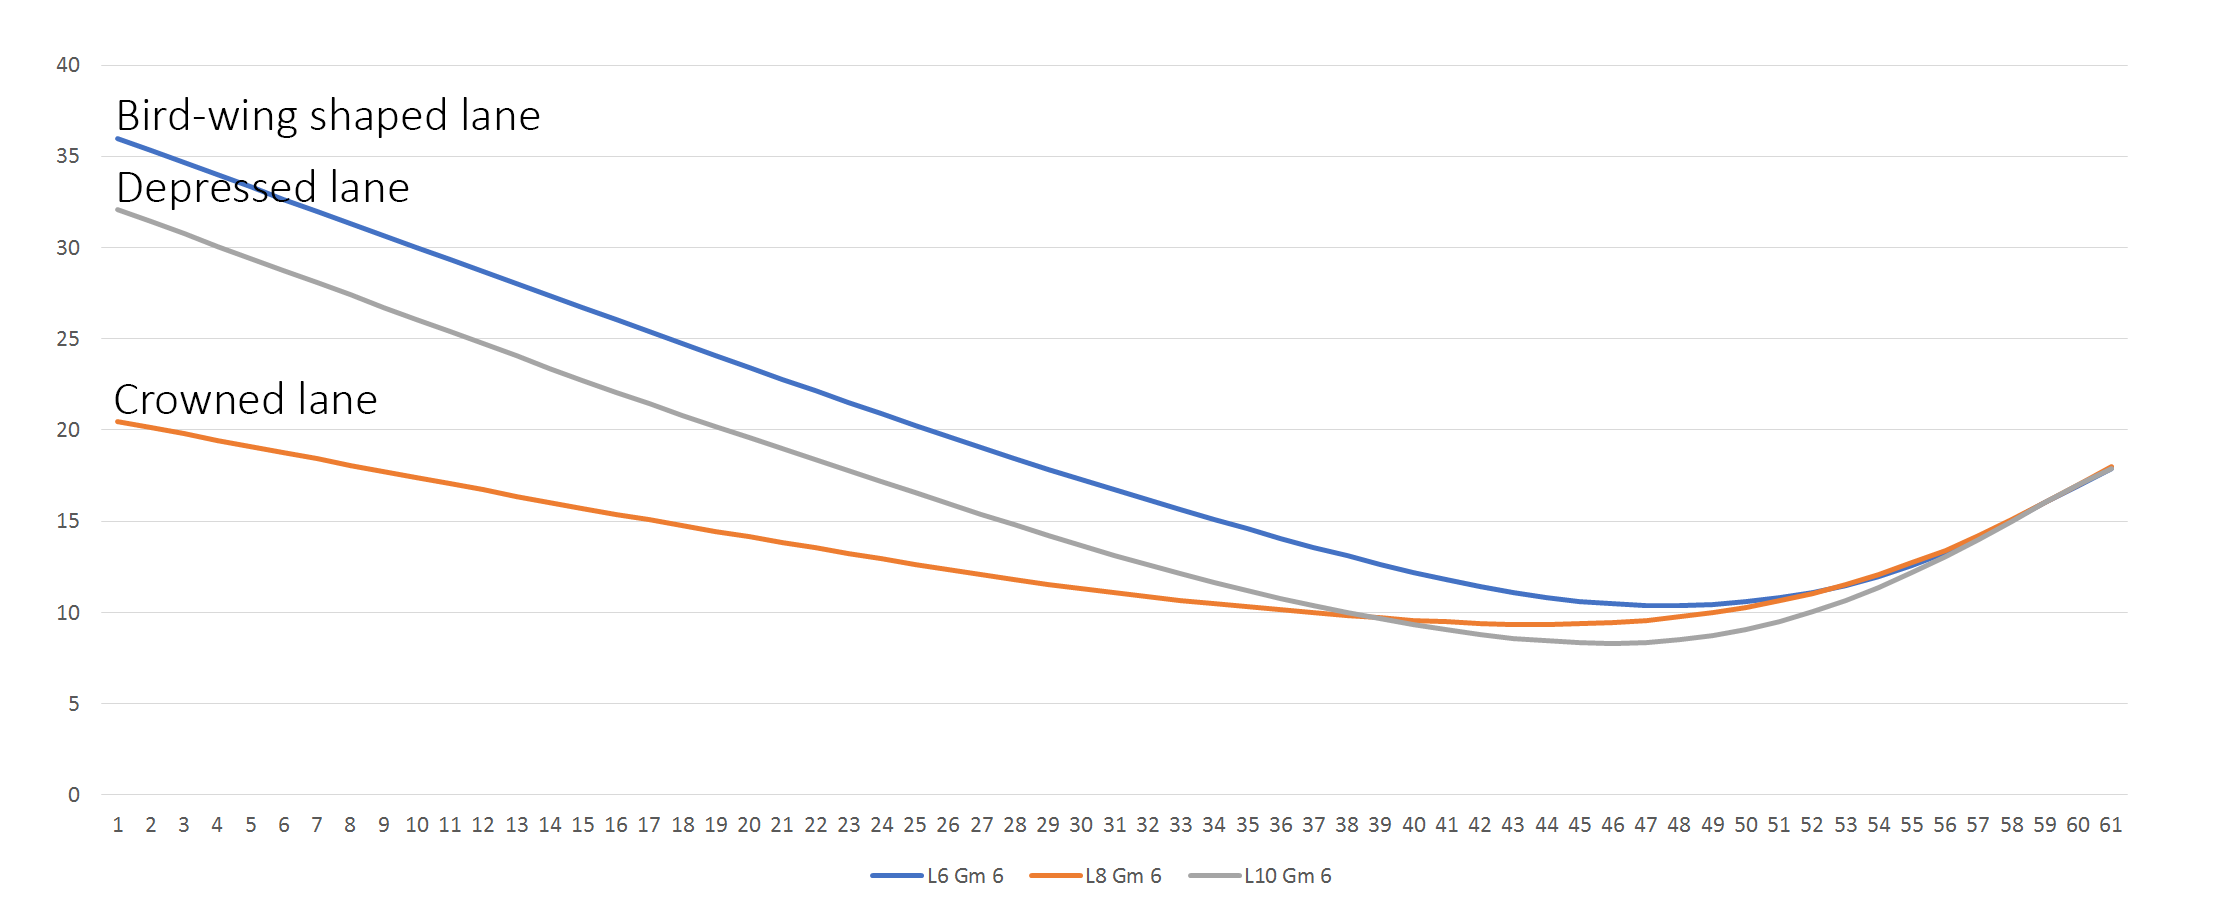
Specto showing the average right-handed ball paths during game six of all three lane shapes
Just like the depletion data showed, the players were most inside on the bird-wing shaped lanes in order to stay away from the hang area and to control the pocket. On the depressed lanes they had more “free hook” so they could swing the ball out farther. And on the crowned lanes, they didn't have to move deep inside so they stayed to the right much farther and played a tighter line.
So there we have it – the same oil pattern, applied at the same time with the same lane machine, using the same oil and cleaner, on the same lane surface, with the same bowlers, but three different lane shapes causing that oil pattern to play different, and break down significantly different.
Topography has been a buzz word for a few years now and we’re really seeing how influential it is, and how it affects lane play. For instance, want to know which part of the lane your ball is influenced by topography the most? Or how different ball rolls are affected by these slopes on the lane surface?
We’ve watched enough over the years to make some conclusions which are not only backed up by results but by physics. Stay tuned, the answers will be enlightening…
5 Must Know Things about Oil Pattern Taper
Oil pattern taper, the amount of lane conditioner in the front part of an oil pattern versus how much is at the end of the oil pattern, has had to change significantly as bowling ball technology has changed. Lane conditioner (lane oil) has two main functions; to protect the lane surface, and to provide smooth predictable ball motion for as many styles as possible.
1 - History
When bowling balls were balanced, the rotation of the bowling ball was very stable and there was essentially one oil ring on the surface of the ball. Front-to-back oil taper with balanced balls is very different than what is needed with modern high flaring balls, which have multiple oil rings on them.
Remember, with high flaring balls, the oil pattern breaks down from back to front and with low flaring balls it’s the opposite, oil patterns break down from front to back. As a refresher, here is an article on that explains how oil patterns breakdown differently between the two types of bowling balls: Breakdown and Carrydown – Then and Now.
At the same time that bowling balls were going through changes, lane surfaces were also changing – “it’s very hard to hit a moving target” was something John Davis used to say often when referring to the art of lane conditioning.
As we have shown often in seminars and online articles, regularly maintained wood bowling lanes are the most consistent type of lane surfaces from lane-to-lane, and bowling center to bowling center. There may be some lengthwise level differences from center to center, but the overwhelming majority of wood lanes were cut with a slight depression, which allowed statements like “the oil pattern taper should be 3:1” to be more valid.
With synthetic lanes however, lane shapes are all over the map, and blanket statements about front-to-back taper, or any oil pattern statement for that matter, can often do more harm than good for people trying to find the best solution for their bowling center.
In measuring hundreds of bowling centers around the world with the Kegel LaneMapper we have found the lanes in any one center follow the same trend as it relates to lengthwise levelness. The only exception to that rule is when bowling centers have added sections of lanes over time.
So if we simply talk about oil pattern taper as it relates to the lengthwise level of a bowling lane, if a lane went downhill we could easily increase the front-to-back taper ratio to help the ball slow down to achieve “good ball motion”. Conversely, if the lanes in a bowling center predominantly go uphill, we might decrease the taper of the oil pattern so the ball would slow down less in order to provide good ball motion for the majority of bowlers.
When lanes were made of wood and resurfaced often, and bowling balls were essentially balanced, it was that simple – but not today.
Today’s synthetic lanes can be crowned, they can be depressed, they can be depressed up front and crowned down lane or the opposite, they can be high right, high left, and anything in between. We very often have seen synthetic lanes that are shaped like a seagull wing; crowned outside and depressed in the middle.
Add the fact that your customers have bowling balls that are still balanced (low flaring) to the very unbalanced kind (high flaring), providing that perfect front-to-back taper can be a challenge.
Of course your daily house pattern is most important for your center, and getting that one pattern “right” can be accomplished, but applying a tournament pattern, or one of the many named patterns out there, and having players expecting it to play similar from center to center is like expecting to win the lottery.
2 - House Shot Patterns (Recreational Type)
Most daily patterns used in bowling centers around the world are of the easy variety – a lot of conditioner in the middle and not much outside. For these type oil patterns, it is most important to control the amount in the mid lane and at the very end of the pattern to 1, minimize carrydown and 2, to open up the outside portion of the lane.
The graphic below is of a typical oil pattern taper when only non-flaring balls were in use. The goal then was to protect and apply conditioner only in the head area and let the conditioner “bleed off” the oil transfer system the rest of the way down the lane to the end of the oil pattern. From 8’ to the end of the pattern was typically a front-to-back taper ratio of 3-4 to 1 and that was with a maximum of 20 units in the head area!
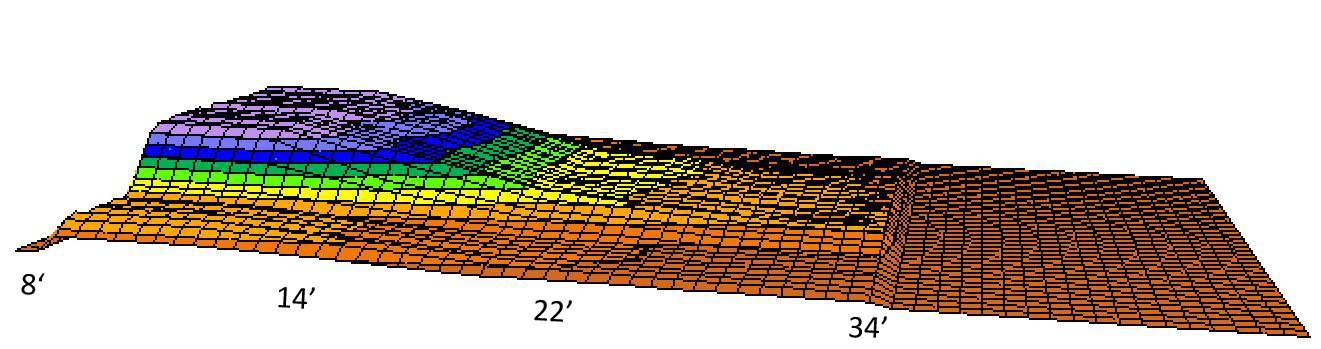
Today’s oil patterns with today’s high flaring balls require a different type of taper, and much more volume. If we start with 80 plus units in the heads, there might still be 50 plus units in the middle to the 30 foot range. We do this in order to provide the bowler with a lot of hold area and decent ball motion, along with providing durability to protect the lane as long as possible.
To get that amount of oil throughout the pattern, the buffer brush must be loaded much more throughout the oil pattern with possibly a much more drastic drop off of conditioner towards the end part of the pattern. The amount towards the end of the pattern should decrease at a rate according to the type of lane conditioner in use and/or lane topography.
Below is an example of a typical daily oil pattern taper using high flaring bowling balls. As you can see, much more conditioner is used throughout the entire pattern.
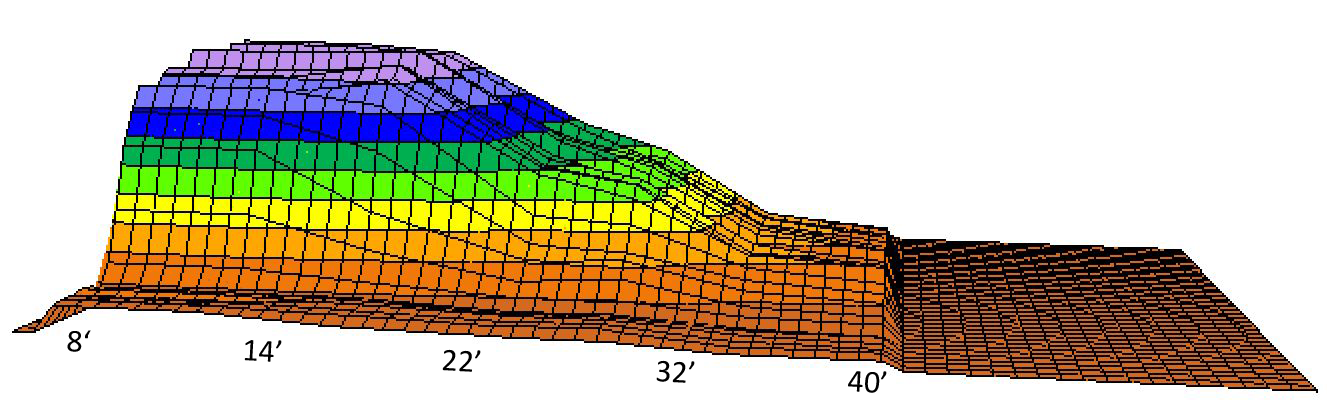
The outside portion of the pattern has very little conditioner because most centers want to provide the bowler with a lot of mistake area outside of target. So even though we may want some taper there to allow the straighter player to start more to the right, most are concerned about not having too much conditioner towards the outside area in order to provide the largest margin for error possible.
3 - Challenge and Sport Oil Patterns (Competitive)
When designing competitive oil patterns, the goals of a specific oil pattern can vary greatly. If the pattern must play good on the fresh, because of a match-play format for example, finding that perfect taper for game one might be in order. That type pattern will usually be a higher front-to-back taper ratio in order to get the ball to read the lane sooner within the oil pattern.
If the goal is for the pattern to keep players in a specific zone for a longer time, front-to-back taper might not be as important as making sure the end of the pattern holds up for more games. That type of pattern would most likely have much less taper and play more difficult on the fresh, and then become easier as depletion towards the mid and end part of the oil pattern occurs.
A perfect example of an oil pattern with very little front-to-back taper is the 2015 US Open pattern that was used in Garland Texas. The amount of oil in the middle at 8’ on this pattern proved to be in the high 50 unit range, at 22' in the mid 60 unit range, and at 2’ before the end of the oil pattern (41') was in the mid 30 unit range. The front-to-back taper in the middle of that oil pattern was about 1.75 to 1 from 8' to 41', and 2 to 1 from 22' to 41'.
Below are two graphics of the 2015 US Open oil pattern – the 3D and 2D graphs. Lane tapes were taken at 8, 14’, 22’, 27’, 32’, 36’, and 41’.
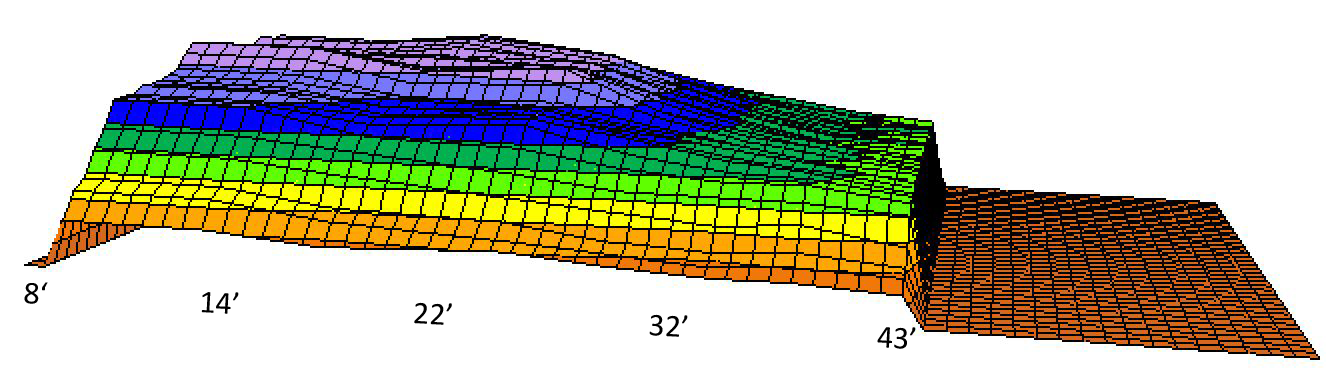

The pattern goal of that event was to try and keep the players from lofting the gutter, which was accomplished, but we cannot discount what was done with topography at that venue as well. Our studies show topography is always a factor in how oil pattern plays, develops, and breaks down. In this case, the USBC made topography public so we know lane topography definitely was an additional reason the pattern held up so well. (The why will be a future article!)
4 - Lane Conditioners
The lane conditioner you choose also must be factored into your oil pattern’s design. Lane conditioners are developed with specific characteristics and your oil pattern should complement those characteristics in order to benefit from them.
For instance; FIRE and ICE were created for increased durability and both require less conditioner at the very end of the pattern than many of our previous conditioners. If there is too much conditioner at the end of the oil pattern the ball will read the carrydown much more than if, for example, the same amount of Prodigy was at the end of the pattern.
If using our newest lane conditioner, Curve, more conditioner can be applied at the end of the oil pattern simply because it’s a higher friction conditioner, and that will help the ball slow down. Also, the ball won’t “see” what is carried down beyond the oil pattern as much as it would with FIRE or ICE. The trade-off however is durability.
5 - Topography
Now that we have those other factors covered, we can touch base on topography some more and how lane shape affects oil patterns. As we touched base earlier, wood lanes have very similar topography; all are slightly depressed (lower in the middle than the outsides) with the main differences from center to center in lengthwise levelness.
Yes we have more wear issues with wood lanes, which can be corrected with a resurfacing or re-coating, but with synthetic lanes we have more diverse shapes on the lane than ever before in the modern history of the game. Those shapes can vary from lane to lane, and even within the same lane. This makes finding that perfect oil pattern on synthetic lanes across any one bowling center more challenging than ever.
For lanes that are predominantly crowned, lowering the amount of conditioner in the mid lane and at the end of the pattern will help the ball lose energy at the proper rate, which will help provide truer ball motion. Crown lanes tend to act like lanes that go downhill, so anything you can do to help the ball slow down will help your bowlers with good ball motion.
For lanes that are severely depressed, and if you wish your bowlers to play right of center, additional conditioner in the mid lane and at the end of the oil pattern helps reduce friction slightly, and therefore helps the ball not lose energy as quick. Think of depressed lane like a banked curve on a race track – the inside part of the lane is lower than the outside part of the lane so the ball is rotating up the hill causing it to use energy quicker, along with normal force helping the ball move more to center.
For seagull wing shaped lanes, and believe us when we say there are many overlays like this, shorter patterns will need increased front-to-back taper in order to get the ball to read the lane earlier. Yet longer patterns on this lane shape will need less taper simply because from 10-10 the lane is depressed - once the ball gets towards the middle and end part of the pattern it sees the lane more, and sooner, as the oil depletes.
Conclusion
In the article titled Breakdown and Carrydown - By The Numbers, we showed how today the front part of the lane never really depletes to the point of excessive friction unless there is a major wear issue – it’s the mid lane and backend that deplete to the point of the ball seeing a great amount of friction.
Sure the front part of the pattern depletes, but if we start with 70-100 units up front, or less like in the US Open example, at the end of play there is still 30 to 40 plus units of conditioner in the front part of the lane, which is plenty to provide a low amount of friction.
In addition, that part of the lane the bowling ball has the least amount revolutions and the most amount of speed - both of those attributes make the ball “see the lane less” than it does at it slows down and revolutions increase.
The point is, front-to-back taper ratios with today’s patterns is not as important as controlling the amount of conditioner in the mid lane and at very end of the pattern.
If you get that correct in your center, the majority of bowlers in your center will have predictable and controllable ball motion, and back end change (carry down) will be minimal. And for the most part, hopefully, you will have happy bowlers.
Balance Approach All-In-One: What, Why, and How
Giving your bowlers consistent approach conditions from day-to-day may often seem like rocket science. There are a plethora of approach cleaners and approach conditioners on the market. And, there are an abundance of tools to help you in your quest for consistent approaches. Which ones to use; that’s the real question.
Approach cleaners help remove dirt, spills, sticky materials, and other foreign residues from the approach while approach conditioners leave an invisible film that helps reduce the coefficient of friction giving more slide-ability to the approach. These products are often great; initially. But, after a game or two, the film in the slide area gets worn and causes inconsistency between the slide-area and the corners. When this happens, the slide-area is tackier and the sides are slicker (or vice versa) leaving the bowlers with, yet again, inconsistent approach conditions.
We developed Balance with this in mind. We wanted to create a product that was simple to use and that would create a consistent slide environment for bowlers. We also wanted to create a product that would clean and condition the approach in one step.
With Balance, you no longer need a separate approach cleaner and approach conditioner; it’s an all-in-one product that can solve many of your approach problems.
Balance is gel formula that must be applied with a rotary buffer and a buffing pad. A thin bead of Balance is applied parallel to the foul line and about six or so inches in front of the foul line. Using a rotary buffer and the white or green-striped buffing pad, Balance is buffed into the approach beginning at the foul line, working backwards towards the ball return and then back to the foul line. While buffing, there is a visible film that appears. Once the film is no longer visible, the approach is complete.
The buffing pad can be used for multiple lanes. However, once the pad gets saturated, you will need to either flip the pad or use a new one. You can easily tell when the pad is saturated as it will take a long time for the film to disappear, if at all.
Balance won’t leave your approaches slick or tacky. Rather, it evens the sliding environment to make the approach consistent from gutter to gutter. It is recommended to be used weekly or as needed. Because it cleans the approaches and conditions them simultaneously, Balance eliminates the need for multiple products and saves you time by eliminating multiple steps in the approach maintenance process.
Approach maintenance no longer needs to be a difficult task that leads to consistently inconsistent approaches. With Balance, one product cleans and conditions your approaches helping you achieve even sliding approaches across your house while simplifying approach maintenance.
Synthetic Approach Maintenance
Let’s face it; approach maintenance can be a sticky, or slippery, business. There is a fine line to walk when trying to keep the approaches as consistent as possible. Some products offer too much slide causing bowlers to slip while other products can leave behind films and tacky residues that could cause bowlers to stick. Both scenarios are a recipe for disaster that could lead a bowler to an unplanned “Machuga Flop”. And while a flop can be funny, we all know it can hurt and it’s uber embarrassing. But, what is a bowling center to do? How can you maintain the delicate balance of not too slick and not too sticky? We’ve got the answers to your approach maintenance questions.
Some history
Before there were synthetic approaches, all approaches were made of wood and coated with a finish that allowed for proper slide. The only real maintenance to be done to these approaches was the occasional spot cleaning for spills and sticky marks and daily dusting. Then, once every year or so, the approach needed to be sanded and recoated to “refresh” the finish. Wooden approaches have a fairly even slide as long as the finish isn’t worn down. Once the finish started to wear, the approach could be spotty. Generally though, this was just an indication that it was time to refinish the approaches.
Synthetic approaches were introduced when synthetic lanes were introduced. Synthetic approaches were virtually maintenance-free since they eliminated the need for refinishing - or so it was thought. Synthetic approaches came with their own set of problems.
Think of synthetic approaches like your kitchen countertops; not the granite, marble, Corian, and fancy varietals, but the Formica and laminate variety. Layers of materials are pressed or bonded together and an outer layer with the approach image is pressed or bonded to the top. The top layer on which a bowler will slide is often textured and porous. This means dirt and residues can get into those tiny pores and cause build-up. It also means that repeated sliding in the middle of the approach can wear down the texture and cause inconsistencies in the slide-ability of the approach from the middle to the sides.
Because of these issues, a variety of different products and procedures have been developed to help bowling centers maintain their approaches. And what was once billed as an approach that was basically maintenance-free has now become even higher maintenance.
So what’s the right way to maintain synthetic approaches?
If I were to ask 50 different people the proper way to maintain the approach, I’d likely get many different answers. There would be variations of cleaning techniques that used various cleaners and solutions and even just hot water. There would be dust mops, wet mops, buffers, and spot cleaners. The only consistent thing would be that bowlers still complain and the approaches are inconsistent. It’s a vicious and never-ending cycle.
Synthetic approaches require temperature and humidity control. I did some digging, well, Googling, and I found that humidity over 50% can cause approaches to be tacky. We all know tacky isn’t good when trying to slide. To combat this, having some temperature control in the bowling center is absolutely necessary. Additionally, having circulation that pulls or pushes moist air away from the lanes/approaches can help keep moisture from the air from settling onto the approach. The optimal humidity is around 40%.
Dusting the approaches is a necessary task. Dust can settle on the approach and get embedded in the pores. Aside from just causing the approach to look dirty, dust can cause inconsistent slide-ability as well. Dust can cause approaches to be slick and, well, too slick is just as bad as too tacky.
Spills happen
It’s important to clean the spills and wipe away residues. Lane conditioner, soda, beer, and an infinite number of other materials can be spilled on the approaches and every one of them can cause sliding issues. When something is spilled on the approach, wipe it up as soon as possible with a clean, dry cloth. Use a weak dilution of cleaner to remove any sticky liquids. Go back over the area with another clean towel and some IPA (isopropyl alcohol). IPA is very good for removing sticky residues and leaves no residue behind of its own. It isn’t a “cleaner” but it will help remove sticky residues.
Clean those carpets and floors!
The carpets and flooring areas around the bowler’s circles must be kept clean as well. Wax from tiles and residues from carpets and carpet treatments can stick to shoes and can easily be tracked onto the approach. It’s just as important to keep the non-bowling areas clean as it is to keep the bowling areas clean. And, be careful what products you choose for cleaning. Many cleaning products leave behind residues and, as I said before, the residues can easily be tracked onto the approach.
The quest for consistency...
When all of this is done, sometimes you still need some help getting consistent slide on your approaches. There are many products on the market designed to help you with this. Unfortunately, so many of the products available have their own sets of issues. When sprayed, they can get on the lane surface and cause issues with the lane conditioner and pattern.
Dust type products can leave dust residue on the lane and the residue can settle in nearby areas. Some products have to be used very sparingly or the approach can end up being too slick. Some products work great when you first use them, but then after a couple of games, the approach is inconsistent again because the product has “worn off” in the slide area leaving the outsides slick and the slide area tacky.
All of this can be a big frustration. And, it’s one of the common complaints that we hear when dealing with approach questions. People just want a process that is simple and they just want the approaches to be consistent. In fact, I’ve heard from many bowlers that they wouldn’t mind the approaches being a little on the slick side or even a little on the tacky side as long as the approaches could be consistent from the ten pin side to the seven pin side. Bowlers can adjust for a little more slide or a little more stick. But, it’s nearly impossible to adjust when there isn’t any consistency across the approach.
To sum it up, synthetic approach maintenance can be tricky. It can be time consuming and tedious. And, with all of the approach maintenance products available, it can be downright overwhelming. But, the good news is, it doesn’t have to be. Giving your bowlers consistent approaches doesn’t have to be such a mind-boggling task. You can give your bowlers the left-to-right consistency they want on a day-to-day basis with Balance, Kegel’s new synthetic approach maintenance product. To learn more about Balance, click here.
Tech Tip: Interlock Probe
Over a period of years, especially if the mounting bolt has been running loose, the probe can begin to bind if bolt is tightened completely. To correct this, add a #10 s. a. e. flat washer on each side of the spacer. This will give new meat for the spacer to tighten against and will decreases surface tension for the bronze bushing.
Note: This is also handy to convert the old style X-washer pin to the bolt and spacer. Just add a long link bushing to each side to bushing up and a washer on each side.
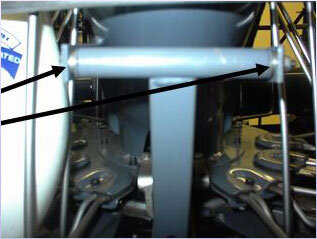
Tech Tip: Interlock Probe Measurement: Pin Release Lever Set-up
In order to ensure the pin release lever is bent/formed correctly and has not become deformed over time, you must first determine what style of lever you have. You can do this by measuring around the outside. The newer versions measure 9 1/8“. If you have an older version, you can simply cut it down to correct length. Put a nice bevel on the cut lever.

Second, you should confirm that the measurement from outside to outside edge is 5 1/8”.
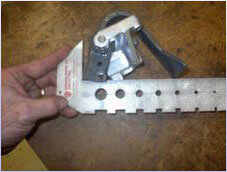
If you need to spread the lever you can lay it against a closed vice (as pictured) and spread the lever using a rubber or plastic hammer/mallet, but be very careful. To make the adjustment smaller, you can compress in a vice using small increments and re-measuring after each compression.
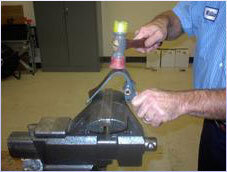
The Truth About Tournament Oil Patterns and Conversions
At Kegel we get many requests for converting oil patterns to and from different lane machine technologies. Sometimes it can be for a specific tournament pattern or it may be a named oil pattern. Although we fully realize the intent, we also know that there are many factors other than the oil pattern that determine ball motion, and how easy or difficult lanes play.
One technical reason some oil patterns cannot be converted is simply because some lane machines do not have the capability to apply an oil pattern exactly like the machine it was made for. A few of the new longer Landmark Patterns are good examples as these patterns were designed specifically for the FLEX lane machine.
For example, the Eiffel Tower is a 48 foot Sport pattern and with the variable buffer speed upgrade feature the FLEX has, the last seven feet utilizes a buffer speed of 200 rpm which applies a very light film of conditioner in this zone. If a lane machine does not have the variable buff option the buffer will be rotating at 500 rpm, and apply more conditioner to that zone, making the pattern play much tighter that it was intended to play. That doesn’t mean you can’t have fun if applied with other lane machine technology or the pattern will be terrible, it just won’t “play the same”.
However, even if the oil pattern is matched up perfectly from one technology to the next, there can still be differences in types of conditioners used, cleaner type, cleaner dilution, lane surface friction, and lane surface topography. Even bowler differences (who you will follow at the tournament) from your home center to wherever that tournament pattern will be used at can have a huge impact.
For instance, some lane conditioners play slicker or allow the ball to pick up earlier than other conditioners, some conditioner’s carrydown affect ball motion more than other conditioners, and some lane cleaners leave more residue behind than others causing different amounts of back-end hook. The dilution ratio, the amount of cleaner to water mixture, also affects ball motion, especially at the back-end.
For lane surfaces, conditioned wood lanes tend to hook more and earlier than conditioned synthetic lanes. Higher textured synthetic lanes tend to have an “arcing” ball motion, while smoother synthetic lanes tend to be more “skid-snappy”.
When practicing on a tournament pattern at home, you may be all alone or with a small group with similar styles. We know in today’s bowling environment using today’s equipment, it doesn’t take very long to change that oil pattern into something else simply by rolling balls down the lane. Once at the tournament site however you will be following a much more diverse group of styles, which may very well transform that oil pattern into something different.
It’s not even uncommon for us to see the scoring pace change from different squads in the same tournament using the exact same oil pattern just by the style of bowlers on specific squads, or even by the type of bowling balls used by the participants on different squads!
Topography is also a huge variable when it comes to how a ball hooks (how a ball depletes energy) and how much it hooks. A portion of a lane sloped opposite the rotation of the ball will cause the ball to lose energy quickly, while a portion of a lane sloped with the rotation of the ball will cause the ball to lose energy slower. These slopes on the lane surface can also help the ball move more easily towards the pocket, or make it more difficult for the ball to move towards the pocket.
A textbook example of how lane surface and topography can affect scoring pace is from the 2014 and 2015 Teen Masters. In this event, many of the participants played both years, all players use the same type balls, the same oil and cleaner were used, and the long oil pattern was exactly the same both years, so we can discount all those variables.
However, in 2015, the event was held at a newer installation and the lanes are predominately shaped with a certain type topography that is known to produce high scores; the overall scoring pace was 20 pins higher in 2015 than in 2014 and an abnormal amount of 300 games were bowled. The 2015 environment also benefited some players more than others as averages between the two events were 40 pins higher per game in 2015 versus 2014, for certain styles of play.
Kegel has mapped thousands of bowling lanes around the world and we have yet to find two lanes that have the exact same measurements with regard to lengthwise tilts, crosstilts, crowns, and depressions. We also have yet to find a perfectly level lane. It could be said that bowling lanes are like finger prints; no two are the same.
Therefore, perfect and exact pattern oil patterns, or conversions, GUARANTEE that ball motion will be different at home versus where you will play on that pattern at whatever event you are going to.
A good coaching tip is to practice on a competitive type oil pattern that has a similar distance to the tournament pattern you will be bowling on. This type of preparation will help you to keep an open mind and to be flexible when you arrive at the tournament site. It is easy to get overly caught up in oil patterns with all the information and focus on oil patterns today. Unfortunately, more often than not, this closes the mind and shifts focus to “what should be” instead of “what might be”.
In conclusion, if you are practicing at home on a tournament oil pattern, and planning on competing or coaching in that tournament, take that oil pattern with a grain of salt and keep your mind open - very open. We can just about guarantee things will be different at the tournament site than at your home center.
GS Tech Tip: Chain Gear Modification (47-075474-004)
The Setting Tale Chain Gear can, through stress, shear the key on the Drive Shaft. A recent modification added two sets screws to attach the gear to the shaft to prevent shearing. However, an optional solution would be to drill a 1/4" hole through the gear and shaft 90 degrees off of the keyway and install a 1/4" roll pin.

2015 USBC Open Championship Oil Pattern Program Sheet
This month’s Inside Line feature article is about key items on the KEGEL FLEX program sheet of both the Team event and the Singles and Doubles event oil patterns for 2015 USBC Open Championships.
Oil Pattern Distance
Oil pattern distance is one of the main key items to look for on any program sheet. The distance tells us how much dry back-end area is within any one pattern and can give us a good idea of where to play on the lane, providing the lane surface is fairly neutral. Essentially, the shorter the oil pattern is, the farther towards the outside portion of the lane one should play, and the longer the oil pattern is, the farther inside a pattern might play. Of course there are other variables that can affect this theory; like the amount of conditioner on the outside portion of the lane, the shape (topography) of the lane surface, and the friction of the lane surface. However, knowing the distance of the oil pattern, and how it affects your particular style of play, can help you line up quicker than not knowing this important pattern detail.
The distance of the oil pattern can be found at the top left corner of the KEGEL FLEX program sheet.
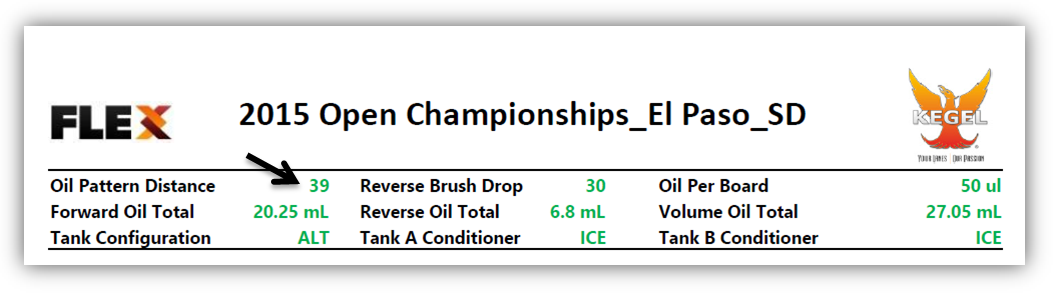
Oil Per Board Value Number
The Oil Per Board value, found at the top right of the FLEX oil pattern program sheet, is the size of the oil stream in microliters - the higher the value, the larger the oil stream, and the larger the stream, the more conditioner is applied to the lane.
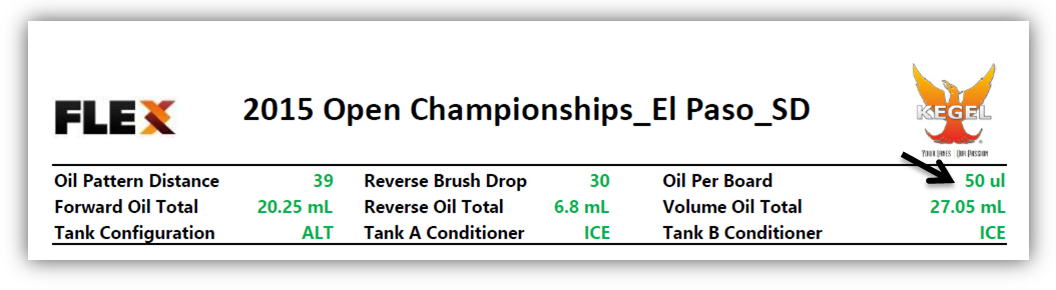
Number of 2-2 Loads
The Number of 2-2 loads can often be a measure of difficulty. Think about these loads as the base of the oil pattern and all loads inside of the 2-2 loads are the shape of the oil pattern. The more 2-2 loads the more difficult an oil pattern will play because once there is a certain amount of conditioner across the entire lane surface, the shape of the oil pattern becomes less relevant.
At this year’s Open Championships, the 2-2 loads make up 12.95 milliliters of the total volume of the 27.05 singles/doubles oil pattern and 14.80 milliliters of the total volume of the 26.90 milliliters team event pattern. In comparison, in most house patterns the 2-2 loads make up 3.7 milliliters of the total volume of the pattern which is in the 22 milliliter range.
The 2-2 loads are normally the first loads on the forward pass and the last load before the buff line in the reverse pass.
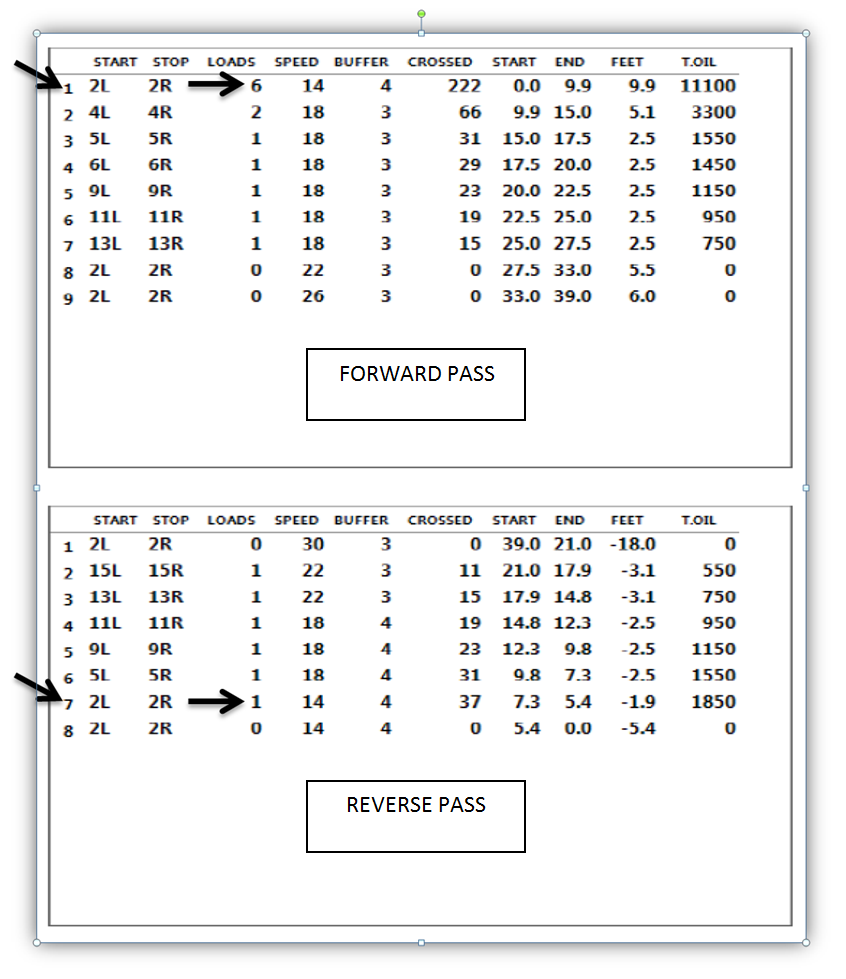
Buffer RPM
The FLEX lane machines in use at this year’s championship have four buffer speed options, which are noted on the program sheet by the numbers 1, 2, 3, and 4. Number 1 is what we call slow buff, and it has a speed of 100 RPM. Number 2 is medium buff and has a speed of 200 RPM. Number 3 buffs at 500 RPM and is the default speed that is used on previous models such as the Kustodian ION and Kustodian Walker. Number 4 is high buff and has a speed of 720 RPM. (Note: Individual FLEX owners can customize the buffer RPM settings for their needs, so you may see different numbers on different program sheets.)
The different buffer speeds on the FLEX allow us to do a couple things; one is it allows us to fine tune the front to back taper of the oil pattern without changing lane machine drive speeds. The other is it allows us to condition the lanes in less time by allowing us to apply more conditioner in the front part of the lane without slowing the machine down, as we would have to do in machines with single speed buffer motors.
In short, the faster the speed of the buffer brush, the more conditioner can be applied in any one section of the oil pattern. Conversely, the slower the speed of the buffer brush, less conditioner will be applied to the lane surface.
You will notice on this year’s championship patterns the choice of using buffer speed 4 in the front part of the oil pattern on both the forward and reverse pass of the pattern. Medium and slow buff is not used in this year’s patterns.
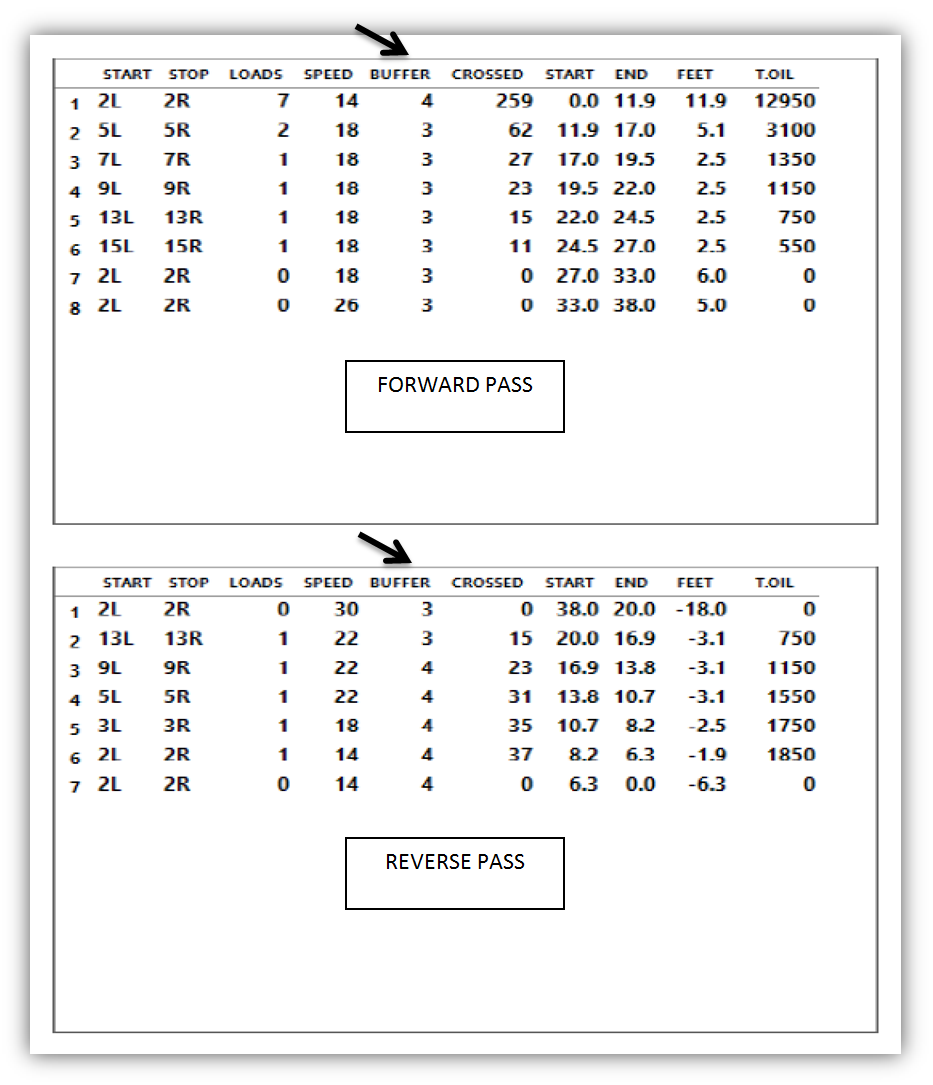
The Load Structure
As previously mentioned, once there is a certain amount of conditioner on the lane the load structure becomes less relevant. However, one thing to note this year compared to recent years, and a house pattern, is how none of the loads are “stacked up”. This means the inside load streams are spread out across the oil pattern which makes the pattern a simple blend, or crowned oil pattern (See graphics above).
Because of this type load structure there is not a defined oil line anywhere throughout either the Team or Doubles/Singles event patterns which places a premium on consistent shot making and accuracy. Only once bowling begins, and depletion takes place, can an oil line be developed if, and that is a big if, everyone plays in the same place from the beginning of practice to at least through the first few frames of game one. This is called “managing the oil pattern” in modern bowling vernacular.
This year’s USBC Open Championship should prove out to be one of the lower scoring championships in recent years simply because of the flatness of the patterns. However, it should also prove out to be one of the most competitive because when scores are lower, the gap between the higher scores and lower scores is much narrower.
In closing, if you have not already made the trip to El Paso, practice your spare game, have a good game plan with your teammates, and let your ball be your guide.
"Is Your Center Fundamentally Sound" The View from a Coach
As a coach that travels the country for a better part of the year, and walks into unfamiliar bowling centers on a weekly basis, I hope to shed some light on what a coach really sees in your center, and what you can do as a mechanic to help bring tournaments back to your center year after year. Sitting in a hotel room now writing this, many thoughts run through my mind about what the start of a tournament tomorrow will bring.
Walking though the doors tomorrow I will immediately walk over to our starting lanes. A quick glance of the lanes themselves will give me an idea of how the mechanic prides himself on his daily duties. The first things I will look at are the gutters (not because we will be in them all day), then approaches, and finally the first foot of the lane surface. You may be shaking your head by now, but take a second to think about something… Freshly dusted gutters tell me someone cares about their job and how their center looks to newly invited guests, as do approaches that are spotless, and the fact that someone took the time to clean the first foot of the lane that the machine can not clean.
As the pinsetters fire up for open practice, every lane my players bowl on, they check the foul lights. A foul can be the difference between winning a match or losing by a stick. Did the mechanic take the time to check and inspect every unit before competition started? Since our practice is 20 minutes across the house and followed by ten minutes on our starting pair, I take the first half of the open practice to write in my notebook taking notes on lanes that set pins off spot on full racks, pins that wobble on a 2nd ball cycle, other players that are having sliding issues and how this can affect my team during a tight match where a key spare needs to be made. Your goal as a mechanic is to never give me the right to use my pen.
My ears are trained as a mechanic myself, I don't want to hear multiple calls to the back, nor do I want multiple malfunctions to hinder our fast paced style of play. Bowling for 6 hours and being on our feet all day is long enough without the hassles of waiting for multiple stops on multiple lanes. Believe me when I say at the end of the day I hear all of the good and bad from a variety of coaches on how a center runs. Most coaches are bowlers, and bowlers don't understand the mechanical side of a pinsetter. They expect it to go up and down, return their ball, and work perfect every time they throw a ball. As a mechanic you should provide that experience to the people that are helping to pay your wages.
Take the time in the weeks prior to your event and check your pin spots. Go through a morning routine and reset all of your lanes using the reset button to make sure it works, and watch your racks to make sure all pins are set on spot on a first and second ball cycle. Turn the foul lights on and check them your self and correct any problems you may find. Check all of your hand dryers to make sure they work properly. This will cover most of the front-end things that we see as coaches and competitors, but take it a step further. Inspect your kickbacks for screw heads that may cause ball damage as well as your ball tracks and any transitions (nothing is worse than scoring well and having a screw head take out part of your thumb hole which takes that ball out of your line-up, been there and have the t-shirt). Make sure your parts inventory is stocked so one small part doesn't make a lane go black for the weekend. Go over your stop sheets and make hot lists to fix any minimal problems such as nagging 180 stops, ball returns, or dreaded blackouts. On the day of competition get to the center in time to clean your gutters, clean your approaches, and take pride in doing your lanes and cleaning that first foot that your reliable lane machine can't get to.
In a coaches eye, I don't want to use my notebook to document off spot pins or approach issues, I want to use it to record my moves and ball changes to better me through out my competition weekend. I want to spend my time focusing on my players and their games, not what I would have done as a mechanic to make things better. If I can spend my entire day focusing on how to make my players win, then your bowling center is fundamentally sound and you have the coach's approval.
How can a simple water filter become so clogged?
Anyone that maintains lane machines knows how critical routine maintenance is. But one item that often gets overlooked in lane machine upkeep are supply tank filters - the filters in the oil supply tank, filters in the cleaner supply tank, and now with the FLEX lane machine, the water supply tank filter (see help video below). In this feature article of the Inside Line, we’ll focus on the water supply tank and how those filters can become clogged over time, even though it’s "just water".
Most people are aware that all water is not created equal. Water can be hard or soft, and have different levels of calcium, phosphates, nitrates, sodium, potassium, and chloride, along with some uninvited guests depending on the water treatment plants. These substances are known as Total Dissolved Solids (TDS).
TDS is a measure of the “combined content of all inorganic and organic substances contained in a liquid in molecular, ionized, or micro-granular suspended form.” In layman’s terms, TDS is a measure of the amount of the stuff in the water you can’t see.
Knowing the TDS is all well and good but, how will this affect your lane machine filter?
Well, when water sits around, you know that mold and fungus can grow on the water’s surface. The water can become very pungent; you can actually see things growing and the water color changing. Think about bird baths and small fountains that don’t have running water; the stagnant water eventually turns rancid from mold and fungus growth.
When water sits in a container for long periods of time, a bio-film will eventually begin to form. Bio-films form on surfaces like tank walls and filters. Actually, they will form on virtually every non-shedding surface in a non-sterile or very humid environment.
On your teeth, plaque is a bio-film. In your cooling and heating system, bio-film forms reducing the effectiveness of the system. The slimy stuff you see on rocks and pebbles in streams is bio-film. In stagnant pools of water, bio-films can form on the surface.
Basically, a bio-film can form just about anywhere as long as there is a place for the cells to attach; the cells can attach to a solid surface or to each other.
So bio-films form in water, right? Well, why don’t bio-films form in bottled water at the grocery store?
Bottled water is packaged to prevent bio-films from forming. The bottled water you buy from the store is packaged under nitrogen pressure to force out the air. This prevents bio-films from forming in the water while it sits on the shelf. Once the bottle is opened and air is introduced to the system, the bio-film can begin forming. This is one reason why you shouldn’t reuse bottles from bottled water without thoroughly cleaning them.
Bio-film goes through five stages of development:
1. Initial attachment,
2. Irreversible attachment,
3. Maturation I,
4. Maturation II,
5. Dispersion.
The picture below shows how a bio-film develops through each of the different stages.
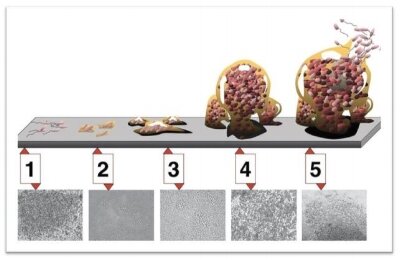
Five stages of bio-film development
Water quality in a specific location will dictate how fast a bowling center will have bio-film develop. TDS and the specific treatment methods used at the local water treatment facilities will change the water quality. Eventually though, every center will have to clean and/or replace their lane machine water filter at some time.
Just like your coffee maker at home, the water filter and supply tank should be cleaned periodically to prevent the problem. If you never clean your coffee maker, eventually the pump will fail. If you never clean your water supply tank in your single cup machines, a bio-film can form in the water tank.
At Kegel, we recommend removing and cleaning the water supply tank filter once a month. We also suggest flushing out the water supply tank at least every couple months, no matter how often you use your lane machine. The water is sitting in the supply tank the same amount of time no matter how many lanes you are doing a day – always.
This is what happens when filters are not maintained regularly:
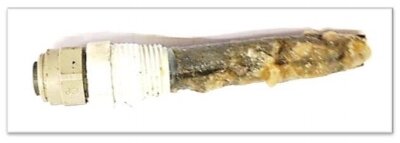
A filter that has not been maintained.
If periodic maintenance is not being performed on a simple item like your water supply tank and filter, or any filter for that matter, the liquid in the tank will not flow properly and that will change your dilution ratios. We know changing dilution ratios will change ball motion. But, improper cleaning can also lead to a host of other issues.
Just like Sanction Technology has done for the oil system with process verification, with Kegel’s sprayless cleaner system it's easy to check volume output for water and cleaner. As we always say, “it’s better to know than to hope”, and as any lane person will tell you, it's also better for you to find any issues before your bowlers do.
Does lane oil evaporate and how long should the oil pattern sit?
When it comes to lane conditions, every person has their own ideas as to what they think works best. Mechanics, proprietors, and bowlers all have a difference of opinion when it comes to dressing the lanes. Ask 100 different people and you’re likely to get 100 different answers. In bowling, it’s one of those topics that just seems to create a lot of controversy and a lot of differences in opinions.
Because of all these different opinions, we get many questions regarding what the best methods are for ensuring lanes are the same from day to day. Some of these questions stem from curiosity while others, like the one I got last month, stem from bowler controversy.
I was forwarded a message that came in from our website. The proprietor was quite frustrated at his bowlers because his bowlers felt like the lanes were getting conditioned too early and the conditioner was “drying up” before they ever started bowling. The proprietor tried to show the bowlers statisitical data in their score trends that suggested otherwise. But, the bowlers just didn’t agree. So, he asked “the experts”; how long can an oil pattern sit on a lane before it starts to deteriorate?
Modern lane conditioners; every lane conditioner available in today’s market; are all mineral oil based. Kegel uses pharmaceutical grade mineral oil in our lane conditioners so it is of the highest purity available. Mineral oil itself doesn’t evaporate. You could fill a cup with mineral oil and leave it sitting and it wouldn’t evaporate. Here is a link to a safety data sheet (SDS) for white mineral oil. If you look in section 9 (page 4 of the document), it shows the evaporation rate as ‘NA’. This means there is negligible or no evaporation of the material.
There are some chemicals in lane conditioners that will evaporate but these ingredients are minor compared to the percentage of mineral oil. For example, solvents such as isopropyl alcohol (IPA) are often used as an inexpensive way to lower the surface tension. Lowering the surface tension will allow the lane conditioner to wet across the lane surface more quickly. Once the lane conditioner is applied, the IPA would evaporate over time. Since lane conditioners are applied in such a thin film with a low volume over a larger area, we would estimate this to be in the 30 minute range at most. It does not take a lot of IPA to lower the surface tension so it is used in amounts of 1% or less. This evaporation does not affect the lane play characteristics that come from the mineral oil and the other ingredients that are used to give the conditioner its characteristics.
While we’ve never tested the theory of how long a lane conditioner could sit before deterioration begins, a lane pattern could sit, well, forever without deteriorating. That is, of course, in theory since we don’t have a time machine! There are other things; environmental and atmospheric conditions; that will affect lane conditions. But, the conditioner itself could sit for days on the lane and it would still be there; it isn’t going to evaporate away.
While we haven’t tested the ‘forever’ theory, we have allowed a freshly conditioned lane to sit for 24 hours. We took tapes from the freshly applied pattern and took tapes on the same pattern 24 hours later. The results: the tapes were exactly the same for both sit times. The conditioner sitting on the lane didn’t change as a result of evaporation.
Other things can affect the conditioners performance though. Dust from the air or from AC vents can be deposited on the lane. These particles can greatly affect the playing characteristics of the pattern. This is one reason that a good cleaning routine is so important. Applying lane conditioner to a dirty lane will also affect the playing characteristics of the pattern.
Atmospheric conditions like temperature and humidity will also greatly affect lane play and these are more likely the cause of changing lane conditions. Bowling centers see this a lot as the weather changes, especially when there are sharp changes from cold to hot or hot to cold. Bowlers will complain that the lanes are tighter or drier or something else but they don’t always consider the weather changes and that can affect lane conditions significantly.
Here are two previous Inside Line articles that address changing weather and lane conditions: The Weather’s Changing… Are Your Lane Conditions? and Lane Conditions and Cold Snaps.
How long a conditioner should be allowed to sit on a lane prior to bowling is a very common question. And, it’s one that we’ve gotten many times. While consistency is key, we like to support our arguments with science. So, here’s a little science behind conditioner application.
When lane conditioner is immediately applied to a bowling lane, several things must happen before the lane conditioner stabilizes enough to provide consistent playing characteristics. One is allowing the lane conditioner to adhere to the lane surface. This takes about 15-30 minutes depending on the amount of conditioner applied, the type of conditioner, the type of cleaner being used, and the surface energy of a particular lane surface.
The surface tension of the conditioner is also important since the surface tension directly affects how the conditioner “wets” across the lane. The conditioner needs to “like” the lane in order for it to wet across. If the surface energies between the two don’t agree, the conditioner will “sit up” on the lane surface (think of this effect as little beads of water sitting on the surface of your car versus the water sheeting off the surface of the car).
Another bonding takes place within the lane conditioner molecules themselves. These bonding forces, known as van der Waals forces, are basically weak attractions between atoms, molecules, and surfaces. The time for this to take place after conditioning a bowling lane is also anywhere from 15-30 minutes. The below video shows these weak bon
With the amount of lane conditioner being used in today's lane patterns, it takes about 15-30 minutes for the lane conditioner to "settle down" and stabilize on the lane. If time is not allowed for this process to take place, things like excessive carrydown can occur. The lanes may also play "tighter" simply because the oil is sitting up on top of the lane more and there is less resistance to the bowling ball as it rolls through the oil pattern. This is one reason; during tournaments where we provide lane maintenance; we always try to get the tournament organizers to allow a minimum of 15 minutes of lane conditioner "sit time" before the first ball is thrown down the lane.
The biggest key is consistency. It’s one of the things that we preach. Create a routine and stick with that routine every day. If you do the lanes an hour before league, do them an hour before league every time and you’ll eliminate that variable (and that complaint from your bowlers).
We hope this information helps you. If you have additional questions, please feel free to contact us. We will be happy to assist in any way we can. Until next time, happy bowling!
A 100% solids UV LED curable coating
Abstract
A 100% solids UV LED curable coating and the machine for its application/cure has been developed. The machine is equipped with a 395 nm UV LED. The coating is suitable for different flooring applications: VCT, hard wood, laminate, marble, terrazzo, concrete. Some of the applications such as hard wood, concrete and terrazzo floors require a 100% solids UV LED curable primer that has been developed as well. The resulting coating is scratch and impact resistant.
Getting your Pinsetter Ready for the New Season
Maintenance to your pinsetter is important to keep your center running smoothly. In this article, we will discuss some commonly overlooked maintenance items and some tips to help you prepare for your winter season.
Pin Damage
Sometimes pin damage can be easily explained as in the examples below, but some can be much more troublesome to find. Small marks and scratches can accumulate so slowly over a period of time that irreversible damage sneaks up on you and can handicap the appearance, as well as the performance, of the pin.
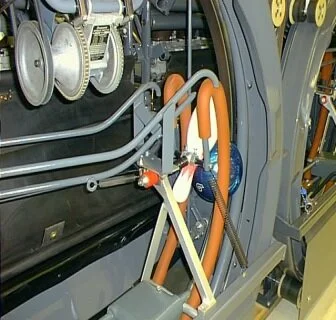
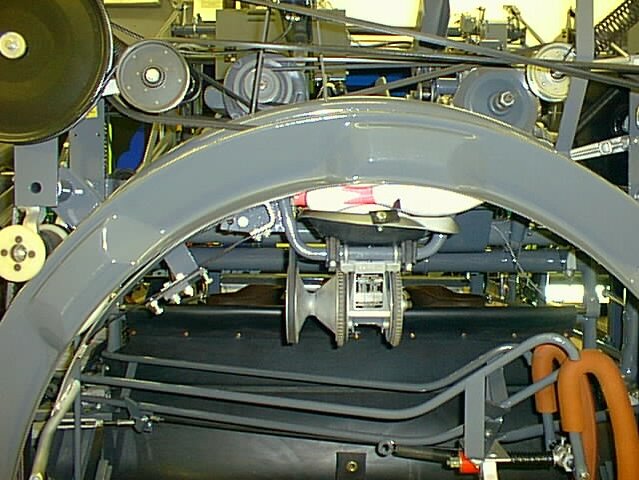
QUICK TIP: Before you install a full set of new pins for the Fall Leagues, first start with installing one single pin in each pinsetter and run for a shift. Remove the new pin and examine it. If there is any damage, remove the pin and tag the machine for a more in depth inspection.
Usually if pins are getting damaged and showing marks, you can locate the problem area by the evidence of pin chips or shavings. Loose or broken parts tend to scratch the pins, so inspecting all pin delivery paths should lead you to the problem.
Common Problems:
-Pin deck area - Screws, flat gutters, edge boards, and kickback plates
-Broken turret wires and missing deck rollers (A-2)
-Misadjusted turret wires can lead to damage from pulley or center chute (A-2)
-Broken or loose parts on the bin assembly (AMF)
-Missing ball wheel guards (A-2)
-Cracked plows (AMF)
These are just a few examples, but the most important thing to remember is that your problems should be fixed immediately before you risk damaging a new set of pins.
Ball Lifts - See what you can “uncover” before Leagues start!
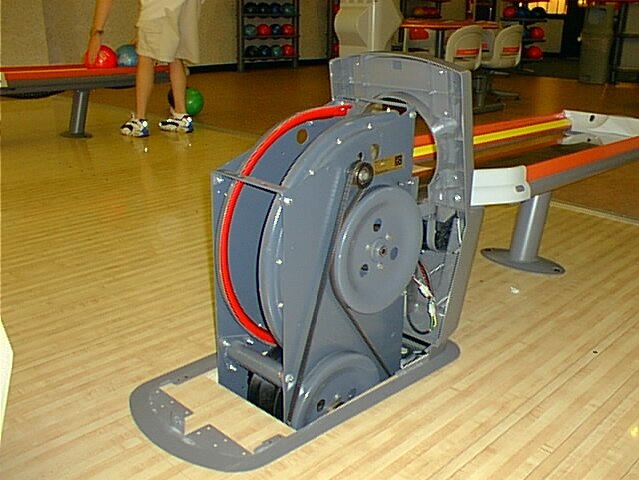
Ball lifts can easily become overlooked throughout the season since they are an efficient piece of equipment. They run pretty much trouble free so the old saying, “Out of sight, Out of mind!” fits here. Simply doing a quick cleaning and inspection can eliminate the chance of unexpected downtime or ball damage.
Inspection:
-Make sure the lift turns on properly when either pinsetter is powered up
-Inspect belt and belt tracking
-Inspect ball lift tires
-Listen for any unwanted noises
-Check for loose hardware
After the ball lift is cleaned, insert two balls in the trap doors, push them into the lift, and watch the transition through the lift. The balls should move up freely with no belt slippage.
Secondly, with the lift off, take a single ball and manually rotate the top pulley to feed the ball through the lift. The ball should transition through the contact points of the two tires and C track smoothly. If you get binding or slipping spots through the transition, you may need to look at your upper and lower tire configuration.
There are several different kinds of tires and each of these have their own characteristics. Mixing and matching tires in a lift can also create different transition characteristics, so find a combination that works well for your center. Smooth consistent transition is the goal here. A binding lift can cause premature belt wear and may also lead to too much motor strain and amp draw, eventually causing the relays to fail.
By performing regular maintenance and catching problems early, you can help keep your center running at its top performance.
Learn about Kegel Pinsetter Parts
Switching Lane Conditioners: Out with the old, in with the new!
Bowl Expo has come and gone once again. That means that summer is in full swing and league season will be upon us before you know it. As such, you may be thinking about trying a new lane conditioner, like Fire or Ice, before league season starts. These conditioners were released last year and they have been gaining attention because of their performance in tournaments and championships worldwide. Now is the perfect time to try one and get your pattern adjusted to be ready for fall.
Changing lane conditioners can be an overwhelming process. In fact, just the thought of it may send shivers down your spine. After all, if your bowlers have been happy, why change it and risk upsetting the balance? Well, technology has come a long way. We’ve worked hard developing conditioners that will help you protect your lane surface while providing a durable lane condition for your bowlers. And, we’ve improved the durability while allowing you to use less conditioner which saves you money.
Once you’ve decided to make the leap (and decided which conditioner to use – we’ll have more on that later), you’ll need to spend some time cleaning your lane machine. While it may seem easy to just empty the conditioner tank and pour in the new conditioner, you won’t be doing yourself any favors by doing this. Cross contamination from one conditioner to another in the same tank can wreak havoc on your lane pattern and make your lanes inconsistent. And that just leads to unhappy bowlers. No one wants that!
Additionally, some lane conditioners just don’t mix well with others.* This can cause things like clogged tubing, pencil tips, or even oil control valves. You can avoid a lot of headaches by taking some extra steps early on.
*The FLEX Lane Machine boasts the ability for centers to use two compatible conditioners simultaneously. Currently, Fire and Ice are the only compatible conditioners that can be used in this manner. Mixing other conditioners, such as Prodigy or Infinity, with Fire or Ice is not recommended.
Changing conditioners in the machine is a tedious process, but it is a process that is well worth it. Here is a brief overview of the process for Sanction Technology™ lane machines:
Remove the conditioner tank from the lane machine. Empty the contents of the tank into a waste container.
Use some lane cleaner to clean the conditioner tank. Add some of your lane cleaner solution directly to the tank. Swirl or shake the cleaner to get it all over the inside of the tank.
Rinse the tank with water. You’ll want to shake and swirl to be sure the tank gets completely clean. Continue rinsing until the water is clear (it will probably look milky at first) and there is no foam.
Rinse the tank with some acetone (if available) and let the tank dry. It is best to let the tank dry overnight, but give it as much time as possible. The tank needs to be completely dry before you add new conditioner.
Use this time to wipe down and perform any maintenance to the transfer system. This is also a good time to perform some cleaning and/or maintenance to the buffer brush.
Place the conditioner tank back in the machine.
Now you’re ready to fill the conditioner tank and flush the machine. We’ve detailed the entire process here: Changing Out Conditioners - Sanction Technology
So, I’m ready to fill my machine and flush the lines, but I don’t know which conditioner to use. Don’t worry; we’re here to help!
Fire and Ice have similar properties chemically but they yield different results on the lane. Both conditioners are pinsetter and house ball friendly meaning that you’ll have fewer issues in the backend. Both conditioners also have improved durability even with reduced volume.
There are a few factors that can help you decide which would be best for you. What conditioner do you use now? What is your lane surface? Do you have more open play or do you have heavy league and tournament lineage? Answering all of these will help narrow down which option will be best for your situation. Every center is unique, so as always, our Tech Support Team is available to guide you. You can also use the comparison chart below to help in your decision.
Now that you’ve got your new conditioner into your machine and ready to go, we always recommend running your normal pattern and watching ball reaction before adjusting anything. This way you’ll have an apples-to-apples comparison from conditioner to conditioner. It is highly likely, based on our experience with Fire and Ice, that pattern adjustments will be necessary.
To reap the benefits of these conditioners, your pattern should have good front to back taper. If you’re pattern doesn’t have good taper, our Tech Support Team can help you make some adjustments to maximize the performance of these conditioners. If you’re pattern does have good taper, some small adjustments may be all you need to dial in your pattern. Here are some of the common adjustments we’ve seen:
Reduced pattern volume (i.e. 50 ul to 45 ul or 40 ul)
Average pattern volume is 10-20% lower with Ice and 10-15% lower with Fire
Shortened pattern distance and/or reverse buffer drop
Reduction of applied loads
Don’t let the fear of upsetting your bowlers stop you from trying something new. You can reap the benefits of Fire and Ice with a little patience. Start now and you have the rest of the summer to fine-tune before fall leagues. You’ll enjoy the rewards of your hard work and patience when your bowlers are happy with the more durable lane conditions and you have less oil-related backend issues.
Learn more about Fire and Ice Lane Conditioners
What is "Waste" and Why You Should Care
What is “Waste?”
When most people hear the word “waste” they automatically think of chemicals or construction materials. And, they almost always think of waste as industrial and hazardous. Yet, the word waste is a very broad term that encompasses many different categories.
From your home to your bowling center, it is important to understand what waste is and how to dispose of it. With changing regulations, businesses that have been unaffected in the past, may soon learn the costs associated with improper disposal.
Residential Waste
First of all, everything that you put in your home trash can or recycle bin is considered a type of waste. Residential wastes can fall into a few different categories. Much of the waste we generate at home is recyclable. Think about the number of newspapers, magazines, cereal boxes (or other food boxes), soda cans, water bottles, and milk jugs that you use. Nearly all of those items can be recycled in some way. Recyclable wastes can be thought of as “good” waste. They cause little environmental impact and they don’t have any negative effects on humans.
But that isn’t the only kind of waste you generate in your home. Have you ever decided to paint a room? What happens to the extra paint when you’re finished with the job? You may keep it for some time but eventually it has to be discarded. Where does it go? Paints, bug sprays (pesticides), cleaning chemicals, and fertilizers are also examples of residential wastes. And, these wastes shouldn’t be thrown in your trash can. Many of these types of wastes must be disposed of more carefully as they can be hazardous to humans and the environment. In fact, many of these items are considered “household hazardous wastes”. Hazardous waste isn’t exclusive to industry; you probably have some of these types of items in your home right now.
These hazardous household wastes must be disposed of periodically and they can’t be just thrown in the trash. To assist residents in disposing of these materials, many local collection agencies arrange certain days of the week or month for residents to either put these types of items by the curb (similar to “everyday” trash) or to bring them to a designated drop off location for appropriate disposal. Items like used cooking oil and even electronics can be hazardous and should always be disposed of in a proper manner. Even light bulbs and batteries have special disposal requirements.
Commercial Waste
Businesses also generate waste. Some of the waste generated by businesses is just like the waste you generate in your home. Paper, soda cans, plastic bottles, and cardboard are all examples of wastes generated by businesses. These wastes, just like yours at home, can often be recycled and they would certainly be considered nonhazardous. But, businesses can also generate more dangerous or hazardous wastes. Hospitals and doctor’s offices have medical waste that must be disposed of properly to keep infectious diseases and germs from spreading. Industrial operations like chemical manufacturers, factories, and even construction sites all generate wastes that can be hazardous.
But, these businesses aren’t the only types that can generate such wastes. Businesses like the local bakery, the shoe store, and even the bowling center also generate waste. While these businesses may not generally create hazardous waste, they still generate waste that can’t always just go in the trash can or recycle bin.
Waste from Bowling Centers
A bowling center with a snack bar/restaurant can generate many different types of waste in each of its various operations. The snack bar/restaurant will generate food wastes, paper products and general trash, as well as wastewater from cleaning and used cooking oil from deep fryers. All of these wastes have different disposal requirements. The food waste and common trash items can generally be disposed of in a dumpster while the wastewater from cleaning; i.e. mop water, dishwashing liquids, etc.; can generally be flushed down the drain. Used cooking oil from deep fryers however, must be collected and disposed of according to specific regulations. In many cases, this material can be collected and recycled. And, in a lot of cases, the waste generator (the bowling center) may actually collect a fee from the recycler (the person who collects the waste for disposal and/or recycling). Many people would see this as a winning situation since they have to discard the cooking oil but they can make a little bit of money from the “waste” rather than having to pay someone to dispose of the oil.
The bowling center itself also has waste. Every time a lane machine moves down the lane to clean the lane and apply new lane conditioner, waste is created. The lane machine picks up a waste that is a blend of diluted lane cleaner, lane oil, and dust. Depending on the lane cleaner and lane conditioner used by the center, this waste is typically a large percentage of water. In fact, depending on the dilution ratio of the cleaner, the waste could be 90% or more water. Of the remaining percentage, a very small percentage; approximately 1%-2%; would be the lane conditioner while the rest would be lane cleaner.
The creation of this recovery tank waste is one of the most common waste questions I receive. When it comes to this waste material, everyone wants to know what to do with it and no one really wants to spend a lot of money to get rid of something that is mostly water. Unfortunately, as environmental regulations and waste disposal laws get tougher and tougher; many bowling centers are finding out the hard way that you can’t just dump this waste down the drain.
But, why can’t I just dump it down the drain? First, grease and oils are not soluble in water and tend to separate from the liquid solution. This means that when the solution travels through the pipes, the oil can settle and cause trouble; i.e. buildup which will ultimately lead to slow flow and clogging; in the piping. Secondly, oils also hamper the effective treatments that are performed at the wastewater treatment plants. In fact, it is because of this that grease traps and other type devices are required at some places.
Improper Waste Disposal
While the waste from the recovery tank of a lane machine would, in most cases, be considered nonhazardous, there are still appropriate disposal considerations that must be followed. And, to make matters even more difficult, the regulations vary by state, county, and city. Just knowing the federal regulations isn’t enough. Your state, county or city may have varying regulations so it is always important to check with the appropriate regulating authorities to determine your safest course of action. Improper waste disposal can carry hefty penalties as well as civil and criminal consequences. In fact, fines for improper disposal can be less expensive than the civil and criminal penalties imposed for the actions. And, the civil and/or criminal penalties could even include jail time!
As I mentioned previously, dumping your waste down the drain can cause problems with the sewage lines and at the wastewater treatment facility. But, it can also be traced back to the establishment as well. When sewage lines get plugged or have slow flow, maintenance workers have to clean the lines or even replace them. When this happens, the managing authorities can determine what caused the blockage. They can then pull samples from surrounding establishments to determine if the blockage was caused by one of them. By pulling samples from lines coming directly off of each of the surrounding establishments, typically, the managing authority can get at least trace amounts of the blocking materials allowing them to determine the offending establishment. They can then charge the establishment with a violation of the federal Clean Water Act. If this happens, the establishment may be required to pay for sewer line maintenance costs as well as additional water treatment costs.
Improper waste disposal can vary depending on the category of waste and the severity of the action. Improper disposal of hazardous waste would certainly be more severe and carry a harsher penalty than improper disposal of nonhazardous waste. That said imposed fines can be more than $30,000 per day! And that doesn’t even include civil or criminal penalties that could be imposed by a court. It also doesn’t include any additional treatment costs that may be imposed by the treatment facility or maintenance costs that may be required to replace or maintain sewage lines.
As I mentioned, the recovery tank waste will generally be considered nonhazardous. This is favorable as it is much less expensive to get rid of nonhazardous wastes than it is to dispose of hazardous wastes. Additionally, there are generally more options available for getting rid of nonhazardous wastes. This means you can shop around and find more cost effective alternatives which will save you some money on the bottom line. Generally speaking, depending on the number of lanes you have and the number of times you clean and condition your lanes per day, and depending on the regulations in your area, you could dispose of this waste for a few thousand dollars (or less) a year. When you start adding up the numbers for fines/penalties, it’s easy to see that the cost of appropriate disposal in one year would be far less than even one day of fines and penalties.
How to Properly Dispose of Waste
So now you’re probably wondering what you should be doing or even who to call that could help you get rid of this waste. As I mentioned before, regulations vary greatly by location so it’s extremely important that you find out what is appropriate for your area. You can always start with a call to your local waste management authority. They should be able to direct you to businesses in your area that can help you with your waste needs. You can also do an internet search for industrial waste or nonhazardous waste handlers. There are many companies around the world that can pick up and transport the waste to an appropriate facility for treatment or disposal. You can also call your local water treatment facility. They may be able to direct you to a company that can work with you. Lastly, if you use a service for a parts washer or even for oil disposal for your restaurant/snack bar, speak with your rep from those companies. They may be able to help you with this kind of waste or direct you to another company that can help you.
Waste disposal is becoming a part of operating a business and it is important, for humans and for the environment, that we dispose of all waste in the proper way. Businesses like bowling centers have generally flown under the radar. But, as regulations are becoming increasingly strict, there are increasing demands of wastewater treatment facilities, and the costs associated with treating wastewater and maintaining equipment increases, law makers and regulating authorities are taking a hard look at problems and where they are occurring. This means it is only a matter of time until your actions could come around to cost you. Taking the extra steps now to insure that you’re properly disposing of your waste may cost you a little bit of money now but it’s far less expensive than the fines and penalties you could be forced to pay, or the jail time you could serve, for improper disposal.
Who do you follow? We're not talking about Twitter...
In previous Inside Line articles, we showed how oil pattern breakdown happens with today's high flaring bowling balls and how different styles of play can affect an oil pattern in different ways. In this article, we will show how different groups of players with similar styles can greatly affect an oil pattern by strategically "managing the oil pattern" during practice time and the first game, and the resulting scoring pace for all those that follow these skillful "pattern managers."
The scene was the Men's Team event second block on the WTBA Seoul oil pattern during the 2013 WTBA World Championships in Las Vegas. The WTBA rule for practice time for 5 person team event is 15 minutes, then all teams bowl 3 games moving lanes every game. This gives us about 4-5 games per lane by the time each team finishes the 3rd frame of game one.
Our testing and after tapes at many modern day events show that when players play a similar line each and every shot during this time on a fresh oil pattern, over 50 percent of the lane conditioner can be removed from that area throughout the ENTIRE length of the applied oil pattern. This is significant and something all competitive players and coaches must be aware of in today's game.
Here was a test showing how much conditioner was removed in the area of play after each 3 games:
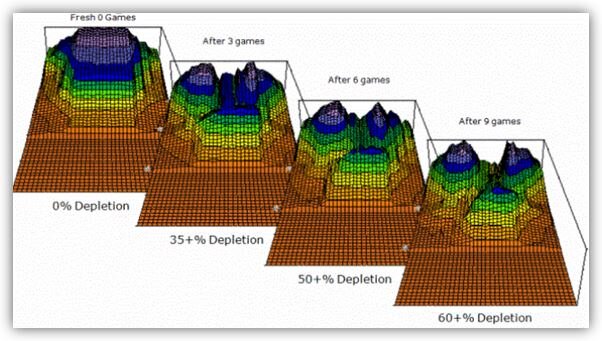
The significance and rapid pattern change is so prevalent in today's game that some Federations even employ multiple coaches during championships- one coach on the lanes helping the players during competition, and another coach "scouting out" the pair of lanes they will be moving to. Just knowing how and where the teams are playing on the lanes in front them can give them valuable information and help them get lined up quicker. In championship events, this can be the difference between winning, losing, or not even getting a chance to win. This played out exactly this way during the 2013 World Championships this year in the men's division.
Here is a graphic of the Seoul oil pattern just before the men's second squad of team event took the lanes - the graphic is with the perspective of looking at the oil pattern from the pins, so the 10 pin side is the left side of the graphic. Also shown below are the Sport Bowling ratios at multiple tape distances before the players took to the lanes:
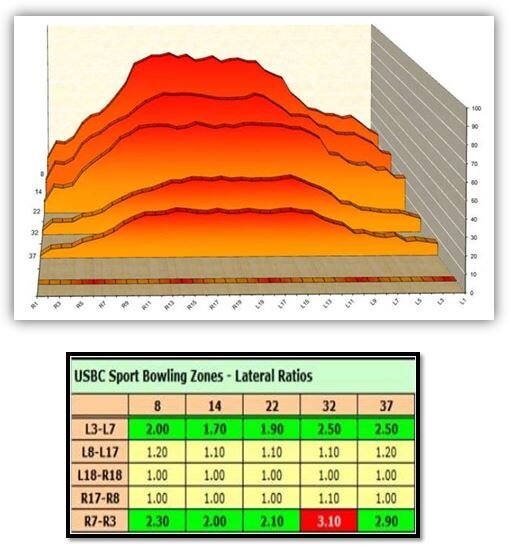
As a side note, the WTBA Seoul oil pattern is asymmetrical with more oil outside on the left side than the right side, hence the lower ratios on the left side. You may also notice that at 32' this pattern does not fall within the 3 to 1 ratio parameters, but Sport Bowling ratios only use 22' and 2' before the end of the pattern to calculate whether it meets USBC Sport Bowling requirements, and the WTBA does not have any ratio requirements.
During this second block of team play, with these pairs of lanes being right in front of the tournament office, I was able to watch and see how each of the teams on these pairs were breaking down the lanes during the 15 minutes of practice. While watching Puerto Rico and Brazil on 57-58 play more outside, and the teams on 55-56 play more inside, I was wondering how much an effect that might have on the teams coming to these pair of lanes in games 2 and 3, so I planned on taking after tapes as soon as the block was over. Little did I know at the time, the way the teams on 57-58 broke down that pair would help Team Finland make history.
After 15 minutes of practice and three 5-man team games (15 plus games per lane), here is what the Seoul pattern morphed into on lanes 55-56:
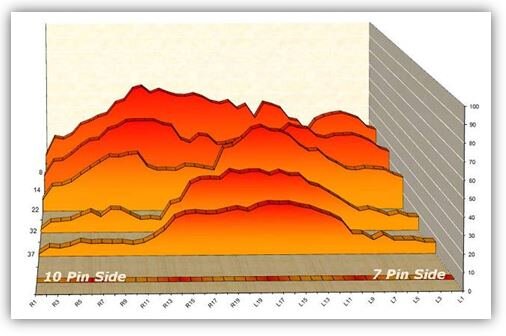
From looking at these after tapes, it is clear how deep inside the bowlers on this pair ended up playing the lanes, which all came from how the initial teams decided to play the lanes in practice and game 1.
Here are the after ratios of lanes 55-56, calculated the same way as before:

The ratios normally get lower up front as the oil pattern gets depleted from the middle of the lane. What makes scoring pace rise as players break down the oil pattern is when all balls come together towards the end part of the oil pattern, which raises the ratios from outside to the middle. In this example the ratios from the fresh oil pattern went from about 3:1 to 3.6:1 at 32 feet and from 2.9:1 to 3.8:1 at 37 feet. This is enough for world class players to increase the scoring pace, and this block was no exception.
Here is the resulting scoring pace of each team for each game of this particular block of games on lanes 55-56::
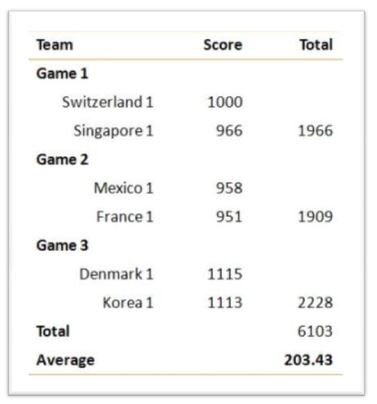
As you can see by game 3 that pair became more playable because of oil pattern development with both Team Denmark and Team Korea breaking the 1100 barrier. It took longer because of how deep the previous teams played that pair. The reason it took longer is because when teams start in the deeper amount of oil, it takes longer for the ball to reach the "spark point", or in other words, break down the oil pattern enough for the ball to poke through the oil film and get to the lane surface. Once the ball sees the lane surface, it also sees friction. The earlier the ball sees friction within the oil pattern, the easier that pattern becomes because left of that is the created oil line.
And now the pair of lanes where the Seoul pattern was changed into something else, which helped Team Finland make history. The mutated Seoul oil pattern on lanes 57-58:
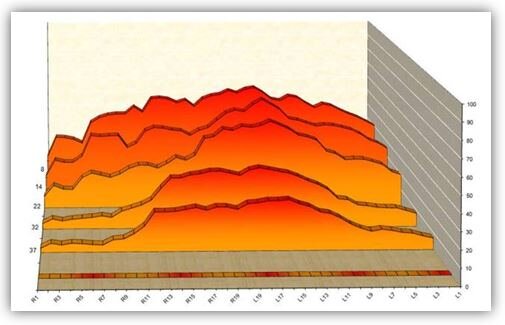
From looking at these after tapes, it is clear how much more outside the bowlers on this pair ended up playing the lanes, which also was decided because of how the initial teams decided to play the lanes in practice and game 1.
Here are the after ratios of this pair, calculated the same way as before:
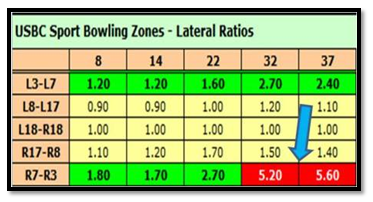
While lanes 55-56 went to 3.6 and 3.8 to 1 towards the end of the oil pattern, the players on lanes 57-58 took the ratios to 5.2 and 5.6 to 1! This is borderline what many house shots are in today's game, but like I said before, most of the change happens within practice and the beginning of game one.
Here is the resulting scoring pace on lanes 57-58 of each team for each game during this block of games:
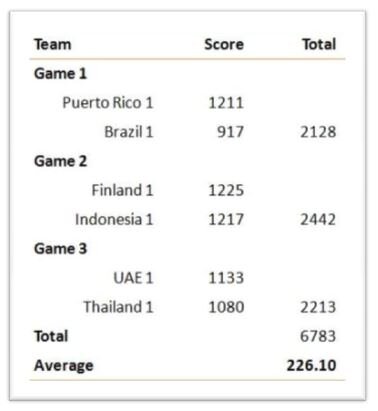
As you can see by the team game total scores, the teams that were fortunate enough to follow Puerto Rico and Brazil benefited greatly, but none more than Team Finland. This second team game with a score of 1225, along with the momentum that gave them and another 1200 plus score in game 3, catapulted them into the Team finals. After winning their semi-final match they defeated Team USA in the finals for the first team Gold medal for Finland in 30 years.
Fortunately, during this championship we also had available Kegel's LaneMap Guide of Sunset Station which shows the gravity influence on the ball based upon topography so we were able to see if one pair was significantly different causing that to be the reason for higher scores this block on 57-58, but that proved to be not the case, as the below graphic will clearly show. Both pairs have very similar characteristics.
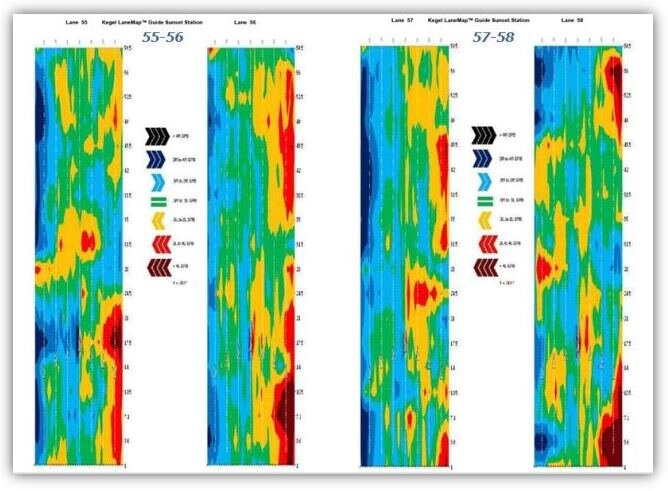
Finally, one more look an after bowling graphic of both patterns and the resulting ratios side by side:
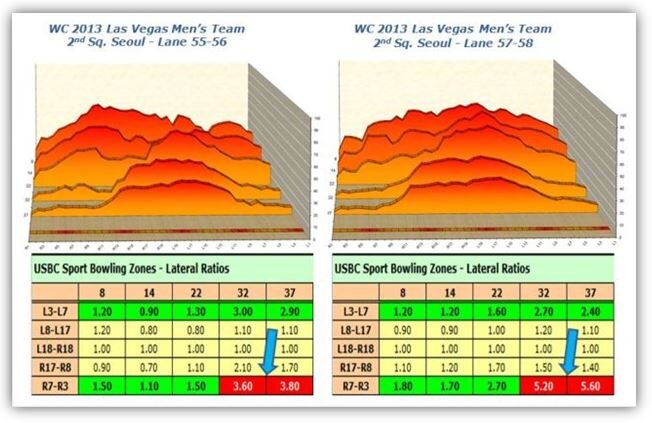
A well renowned Kegel laneman and now National Team Coach for Indonesia, John Forst, had a saying; "the applied oil pattern is only the pattern until the bowlers start bowling on it. After that, they are the ones that decide what happens, not the laneman."
In today's vernacular, the Seoul oil pattern, or any other named oil pattern for that matter, is only the intended pattern until players start rolling balls over it, and then that named pattern becomes something else. Some players can turn it into Easy Street, and some can turn it into the Highway to Hell. Keep your fingers crossed you follow players that can turn things into Easy Street.
Oh No! My pattern is not playing the same as last year!

By Doug Dukes - Kegel Technical Sales Specialist and Kegel Pinsetter Parts
"My pattern is the same as last year but it is not playing the same" is one of the #1 lines we hear this time of year. As one of the techs at Kegel that has the privilege to not only help all of you on the phone, but to also work on lane machines in the field, let’s take a look at some overlooked parts and adjustments to your lane machine.
CLEANING - “You can’t paint the Mona Lisa on a piece of toilet paper.”
The number one overlooked problem on a lane machine is its ability to clean. Anytime a pattern adjustment is requested because they don’t play the same, our first question is “have you done a clean only”.
On Spray Jet machines, the screen check valves (153-0220) should be taken out regularly and cleaned. Lint build up on these can wreak havoc on the jet's ability to spray properly and as the check valves get weak, your spray tips can drip. If you notice that your machine is using less cleaner, it may be a good time to take these screens out and clean them. There are also two filters that cleaner passes through before it gets to the screen check valves, one in the tank (154-0212B) and one inline filter before the pump (154-8867A or 154-8887). It is always good to replace these filters every summer.
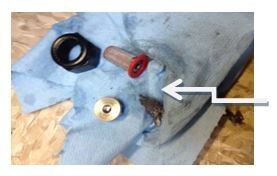
On Sprayless Cleaning Systems, you need to replace the two filters talked about above, but also your Norprene tubing in your cleaner pump (154-0861B). This style cleaner pump operates by using a set of rollers that press cleaner through this tubing every time the motor turns on. Over time, this tubing can lose its ability to allow cleaner to be pushed through it, and your volumes can be significantly reduced. Many times I have run a cleaner volume check on a lane machine and looked at the touchscreen only to realize that I was the last one to run the test during the yearly service last year!!! You guessed it……the volume was significantly lower than what it should have been.
Once you change the tubing, run a volume check and set it to your desired output and monitor this for a few weeks as the tubing breaks in. It will vary a bit during this time and a readjustment may be required, but it will settle in quickly. This should be checked on a regular basis throughout your season as well.
The cushion roller (153-8838 standard roller and 153-8839 roller with wrap), is another frequently overlooked piece to the cleaning puzzle. The size of the cushion is the key to your cleaning. If we think about how the cushion roller works, when the cloth unwinds, the cushion roller drops onto its stop bolts. When the machine is pushed onto the lane, the cushion actually lifts up off the stop bolts, and the weight of the cushion is what helps clean the lane. Simple right? If your cushion has gotten smaller over time, now it is not making full contact with the lane surface. This means it will not clean well. Mona Lisa and toilet paper soon to follow.
If you look at your cushion roller and see the “alligator skin” look, the ends are flaring out or torn and the cloth is visually pulling into the roller, or if you can wrap your hand completely around it, it is probably time to send it to greener pastures. One trick I show during service stops is releasing the tension on the cushion roller when you finish your lanes.
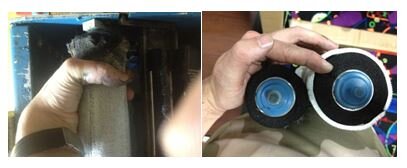
On machines that have the take up roll on the top, you can stand the machine in the transport position when finished and open the duster compartment. Slide the take up roll to the side and turn it 180 degrees and lock it back in place. This will relieve the pressure on the roller and when you turn the machine on to run lanes the next day, the machine will find “home” and wind the cloth back up for you. This can extend the life of your cushion and save you from headaches mid-season.
Squeegee blades (153-8204E Blue or 153-8834 Brown) normally are not overlooked, but why leave them out. Your squeegees should be flipped every six months, and changed once a year. You don’t want to leave any cleaner behind. Always check for your 1/8 to 3/16 adjustment as well, once you change or flip your blades and adjust accordingly.
Recovery tank filters are another overlooked item in the cleaning process. Waste tank a little lighter than normal? Check your filter and change it regularly. This is the perfect time to flush out your vacuum hoses and check for small pin holes that may affect suction, along with cleaning your vacuum motor and checking the motor brushes.
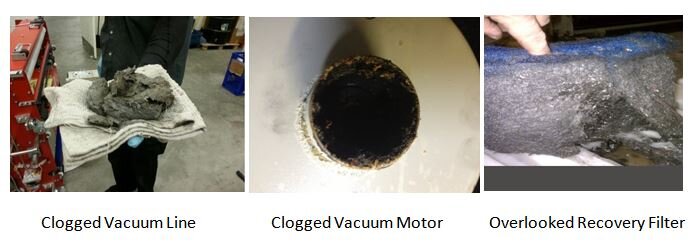
Conditioning - “The best canvas deserves a worthy brush.”
A few minor adjustments in your transfer system that have been overlooked can also make you pull your hair out when you’re dialing in your pattern.
Have you checked your crush adjustments on your brush? Most people check the crush from the buffer brush to the lane and set their buffers at 1/8 to 3/16. What most people don’t check is the crush to the transfer brush or roller depending on the machine type. If it can’t pick it up off the transfer brush or roller it can’t get it to the lane!
As the brush wears, it may lose some contact with the transfer brush or roller. When getting ready for the fall season with an existing brush, or when putting in a new brush, always check this adjustment. We like to see 1/8 inch of crush to the roller or transfer brush.
On a transfer brush system, if you turn the buffer on while the brush is in the down position, you should see a thin light colored line where the transfer brush and buffer brush meet. This is from the bristles on the buffer brush being pushed together as they push against the transfer brush. Adjust accordingly.
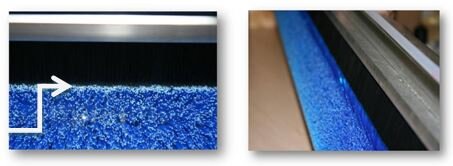
Your pressure gauge can tell you a lot about your lane machine as well. If your pressure gauge fluctuates as you are applying loads or your pressure seems much higher than normal, you may need to clean your oil control valve. Dirt can accumulate in your valve over time and cause pressure fluctuations while applying loads. If the valve is dirty, take a good look at your filter inside your oil tank as well (154-0212). Replacing it once a year will keep you in top running order.
Your lane machine is one of the most important machines in your center. My final example I tend to give to proprietors and mechanics alike goes something like this…….
If one of your pinsetters happens to go down during a league, you may upset at most the 10 people that are bowling on that pair. But you probably have the parts to be able to fix this later that evening. If your lane machine goes down, and you have a 32 lane center that is full, you’ve now made 160 people upset, and you may NOT have the parts to fix it. You next day air the parts, but your still down the next night, and 160 turns into 320. It is extremely important that you keep your machine clean, do your daily and monthly preventative maintenance, and not take your lane machine for granted. Always keep a few parts on hand. One of every relay, two of every fuse, a fuse holder, a head drive belt, check valves, etc.
This minimal list of low-cost items can be the difference between a full house of happy bowlers, or a lynch mob and a quick backdoor exit of the center. Spend ten minutes a day, 20 minutes once a week, an hour a month and a half day every six months on your machine, and you will be able to keep it clean, and inspect the machine for wear on a regular basis. Always remember we are only a phone call away 24 hours a day 7 days a week from anywhere in the world. We are ALWAYS here to help.
Good luck and good scoring on your new season.
Understanding 3 Point Targeting with Quiet Eye in 7 Easy Steps

By Rick Wiltse, Coach at the Kegel Training Center
In the history of bowling there have been many methods to allow bowlers to accurately roll a bowling ball from one point to another on a bowling lane. Probably the most common and easily recognizable target system has been the seven “arrows” that are placed between 12 and 15 feet past the foul line on most every lane in bowling. More specifically, the 2nd arrow on either side of the lane has become the most famous target for bowlers. In addition, bowlers have used pin bowling, spot bowling, area bowling, visualizing the ball path and breakpoint targeting.
All these targeting methods have been used with some measure of success, but none of these systems compare to the immediate improvement in accuracy and consistency that has been documented by using 3 Point Targeting and Quiet Eye.
At the Kegel Training Center, the coaching staff has been teaching this very effective targeting system called 3 Point Targeting with Quiet Eye. Although our research has proven that this system produces dramatic improvement almost immediately, it also has raised more questions by bowlers than any other area of bowling in my experience as a Kegel coach. In this article we will explore 7 Easy Steps to Understanding 3 Point Targeting with Quiet Eye and we will then answer some of the most common questions asked by our students at the Kegel Training Center. This process will hopefully give you a much better understanding of 3 Point Targeting with Quiet Eye which, in my opinion, is close to being a “magic bullet” in bowling.
Step 1 – How Long is the Oil Pattern - Find out the length of the oil pattern on the lanes where you will be bowling. This can be done by reading a program sheet or lane graph. You can also consult your local laneman or the center staff who may be able to tell you pattern length. If none of these methods work, you can roll a few slow speed practice shots and make an educated guess as to where the oil ends and the dry lane begins based on the hooking action of your ball.
Step 2 – The Formula PL Minus 31 - Take pattern length (PL) number and subtract 31. The result of this subtraction will give you the desired location of your bowling ball at the end of the oil on the pattern. For example, if the pattern length (PL) is 43, subtract 31 from 43 and the result will be 12. Board 12 (at 43 feet) is where your bowling ball should be to gain the most margin of error for this lane pattern.
Step 3 – The Focal Point - Look at board 12 at 43 feet down lane and draw a straight line to the pins. Pick out a part of the pin that most closely matches up with the line from board 12. Each pin will have 5 locations that may match the line.
1. Inside edge
2. Center
3. Outside edge
4. Inside base
5. Outside base

The pin location you selected for the 43 foot pattern should be the outside edge of the 3 pin (board 12) and this will be called your “Focal Point”.
Step 4 – The Visual Target - Now trace back from the outside edge of the 3 pin location along the line to board 12 and extend this line back to a visual target of your choice such as the arrows or dots. This location will be called your “Visual Target”.
Step 5 – Locate Your Starting Point on the Approach - Step up on the approach and align your body with the Focal Point and Visual Target by placing the inside edge of your slide foot 6 boards from the 12 board. In this example, that would place the inside of your slide foot on board 18. Now your body is properly positioned to swing the ball and roll it down board 12 toward the outside edge of the 3 pin. Achieving this trajectory will give you the most margin for error and the greatest chance to strike even if you miss your target on one side or the other.
Step 6 – Quiet Eye - Combine this targeting system with what we call “quiet eye”. To implement “quiet eye” simply focus on the “Focal Point” which in this case is the outside edge of the 3 pin for two full seconds – count in your mind 1001 – 1002. Then move your eyes smoothly from the focal point pin to the Visual Target at the arrows or dots. Again, focus on the Visual Target for two full seconds – a count of 1001 – 1002. Then take a breath, exhale and execute your delivery keeping your eyes on the Visual Target throughout your approach.
Step 7 – Drift and Shift - Note the position of your slide foot at the foul line and determine if you have any “Drift”. If so, adjust your starting position (based on the amount of drift) so that you will be sliding on the appropriate board at the foul line. In our example, you want to slide on board 18. If your drift causes you to slide 2 boards to the left (board 20), you will need to adjust your starting position on the approach 2 boards to the right (board 16) to compensate for your drift and slide on board 18. Finally, if you roll the ball down the intended target line and you don’t hit the pocket, you will need to make an adjustment or “Shift” such as a 2 and 1 move (2 boards with your feet and 1 board with your eyes) to hit the pocket. Continue to adjust as oil depletion occurs on the lane and your ball motion changes.
The Example below shows three focal points for short, medium, or long lane patterns, for both right and left-hand bowlers. Right-hand bowlers would focus on some part of the 10-pin for short patterns, a part of the 6-pin for medium patterns, or a part of the 3-pin for longer patterns. Left-hand bowlers would use the 7-pin, 4-pin, or 2-pin respectively.
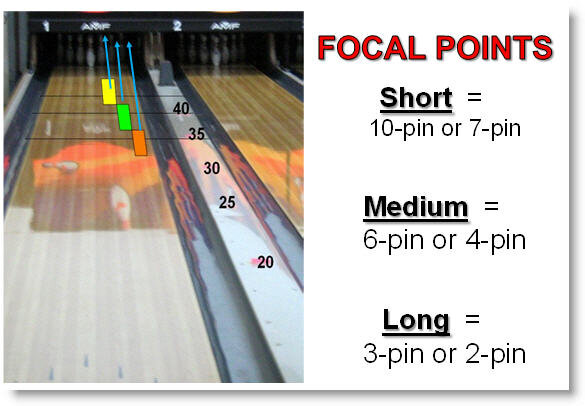
Answering Questions About 3 Point Targeting with Quiet Eye
Question: Most students, who come to the Kegel Training Center, enter with a strong desire to get better and a willingness to try almost anything to improve their game. The exception to this willingness to try new techniques seems to appear most often when we ask a student to try a new targeting system. The comment is often heard, “But I’ve always used the 2nd arrow as my primary target”. The implied question is “Why should I change?”
Answer: The response to this question is simple. If you use a single point as a target such as the 2nd arrow, it is possible to roll a bowling ball across that target at an infinite number of angles – each time hitting the 2nd arrow, but each time the angle of the ball path will be different. In order to obtain consistency, two points are needed to create a straight line and a ball path with a single angle of travel. Thus, the use of at least two points for targeting increases accuracy and consistency to a degree well beyond the scattered outcomes of using a single point target.
Question: The 3 Point Targeting System begins with a simple mathematical calculation that we have termed pattern length minus 31 (PL – 31). For some bowlers who are feel players or who just don’t feel comfortable with math, this beginning calculation can be a roadblock to going further. The question for these bowlers becomes, “Why do I have to solve a math problem to bowl?”
Answer: The incentive to find out the lane pattern length by asking your local laneman or center staff or by consulting a program sheet is that by doing this simple subtraction problem you will gain the most margin for error. This means that every time you use this simple formula you will be able to miss your target left or right by the largest margin possible and still have a chance to hit the pocket and strike – not a bad incentive to go back to math class!
Question: The next question that we often hear is “How does PL-31 give me the most margin for error?”
Answer: If you examine the lane graph shown above you can see that outside board 12 there is a lower volume of oil on the lane. This means that if you miss your target to the outside, the ball will encounter less oil (more friction) and it will hook back toward the pocket.
The lane graph also shows that inside board 12 there is a larger volume of oil, thus if you miss your target to the inside, the ball will encounter more oil (less friction) and it will tend to “hold” its position and stay close to the pocket. In this way, the PL-31 formula insures that you have the most margin to miss your target and still hit the pocket and strike.
Question: So now let’s say that you’ve made it past PL-31. For example, you found out from the front desk staff that the house pattern is 40 feet long. You take the number 40 (which represents PL) and you correctly subtract 31. The result is 9. The next question is, “Now what do I do with this number 9?”
Answer: The number 9 represents the board on the lane that the ball should be on at the end of the 40 foot oil pattern in order to gain the most margin of error. Look down the lane to board 9 at approximately 40 feet keeping in mind that the lane is 60 feet long from the foul line to the head pin. From this point on board 9, draw an imaginary line to the pins and pick out part of a pin that corresponds to the imaginary line. In this case it will be the center of the 6 pin.
Then move your eyes smoothly back from the center of the 6 pin and a corresponding visual target of your choice (i.e. at the arrows; at the dots or at the foul line). This will allow you to select a starting position on the approach and to have two points of reference to guide your swing along the correct ball path to get the most margin of error.
In summary, 3 Point Targeting with Quiet Eye offers an effective method to increase your accuracy and consistency. Using the seven steps above, you should be able to obtain a clear understanding of how to practice this technique which will help take your game to the next level. For more information or to schedule a lesson, please contact the Kegel Training Center at: US Toll Free (800) 280-2695 or International +1 (863) 734 0200.
Silicone is Not a Four Letter Word
We’ll say it right up front - silicone in lane conditioners is a good thing. That’s right, it’s a good thing. In modern chemistry there are no other additives that perform, and are as safe, as silicone.
The idea of using silicon in place of carbon did not come to be until the early 1900’s, and the first patent ever issued for a silicon containing chemical was not issued until the 1940’s. This is when the term 'silane' was developed, later to be known as silicone.
In the early years of development, silicone products were developed and used everywhere with great success. But then some problems arose with silicone, and it came from wood polishes. It was noticed that these new products repelled water, and when people started to re-coat the furniture and floors that were polished with this new stuff, they could not get the finish to wet - the finish would fish-eye everywhere. Eventually they figured out the silicone was not cleaned off the outer layer of coating and when they sanded the furniture, they literally sanded the silicone into the wood.
A similar problem occurred in the bowling industry in the late 1970’s with a lane conditioner called 42/40. That lane conditioner was silicone oil and it created a bunch of problems with re-coating a wood lane, and this is when silicone was "deemed bad" by the bowling industry.
However, it was found that you could actually re-coat wood lanes in bowling centers that used 42/40 with success and without problems, it just required more work. A fish-eye remover was required to get the finish to wet the lane surface again, and ironically, almost all fish-eye removers contain a type of silicone.
So to say something has silicone in it, and therefore it is bad, is a very generic statement. But that’s what has happened in the bowling industry.
Currently there are thousands of chemicals that contain the Si (silicon), and they can be found in everything from cleaners to adhesives. In cleaners, there are silicone based surfactants and silicon based builders, with some of these even being used in the bowling industry today.
The reason for using silicone chemistry in products is simple; performance. Most silicone additives are used in very small amounts, typically less than 0.5%. With carbon based additives on the other hand, it takes 1-3% of those less safe amounts to achieve a similar performance effect.
Kegel uses 0.1% or less of silicone chemistry in its lane conditioners to increase performance, while keeping a focus on safety. The advantage with using this technology is achieving the desired properties with maximum safety for everything the conditioner comes in contact with, and those products are tested extensively to ensure just that.
Nevertheless there are still some that like to promote their products as silicone free, as if it’s a good thing. But, the alternative chemistry available for use today is much less safe in terms of health.
Don't fall for a sales or marketing pitch on a fear of something that happened a long time ago in a much lower tech era - chemistry has come a long way over the years. If you read the material list on the back of a product in your house you will find silicone in most of them. Silicone performance and safety make it great choice for use in everyday products, and also in lane conditioner. Bottom line, silicone is a good thing.
Read more about Silicone from Dow Corning
Read more about Silicone from the American Chemistry Council